4.25.2013

Sewing room chairs slipcovered at last!

Garment sewing put to the side for a few days this week to concentrate on slipcovering my sewing room chairs, and I am quite satisfied with the end result.  Though I have done a lot of home dec sewing in the past in the form of window treatments and pillows, I have NEVER slipcovered ANYTHING and I was so nervous busy-with-other-projects that these two humble chairs waited almost two years to be tended to.
What a difference they make in my sewing room now!
Before:
After:
My story began with the purchase of this pattern, and I hope to goodness I really did not spend $15.95 on this!
Took the time to meticulously cut out all 8 corresponding pattern pieces, read the directions, sketch my chair, then draw the pattern pieces out on my fabric because I only had 2 yards.... and that was IT...
.... of this beautiful tapestry fabric that was given to me years ago.
My sewing room also doubles as our spare bedroom and look how it coordinates with the bedspread quilt motif/colors below. 
Last week's library visit procured this nice book.  How could one not pass up an 'Ultimate' sewing book, no less?!
Lingered on this page.... and had one of those 'Aha' moments.  Notice this chair's slipcover only used 1 continuous piece of fabric.  Different shaped chair, but not really if one transferred the same concept to my chairs.
My chairs were meant to be slipcovered and were purchased at World Market on sale for @$86.00 each.   The World Market slipcovers are $34.99 each if you wanted to buy one to fit this chair.  But they looked loose fitting to me and thought this could be a challenge project for me.

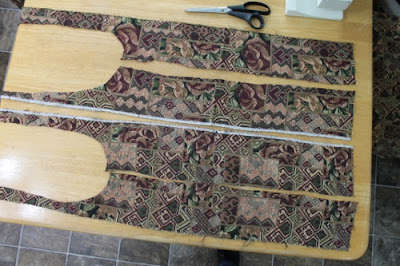
I've also been reading a lot lately about fitting patterns and fabric in garment sewing so took those thoughts to my chair(s) and ditched my pattern, that I sincerely hope I did not pay $15.95 for, and began to wing it.  My fabric measured 58/59" x 72" and by cutting my fabric in half (@29" x 72") I could tell it'd (barely) be enough for each chair.  Turned my fabric inside-out, draped and began to pin.  Where my pins were would be my seam, so did not have to worry about seam allowances.
My exercise ball worked great as a 'fitting' chair.  I could roll around as I pinned.  :)
And can you believe, everything worked!  This photo is of the two chairs 'done', except for the hem.  (hmmm, don't know why that one side looks wonky here).   Now I was at a dilemma point, because remember I only had 2 yards of fabric and still needed to hem my chairs and the fabric was too short to just simply turn under and stitch a hem.  What to do, what to do.  Let's think...
THIS is all the fabric I had left at this point....
So I thought about a contrasting strip of fabric/hem out of this coordinating silk/satin I had from some old window treatments I made yearsssss ago.  I wanted a clean look and not introduce another color, even if it coordinated well.  So, how about the fringe?  I could unpick it and had plenty and it coordinated too.
Can you tell this fringe was purchased in copious quantities years ago and incorporated into almost every window treatment I made?!  Not only the photo above, that is currently not in use, but the view to the left in my sewing room....
....and the view to the right.  I am TIRED of looking at this fringe!!!!  (These window treatments are also on the Update To-Do list too btw!)   Plus, I still wanted a nice, clean, fresh updated look. 
So with limited fabric scraps cuttings from the slipcover, I carefully measured (and measured again!) and cut 1 1/2" strips that I folded in half, stitched to the bottom of the slipcovers, then topstitched so all would lie flat.  It was enough to finish covering the chairs without being too short or too long.  Yes!
My scraps.  Juuuuuust enough as only the strips right next to the squares are 1 1/2" wide.  None of the others would've worked.
The front view:
Side view:
Back view:
This tapestry fabric with a random, yet straight-lined design was perfect for slipcovering these chairs.  I was able to use the design to my favor, it stretched well, yet doesn't sag. 
Slowly but surely my room is coming together.... and does not everyone need a bed for a fabric table and store their exercise equipment in a little corner?  Next up is new window treatments, repaint my sewing table and a little desk that's also in my room, paint the walls..... but meanwhile I am most happy! 

Pin It

4.19.2013

lunch with a friend

Lunch with a friend gave me a perfect opportunity to wear one of my new skirts 'out in public', and I found not only was I comfortable all day, but felt pulled together to be in town to eat and shop.  Living in the country, with all the responsibilities it requires, I am ready for a change from 'jeans' when going out.  What do you think?  Remember this skirt.... 
.... from this post?  Chose not to wear the ruffled sleeveless top, instead opted for a RTW simple black knit top.  Feel I need some kind of jacket to 'tone down' the ruffles before I wear that out in public.
My pattern NEWLOOK 6108...  LOVE this skirt!!!  Easy to make, wears well and so comfortable.  Got plans to make more..... many more.
The whole look.    Warm enough for bare legs and sandals.  Oops, forgot to remove the ear protectors hanging on our wood-screen divider
Living in the country we enjoy sharpshooting (target practice) and need those things.  I wrote a post last year on our garden/nature/homestyle blog about our 'friendly' competition.  *insert big smile here*
Thought turquoise jewelry would be a nice contrast....
....so wore my turquoise bracelet with my turquoise necklace wound around my wrist making it all look like 'bangles' along with my not-seen-here turquoise earrings.  Added a belt from a RTW skirt that worked well here.  The turquoise-accented necklace is a family heirloom, from my great-aunt Ruby, that I love and want to wear more often.
My great-aunt Ruby from Oklahoma, who was probably all of 4'10" in height and width, with flaming red hair, hence the name 'Ruby', drove full-size Cadillacs and lived life BIG and FULL graciously left me a few precious things when she died many years ago.  Just imagine those red-painted fingernails tucking her red lipstick back into this fully-beaded lipstick case.  And such a pretty necklace, unlike anything you'd see 'new' on the market today.
If you turn it over you'll see it's a little watch.
One other item she left me is this sweet wrist watch.  It's non-working and so old the jeweler was afraid to take it apart to try to fix.  He told me these diamonds are 'real'.  I don't know why, but I was still shocked.  Had always thought they were some kind of rhinestones.  I keep these all together in the little beaded lipstick case and think of Ruby.  I'm glad I have a pretty outfit now that her necklace accessorizes so well.
Lunch was actually a birthday lunch, for me, where my friend gifted me with 'Redneck Wineglasses'!!!  She made them herself and I thought they were a hoot!!!  She calls me her 'Sister'.  I like that.
Our little Maltese, Towa, kept me company during photo-taking time.  
What a terrific feeling to wear a garment I made in public and feel I looked nice and presentable.  Not the I'm-wearing-a-homemade-garment-and-don't-feel-comfortable-feeling at all.  Once I got home, I didn't want to take it off, as it was so comfortable to wear.  Oh, and after we ate, where did I stop to shop?   To buy more fabric, of course!

Pin It

4.10.2013

Getting ready for summer!

A new top was completed today.
I've been wanting a peasant top for the last few years, so this NEWLOOK 6891 pattern looked like it would suit my needs.  Initially I planned on making the short-sleeved version, View D, but settled on the sleeveless View E without the extra band at the bottom.   The extra band would add enough length to be worn more as a tunic.  Cute, but not the look I wanted today.
Photo credit
Front:
Back:
My top was made from 'quilting cotton' fabric from my stash, and would probably be better made of challis, rayon, or some other softer, 'flowing' fabric.  Mine is a little too stiff.

This pattern has the front gathers 'sewn in', so I wonder if this could be made without the center seam in the front?   What about taking out the center seam in the back?  hmmmm..... may try that next time.  I chose to hem this with a serged rolled hem.
The pattern called for the armhole binding to be sewn on the outside, but I chose to sew mine to the inside, so it would not be seen.  Was hoping for a 'cleaner' look that way.  This tie is purely decorative as the top is plenty big enough to get on and off without untying the tie.
The back, shown below, is not gathered and lies very flat.  I like that.  Initially I was concerned that the top would not be wide enough at the bottom for my shape, so I added fabric and modified the pattern, all to rip everything out and sew a size 10 as per the pattern instructions with no adjustments, with exception to the armhole binding.
On the subject of pattern instructions, read each part of the instructions carefully for the view and design of the shirt you choose.  This basic top can coordinate with different sleeves, as well as a different finish of the front (i.e. a 'tie', or a 'button').   Each choice requires a different pattern piece.  Somehow that went over my head until I realized I'd cut out the binding for the front button closure and not the tie.  Luckily I had just enough fabric to re-cut.
Not sure the peasant style really suits my figure, though I'm wearing my new top as I type and it is super comfortable and cool.  (We're already hitting 80+ degrees today - and it's HOT!)  Though this is a simple top to make, I took my time to use this as a skillbuilding opportunity.   I want to enjoy the process, not just see how fast I can knock out a garment....

.....and I have to say, I did enjoy making this little top.  'Hello' Summertime!
Pattern cost:  $2.97  (and I will make more shirts from this pattern in the future)
Fabric cost:   $ -0-   (from stash)
Notions:        n/a  (no zipper, no button, no elastic, etc.)
                  ---------------
Total Cost:    $2.97

Pin It

4.05.2013

a Burlap Wreath inspired by Ballard Designs Burlap Wreath

Our stonework above our fireplace mantel was calling for a spring makeover, and this burlap wreath fits the bill.   Light and airy it is perfect for our home.
Thanks to Lori at Girls in the Garden for posting a photo of her Easter table using her Ballard wreaths as part of her tablescape, I was inspired.
Lori's Easter Table - isn't it pretty!
The Ballard Design wreaths are small wreaths.....
Photo Credit
...mine is huge.  But this area is large and a tiny wreath would be 'lost'.   Plus, I already had the large grapevine wreath on hand to use as my base, as well as the burlap, low-temp glue gun, and twine.
I cut my burlap strips 1" x 16 1/2" wide.... folded in half...
.... then folded like this pattern, below.  Where my finger is 'mooshing' everything together, is where I applied the glue.....
.....then stuck it to the grapevine pushing it between the vines with a pencil. 
Tried to get a general layout going, before filling in between.  
Once I had the burlap strips placed and glued like I wanted, I cut the Bundling Twine (the green label to the left in the photo above) into @5" long strips and spot-glued those in.  This took a LOT of burlap strips and a handful of twine strips...... and be warned it makes a huge mess.  The burlap shed lint all over the place!
But it was worth it.    I love our new wreath!
 Now to decorate the rest of the mantel for Spring.
UPDATE:  Keeping things light and airy, inspired by my 'new' burlap wreath and nature around us, click here to see how our summer mantel looks now.   Below, a little preview.
Linking to:


Pin It
Related Posts Plugin for WordPress, Blogger...