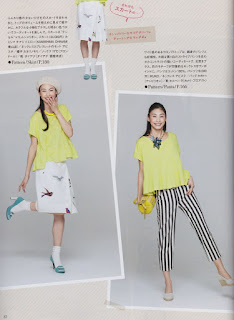
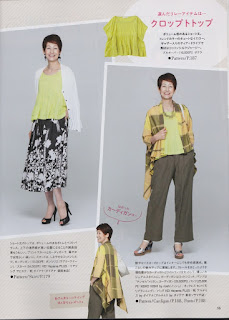
Mrs. Style Book 2015 P. 187 self-drafted top is complete! I'm showing it worn here under the
Yoshiko Tsukiori's Pattern N, 'Happy Homemade Sew Chic' cardi along with one of my
newlook 6192 skirts.
As you may recall, I was recently gifted with this wonderful publication that is unavailable in the United States. At least in any part of the U.S. that I am aware of, and so desperately wanting to make something from this book chose the cute yellow top on the cover. All patterns are self-drafted with this particular top drafted from rectangles, felt this pattern might be manageable for my skill level.
More views of the same top shown on both younger and older models. As I fall into the 'older' model category thought this would be appropriate for me, even though it has a younger vibe to it. The older model shows it worn with a sweater and a cardi/jacket.
This is all I had to go on. Everything is written in Japanese.
Loving math, I dug in with great joy to create my master pattern. A math puzzle to me! It wasn't until this moment I realized I had no metric system measurement tool other than my old wooden yardstick. It worked fine.
Can't remember if I've shared my 'tracing paper' with you before.....
but pellon 830 Easy Pattern Interfacing - Tracing Cloths is my
go-to- tracing paper now. Joann's is the only retailer that stocks this
product locally, so the last time I was there I bought the whole bolt.
At $2.49 with a 50% off coupon the cost was quite reasonable. I love
this stuff! You can write on it (though pencil does not erase
well.... at all), cut it, iron it, and the big winner in my book is
that it sort of 'sticks' to your fabric for cutting ease. Even the
slippy slidey, liquidy fabrics are easier to cut using this product as
your master pattern as your fabric doesn't move around during the cutting out process.

Anyway,
in the photo below I was beginning to form my pattern. My new
large-size cutting mat made this sooooo much easier as it is prepared
for fabrics to sort of 'stick' to it and the grid made making rectangles
easy. I'd bought this mat for cutting
fabrics for quilts, but it's cost-effective for garment sewing too. The neckline was drawn free-hand and I was a little concerned it might be too little or too big, but figured I'd handle any needed alterations during the construction process. These are both the front and the back pieces. You trace the different necklines on your fabric for the front and back bodice, then cut 2 each of the middle and bottom ruffle. The straight edge is placed on your fabric's fold.
Let's see how my pattern pieces compare to the line drawing. Not bad.
Thought I'd put these two different top drawings up side by side to show what I used during the construction process. The photo, bottom right, is of a very straight, billowing top.... not at all what I desired.... but the basic idea is the same as the top I wanted. See how my top, photo left, sort of hangs down... not billows out straight.... due to the middle and bottom ruffle slanting upward, not cut straight. Anyway, this diagram helped me think through the construction steps.


And here's the finished top. The soft, drapey gray knit was a perfect choice for the desired effect of this top.
In the photos above and below, I've paired it with the (now blogged!)
4-panel Alabama Chanin skirt, unembroidered with the exception of faux flat-felling all seams by hand-stitching with 3-strands of matching gray embroidery thread.
Side views. Hmmmm, these made me unsure if I thought this little top would complement my shape on its own.
The gray t-shirt jersey fabric 4-panel AC skirt, with the faux flat-fell hand-stitched seams, coupled with
the gray knit fabric from my stash for this top completes my Make a Garment a Month Challenge for both
May and
June 2015.
Upon closer look you can see that I hand-stitched the neckline with the same 3-strand embroidery thread that I faux flat-felled the seams on the AC skirt, but in the herringbone stitch, as that is a 'stretch' stitch. I tried to finish the neckline with a bias strip as per the pattern's line drawing, but that is a skill I just have not mastered on knit. As a plus, this neckline finish helps the top coordinate with the AC skirt, and with the Tsukiori cardi/jacket whose neckline is finished the same. And by the way, the size of the neckline turned out perfect!
Sort of scrunched here to look like the magazine photo.
What the top truly looks like, below. The sleeve hems were finished by turning under 3/8" and topstitching with twin needle. Even then it 'tunneled' a little, but felt I could live with it.
On the hanger.
Below, I am wearing the top with my
off-white newlook 6192 skirt and added the
Yoshiko Tsukiori cardi/jacket and love this look! Wore it to church this day. Hmmm, didn't know the top was pulled up in the back in the photo, below right. That's one thing about this top's knit fabric, is that it sort of 'clings' to stuff.... inner jacket in the back here......
....and tops of skirts in the front, photo below. Here is another
newlook 6192 skirt with the same cardi/jacket. What's a nice plus is that this color slips into my existing wardrobe well.
Thank you sweet friend for my wonderful gift!
I'll be writing the Alabama Chanin 4-panel skirt information soon. Happy Sewing Everyone!
UPDATE 6.18.2015: The
Alabama Chanin 4-panel skirt information has been written here


