4.27.2016

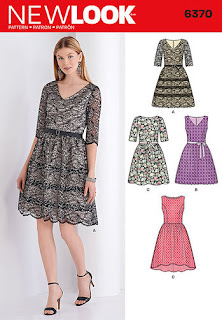
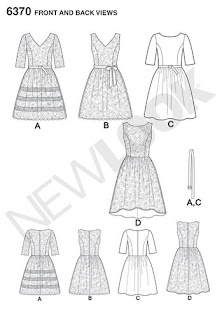
a Toile de Jouy Dress - NewLook Pattern 6370

I have made a new dress out of a favored Toile de Jouy fabric using NewLook Pattern 6370.
A dress that began as a dress for my daughter, Melissa.  Um, yes, you are seeing me here....
.....because she needs dresses and she likes the NEWLOOK 6370 style of dress.  Princess seams front and back, V-neck variation, gathered skirt, sleeves.  She liked this pattern when I brought it home with her in mind..... she seemed to like the fabric on the bolt...
.....but as the construction process was progressing, it was clear she was not in love with this dress.  She was maybe tolerating it because her mother was making it for her.... but not loving it.
As her mother, that was sweet, but I don't want to put a guilt trip on my daughter to 'like' or 'wear' an outfit simply because I made it for her.  I, on the other hand, LOVED this fabric.... always have ever since I purchased it a few years ago from the Home Dec fabric department of I can't remember where.  ;) 
I only knew the fabric as a 'toile'..... and thanks ever so much to SaSa from Alles neu macht der Mai! via an Instagram conversation, she told me my fabric is called Toile de Jouy.  Ever interested in learning new things, toile de jouy was immediately googled to read about this beautiful fabric at wikipedia and learn the correct pronunciation at merriam-webster dictionary.   DesignSponge also wrote an article on its history you can read here.
So, this dress was not made with myself in mind and to be honestly truthful, I've not been sure how I feel about this style of dress for me.  On me. 
It's not the pattern's fault, nor the fabric's fault..... just this particular style always seemed more suited for the younger set? 
Not my age?  Thoughts?!!!
So many, many mistakes were made making this dress that it shall be counted as a grand learning experience in lining and underlining and what not to do.

Made size 14, view A (with no lace overlay) because that's where Melissa's measurements fell.  No modifications to the pattern were made with the exception that I cut the sleeves where I ran out of fabric and they turned out perfect.  Took 1/2" off center back of bodice and skirt and also sewed a 1" seam allowance at center back with the zipper application because at that point I was beginning to realize this dress would probably be mine and it was the only way I could think to alter it a little smaller at that time.  For some reason I went with a regular zipper and am pleased with the topstitching.
Lined... or rather underlined..... with the softest 100% cotton from le stash.  It was meant to be 'lined', but instead ended up as underlining and that was the biggest mistake in making this dress.  The toile fabric and cotton were treated as one at the bodice waist gathering, so it makes the skirt a little stiff.  Treated each separately at the hem and the hem is the barest of hems simply serged and turned up and straight stitched.  At that point I wasn't sure if this dress would be wearable but I still wanted it 'complete'. Below, you can see where I finally made do with the way I put the zipper in.  All wrong.... but from the outside who knows?!
Front and back inside out.  Did not line the sleeves.  Wanting a nice clean finish on the sleeves, machine hemmed with the blind hem stitch feature on my machine.  The more I use that feature, the more I like it.  It is so easy and so fast and produces an almost invisible hem.
In the photo below we'll talk first about the positive..... I was stupendously happy with the fabric's pattern placement.  I got the shepherd and the sheep perfectly centered on the front bodice piece.  The negative.... it seems a little large.  If I ever make this again specifically for myself, I think a 12 would be about right.
Here, below, showing the beautiful princess seams.  I happen to really like princess seams and feel it is a universal flattering look.  You can see where this princess seam is a little 'off' my bust line and not filled out correctly.  Am very pleased with the length of the sleeves though. 
Sooooooo, what have I done with this dress so far?  I've worn it to The Peace Center for the Performing Arts to see a matinee performance of the Broadway play 'Sound of Music' with my family as part of my recent birthday celebration.  Below, I'm standing in front of the Concert Hall entrance.  I took along my coral Burda Jacket and wore little flat shoes because there's always lots of walking in downtown Greenville, South Carolina.
A really nice lady offered to take my family's picture for us.  As I was prepping this photo to incorporate in today's blog post..... taking the time to really 'look' at the three of us..... maybe I can now understand why Melissa did not like this dress.  She has her own unique style that I haven't quite figured out how to help her in that category yet.  ;)
I do like this dress MUCH better with my heeled pumps!  Methinks it is a keeper.
Speaking of my shoes..... love, love, love my LifeStride Parigis!!!  First pair of pumps that look stylish and are so comfortable to wear.
And my carefully tended and planted wildflower garden seems to be doing well this year.  :)
Happy Sewing Everyone!

4.22.2016

The tale of two Plantains

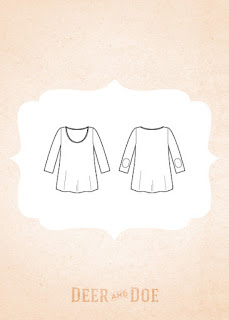
This fall and winter has definitely been the season for the Deer and Doe Plantain in my sewing room.  Hardworking basics are a wardrobe staple, and this top checks that box for me.  This is the 3rd and actually 4th Plantain I've made in the photo below.   
The Plantain is a free download from Deer and Doe patterns.  You can find my first one here and my second one here.  Depending on fabric choice and design modifications, each top looks a little different and wears a little different.  The top I'm wearing here fits tighter than the others because it was a thick terry-clothish fabric and I did not cut a little larger to take the thicker fabric into consideration.  Note to self:  thicker fabric = larger size
Free pattern to download
I made a size 38 with serged 1/4" seams, raised neckline @1/2" and narrowed center front and center back nominally.  Running out of fabric, I made the sleeves as long as the amount of fabric I had left and really like these 3/4 length sleeves.  I'm showing the top on its own today, but it's actually been a great little layering top and with the thicker fabric, quite warm.  I tried a new sleeve and bottom hem stitch and now I can't remember!  Sorry!  I used one of my stretch decorative stitches and it blends in so well I can't tell what stitch it is.  This is what happens when info doesn't get jotted down on my little notecards as the work is completed.  *sigh*
The other Plantain I made for my daughter, Melissa.  She wasn't sure she liked the way it fit to wear in public, but she likes it as a comfy top.  And the bonus is that it's a perfect match to her Happy Cats pants I made for her.  :)
Loved this blue fabric on her.  So soft and such a great color for her.  We wear the same size.... so this is another size 38 with 1/4" serged seams with the sleeves lengthened looooong per her request.
Up close look at the sleeve detail I did for her.  Mimicking a sweatshirt type of finish, I made a turned under band and serged it on after lengthening the sleeves.  All necklines are finished as per Deepika's technique.
Paired with the pants it looks like it was all planned to go together!
Pants were made from a fun flannel fabric using McCall's Pattern 4979 you can see here.  This is my TNT comfy pant pattern for her.
You can see more how the top fits her here with the loooooong sleeves.  These photos of her were taken a few months ago when she'd just arrived home from her day on campus.  She was so tired, but graciously posed for a few photos for me.  These pictures have just been waiting for me to write this post.  She's very sweet.  :)
So that's probably it for the Plantain this year as we head into Spring and Summer weather. 

Happy Sewing Everyone!

4.21.2016

Who made my clothes | Who grows my food

As I prepared my Instagram photo this morning to support Fashion Revolution Week April 18-24, 2016, it struck me that as we pay attention to 'Who made my clothes', we might also think about 'Who grows my food'.  At first glance, 'Food' may not be necessarily be connected to 'Fashion', yet maybe a similar thought process can be found there. 
In America, and particularly in the area in which I live, there is a highly popular movement called 'Farm To Table' where our local restaurants are buying farm fresh organic produce from our local farmers, even altering their menu to take into consideration the seasonal items.  This not only enables our local farmers, who own small organic farms, to economically survive, but also for folks to have an opportunity to know where their food comes from and enjoy meals prepared with the freshest of fresh ingredients.

Through the years, my husband and I have embraced the sustainable organic gardening methods and have incorporated this way of gardening into the food we grow on our land.  We are not able to grow enough to provide all our needs, but we very much enjoy what we can.  Our small flock of chickens provides us with delicious eggs, and are hardworkers who eat our kitchen compost and fertilize our garden soil.
We also pick and process fruits that grow wild on our property, like the muscadine jelly you see here below.  My favorite!
So, if anything, this post is to encourage thinking about maybe not only where fabric originates, and clothing is made and what people and industry are supported in this way, but also how and where your food is grown.  This morning I am harvesting baby romaine lettuce whose taste is unlike anything one can buy in a store.
And because this really is a sewing blog, I am wearing the Ottobre no. 10 Sculpture top with a new (unblogged) Newlook pattern 6192 skirt.

Happy Sewing Everyone!

4.19.2016

Fashion Revolution Week April 18 - 24, 2016

On April 24, 2013, as I was cutting out a new garment while listening to my local NPR (National Public Radio) station, I still remember the horrible feeling that overcame me as I heard the tragic news of the Rana Plaza factory collapse in Bangladesh where 1,134 garment workers were killed and over 2,500 were injured due to known unsafe working conditions.  Even though I was new to sewing handmade clothes for myself at the time, I thought to myself that I should be more conscious about where and what my money was supporting. 

Shortly after this horrible incident in Bangladesh, I watched a documentary about the Triangle Shirtwaist Factory fire in 1911 that killed over 100 innocent young girls and women and is considered the deadliest accident in New York City's history and in the Fall of 2015 I watched the documentary The True Cost,  a truly eye opening film into our present day apparel industry.  These informative films, coupled with the sustainable and slow-sewing/fashion movement resonate within me.  I want to be more aware.  More aware of where the goods I buy originate.  Of where and what my money is supporting.

In America, clothes are fairly inexpensive and easy to buy with major retailers offering deep sales so often, it seems more like everyday discount pricing.  Many people list 'shopping' as their favorite 'hobby'..... with clothing at the top of the list.  Living in the Upstate South Carolina I have seen first-hand our textile mills close and manufacturing move abroad.  As late as the 1980's, we were considered to be the textile center of the world.  Not anymore.

As I understand, Fashion Revolution is to encourage us to think about not only who made our clothes, but also who grew the cotton and spun the yarn into the fabric used for those clothes.  In 2015 I participated in Fashion Revolution Day and now in 2016 the movement has grown to Fashion Revolution Week of April 18 - 24, 2016.  I want to join the conversation... to encourage others to think about the origin of their clothes..... the origin of fabrics used...... who made your clothes...

I make my clothes!
And in this photo I am wearing the coral Burda jacket #120 from 01/2016 issue with the self-drafted top from Mrs. Style Book 2015 paired with the hardworking NewLook 6192 skirt.

More on the Fashion Revolution subject can be read at in the folds blog.

Happy Sewing Everyone!

4.15.2016

A most special dress is in the works - NewLook Pattern 6261

This rayon/cotton beauty has been sitting in my stash for the past six months just waiting for the perfect occasion and the perfect pattern.  It has been lovingly petted and attended to in the meantime.  :)
Many of you are probably familiar with Handmade by Carolyn, a blog written by the lovely and most creatively talented Carolyn from Perth, Australia.  I have admired her work for years.  I have learned so much from her.  I am so grateful to her for writing and sharing her work so freely.  Her unabashed love of the art of sewing is very clear and one that I personally find engaging, encouraging and inspiring.

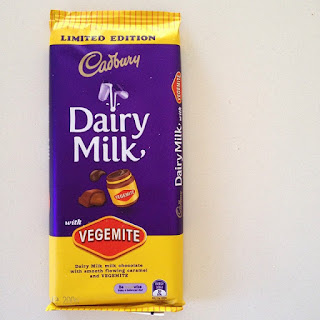
In the more early days of Instagram, a Cadbury Chocolate Vegemite bar became the topic of conversation one morning on Carolyn's IG feed.  And as this American had never tasted vegemite, much less heard of it..... one showed up in my mailbox soon after, shipped all the way from Perth, Australia.  :) And, by the way, I liked it! and I savored this chocolate bar eating teeny tiny bites at a time to draaaaag out the goodness.  Another chocolate bar with bits of honey accompanied.  That was good too.  
Carolyn's IG
So what does one do upon receipt of a thoughtful gift of chocolate and a desire to share one's own 'something' from her area/country?  Well, if you are born and raised in Alabama and grew up a short distance from Florence, riding your horse surrounded by fields of cotton we Southerners like to call 'Southern Snow'..... you send a yardage of Dusk Blue Alabama Chanin fabric to Perth, Australia.  Carolyn's fabulous outfit she made with this yardage, coupled with yardage she purchased locally and dyed herself can be read about here.  This, below, brought tears to my eyes.  Is she not beautiful!  Please read her post as the photos of the work she put into this ensemble is stunning.
Carolyn's IG
My story is getting long, but suppose you've figured it out by now, the most special fabric shown at the beginning of this post is from Carolyn.  It is a print of the gum blossom flower native to her beloved Western Australia.  Carolyn has photographed it in her instagram feed here.....
Carolyn's IG
 .....and also here, below.  She writes that the blossoms can be found in red, pink, orange, yellow and white colors..
Carolyn's IG
This fabric is more of a modern contemporary print of the gum blossom leaves, buds and blooms.  My photographs just do not do this fabric justice.  It is simply beautiful and needed a most special occasion to be made and worn.  My daughter Melissa's upcoming college graduation seems most fitting and worthy for this special fabric.
You may recall I recently made Newlook 6261 out of bird print fabric to be worn at my niece's Florida wedding.  You can read those details here.  This sheath dress pattern will be perfect to showcase the lovely pattern of the gum blossom fabric.
Since the time the bird print dress was made, I have lost a little weight.  Not much, but enough to alter the sizing of the pattern.  Yesterday afternoon was spent drawing new pattern tracings complete with much pondered size 12 bodice to size 14 hip modifications.  After taking my measurements again this morning, and considering the 5/8" seam allowances, decided to cut a straight 12 with the thought I'd have 5/8" on each side for fudge factor if needed.  Below, I'm showing all my hard work before cutting off the modifications.  Also, whenever I begin a new project, I like to begin a new index card for all the notes to be jotted down along the way.
You can see my little red arrow at 5" on the gauge below showing the scale of this beautiful motif.  My biggest concern today was placement of those blossoms. 
Thinking it probably would not be a good idea to have the blossoms on the bustline, nor right at the derriere, it took me another couple of hours of agonizing to figure out how to place my pattern for cutting.  Can you tell I'm quite scared to cut into my beautiful fabric as I simply do not want to mess up!!!  Below I'm using my patterns to sort of 'see through' for ideas about a cutting line.  About this time I also realized I did not know enough about gum blossom trees so I stopped everything and searched the internet for about an hour to see how the trees grew and how the leaves and blossoms hung, deciding that the fabric did not have an 'up' nor a 'down' so that helped move things along.  I also learned a lot about the gum blossom trees that grow in Australia.  :)
So....... after thinking and pondering most of the day, the courage has been mustered.  This is where I'm at now...... front, below...... and may I say how pleasantly pleased I am to see the blossoms centered nicely at the neckline and toward the bottom.
.....back.... not bad though it looks like I'll be sitting on a clump of blossoms on the right, but the placement could've been worse.  ;) 
Thank you so much Carolyn for your generous gift.  I hope the finished dress will be worthy!

Happy Sewing Everyone!
Related Posts Plugin for WordPress, Blogger...