3.26.2012

a new duffel bag....maybe, maybe not

Some projects turn out like you 'see' them in your mind, like the recent quilted Bible bookcover...
....and some projects do not, like this duffel bag I recently completed for my husband, Tom, who needed a bag to hold his tennis shoes, change of clothes and water bottle for his 2 mile walks after work...
....poor thing, it looks a little pitiful in these photographs....
It is pretty neat in that it is loaded with pockets...
...one on each side and 2 built-in with the webbing straps...one on the front/one on the back...4 total...
...a nice sport zipper...
...the stripes matched up evenly...
So what happened.. .why am I not 'loving' this bag...
....for one....it's huge..it's more like a 'weekender' sized bag than a bag for tennis shoes and change of clothes... I've got 2 full-sized pillows in there to 'shape' it for these photographs!...
...and the fabric choice...
...that seemed like a good idea at the time...
....an outdoor heavy-weight canvas from my stash....
 ...turned out way too 'stripey'.....I should've made a trip to the fabric store.
 What about the pattern....
....the pattern was actually quite simple...
....I just didn't comprehend 'size on paper' vs. 'size completed'....
 
....this pattern is for a circle shaped duffel bag and I wanted a square bottom so I made a new template for the design I wanted....which meant I had to change/modify ALL her measurements.... basically re-make the pattern, but follow her instructions...no problem, just took a little more time....
....it was actually an easy project....
 
....from this book "Made For Travel" by Mary Mulari....I love this book! 
A little story about how I obtained this book..... our local library had a copy of this book that I could (almost always) count on to be available for me to check out whenever I wanted to use it....but all of a sudden, it was never there any time I stopped in....it had simply vanished.
Our library system has a book sale each month, of which we've never attended, until this one Sunday afternoon we happened to be in the area and thought it'd be fun to see what the sale was all about...and imagine my surprise to find this book for sale for $1.00!!!!   It had been discarded, pulled from circulation and ready to be sold----to me!!   I was so happy.

Back to the duffel bag....I am going to make another....shortening the length considerably.... the width too... but still basically following Mary Mulari's instruction... with my modifications.
Meanwhile, Tom is using this one and Melissa wants it when his next new one is complete.
So I guess it will be used after all.  She says she likes it..... !!
~Lisa
Linking to:


3.22.2012

a quilted Bible bookcover

Don't you feel great when something works out like you 'think' it will....
...and that's how I felt today when I completed a quilted bookcover for my mother-in-law's Bible.
My mother-in-law, who wants everyone to call her 'Granny', is a special person to me and I love her very much.  Let me introduce her more properly with a collage of some of my favorite times....
....the largest is a most happy mother with her two 'boys'....then moving from the top left....Granny and Melissa making 'Oreo Turkeys'....Granny and her beloved dog, Suzi....Granny and Tom (my husband/her youngest son)....Granny supporting Melissa's Homeschool High School Graduation.... Granny's 78th birthday (cheering section to the fore right)....

Remember her Florida Room Transformation?   It was an 'oh'wow' moment to see her room after replacing those old green blinds with custom burlap panels...
....a tatted cross....
....and now a new quilted bookcover for her Bible....
 ....she loves the color 'lavender'....
 ....so I thought of her immediately when I saw this lovely white fabric with embroidered lavender dots....
 ....the front...
 ....the inside...showing the lining as well as the side pockets I made by folding my fabric....much cleaner and neater than serging the edges then 'hemming'....
 ....kept the trims simple for the front decorations....
....a little lace overlapped with the embroidered scalloped edge cut off the fabric, topped with a piece of fabric doubled and sewn on with a simple decorative stitch....then stitched in-the-ditch to attach everything to the front fabric and batting....
 ....it fits well on one of my Bible's that's the same size as Granny's....
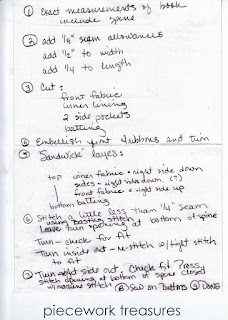
 .....my notes....
...probably looks more like 'chicken scratching' to anyone but me :) ....
 Remember an earlier simple quilted bookcover made for a young friend...
....I used my notes from that project and applied them to this project....and it worked like a charm and fit perfectly!
 ...and now I'll give it to Granny when I see her soon.  I hope she will like it.

For those who may be interested in making their own custom quilted bookcover, I plan to write a more detailed tutorial and post it here on Piecework Treasures soon.
~Lisa
Pin It 
Linking to:
Crafty, Scrappy, Happy and
 

3.20.2012

a new Walker Bag completed


Ever since I made the first Walker Bag, it seems every time I turn around I notice another person in need of a bag for their walker.  So with an ever increasing list of names, I've completed another walker bag to be shipped to Oklahoma for my cousin's mother-in-law.
What is a Walker Bag?  A walker bag helps someone who uses a walker hold the things they need..... maybe a phone, tissues, book they are reading..... while freeing their hands to use their walker safely, without having to juggle their stuff, as they move about.

The photo below is of the first bag I made 'in use' on my elderly friend's walker.  She's even brought it to church on her walker holding her bible and sunday school lesson.  She had the biggest smile!
 As a precaution, recipients do need to be warned not to pack their bag with too much stuff, as it could make the walker unstable and hard to maneuver. 

Using Laura's easy-to-follow free pattern from Laura's Sewing Studio.....
(Laura's Hall of Fame included my first walker bag and there are also photos of others).....
.....this is what I came up with.... denim and toile....a great combination.
The front:
 The back:
I kept this one simple.  No decorative stitching, just a straight double stitch complements the 10 oz. denim and the toile twill.  I am in love with this toile.  It is washable, easy to work with and very pretty.
Instead of buttons I used 5/8" heavy-duty snaps.  There is definitely a technique to using the specified pliers and installing these snaps. The directions on my package were of little help.....
...but after a few tries, and instructions from sew4home....(though she used different-type snaps - I still 'got' it) ...they went in well. 
 I used a small piece of stabilizing fabric on the back of the twill.
The photo below is of the first walker bag I made, but I wanted to show you all the pockets Laura's pattern provides...2 in front, 3 in back, and the entire middle, as shown here, is a large pocket.   (I now realize I should have made the buttonholes perpendicular, and not parallel.)
This time I wanted to try out snaps instead of buttons.  I'm asking each recipient to give me feedback of what they like about their bag and what modifications they would like to see, if any.  I'm curious to find out what is thought about the snaps vs. buttons.
As a personal ministry, my goal is one walker bag per month this year.  Hmmm.....I think I may be one behind.... this year is going by so fast!
 ~Lisa

Pin It 
Linking to:


3.16.2012

Which lighting would you choose?

...the lighting on the left...
or the lighting on the right?
(yes, I know one light is not working....it started working AFTER I took these photos:))

Do you struggle to see detailed work? As I've gotten older, it's harder for me to see up-close, detailed work....well....it's really simply harder to see! I replaced all the bulbs in my workroom lighting fixtures with bright white "Reveal" lightbulbs, thinking I was getting the best possible lighting... until a few months ago I came across an interesting post Sandra did at Sew in Peace where she was sharing her new sewing room. She showed a dramatic photo of her ceiling fan where she had replaced half the bulbs with Ott lightbulbs and left her 2 regular 60 watt lightbulbs in place... and showed the difference. I thought 'Wow! I need to remember this.'

I've been using Ott products for the last couple of years, but never thought of replacing existing lightbulbs, like ceiling fan lights, with their bulbs. OttLite bulbs produce a more natural light that helps reduce eyestrain..... to me it's a brighter, cleaner, easier-to-see, daylight-light. Sandra purchased her OttLite bulbs at Lowe's and I've seen them at Hobby Lobby and other craft stores..... but yesterday I found these at Hancock Fabrics for 40% off. This is great because they are a little pricey at $9.99 each for a 60 watt equivalent bulb.   Also, Hancock Fabrics had enough OttLite bulbs in stock for my needs.

Just thought I'd pass this little tip on.  It's so much easier to see now while I work on my 'piecework treasures'.
~Lisa
Pin It