4.25.2015

Another boring basic top :: that is so needed

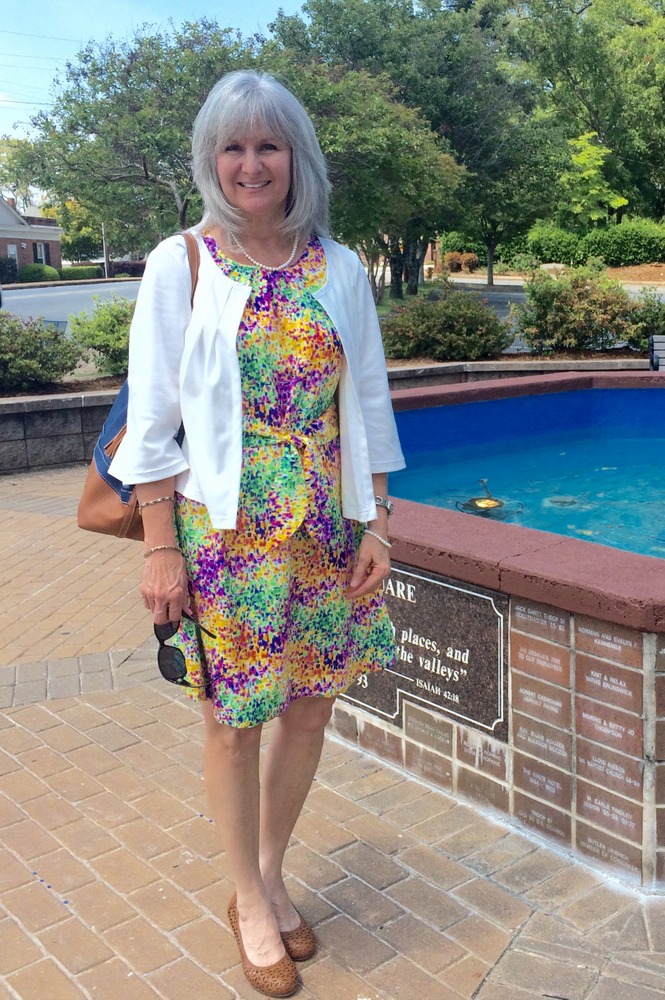
Not much to say except a third Alabama Chanin inspired top has been completed using NEWLOOK 6735 pattern.  I'm wearing it here with my Vogue 1247 cream corduroy skirt.  This is turning into one of my favorite skirts!
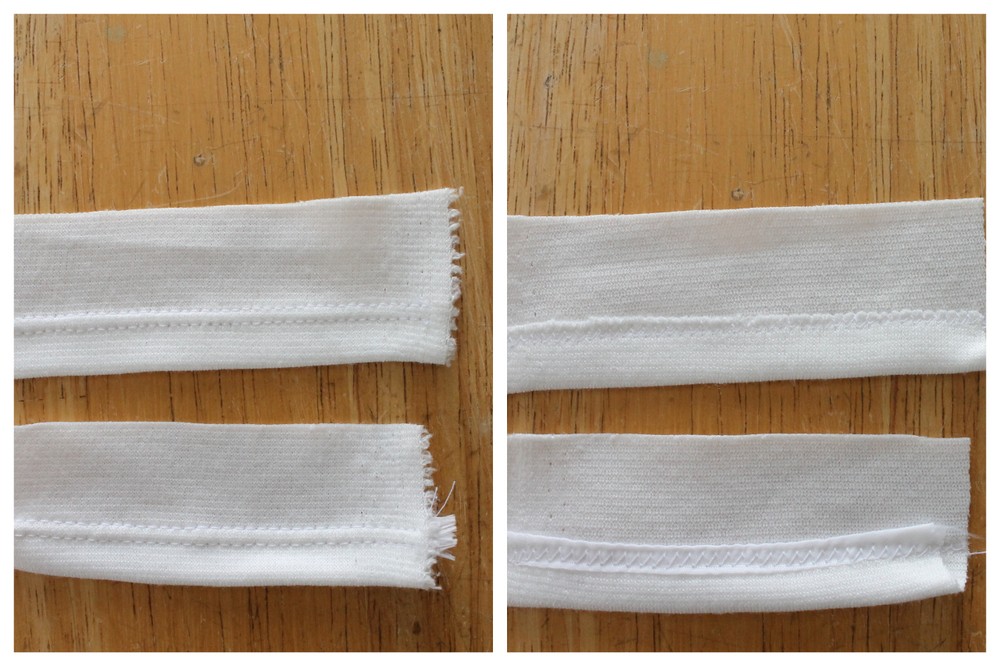
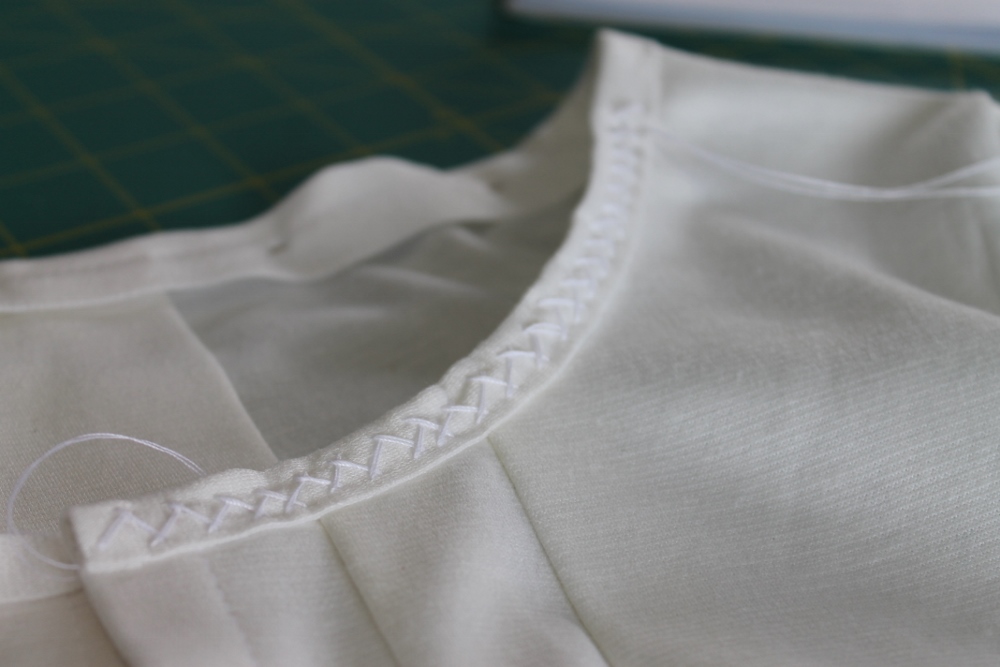
Neckline finished like the others.  You can read about the technique I used here.  Getting faster with my hand-stitching as this neckline was finished in less than an hour.  Yes!  Again, herringbone stitch with double strands of Coats & Clark button thread.  Serged other seams.
Clearly this is a great pattern for me as this is my third version of this top.  Sleeves were lengthened to long-sleeve.  I like to be able to push them up if I want to.
Ox-eye Daisies are a'bloomin' here.  These were growing wild on our property, and through the years I've successfully transplanted them here 'round our old wagon wheel.
Now, back to Spring/Summer sewing projects!

4.24.2015

'I made my clothes'
Fashion Revolution Day

Sewing handmade clothes for myself began early in the year 2013.  On April 24, 2013, I still remember listening to the tragic news of the Rana Plaza factory collapse in Bangladesh, where so many garment workers were killed and injured due to unsafe working conditions, on my local NPR (National Public Radio) station as I was cutting out a garment; thinking, from this day, I should be more conscious about where and what my money is supporting.  Shortly after this horrible incident, I happened to watch a documentary on our PBS (Public Broadcasting Station) about the Triangle Shirtwaist Factory fire in 1911 that killed over 100 innocent young girls and women and is considered the deadliest accident in New York City's history.  That sealed it for me.  Both these incidents have prompted me to 'think' about my clothes in a different way than before.

In America, clothes are fairly inexpensive and easy to buy with major retailers offering deep sales so often, it seems more like everyday discount pricing.  Many people name 'shopping' as their favorite 'hobby'..... with clothing at the top of the list.

So this Fashion Revolution Day I want to join the conversation... to encourage others to think about the origin of their clothes..... who made your clothes...
Thank you to the lovely Carolyn, of Handmade by Carolyn, for bringing the Fashion Revolution Day to my attention again this year.

4.22.2015

A Pointillism Dress
Pattern a, 'Stylish Dress Book' by Yoshiko Tsukiori

I have made a new dress.  Wishful thinking to be outside this morning, but it's too cold, and I am excited to share my new dress with you..... so inside pictures it is today!
This dress was not completed in time to wear to Easter services at church, when our weather had been unseasonably warm..... and by the time the last stitch was sewn our weather turned rainy and cold, so I've not been able to wear it out.... even for my recent birthday.  But not to worry, there will be lots of hot, humid, summer days ahead for plenty of wear.  This completes my April plans for the Make a Garment a Month Challenge.
Another terrific garment from Yoshiko Tsukiori, this beautiful dress is from her 'Stylish Dress Book Wear With Freedom", Pattern A.  Her version, below. 
Basic, simple construction of 2 pattern pieces with no zip, buttons or closures to worry about.  It pulls over my head just fine.  The front sports a bust dart and a little taper at the sides.  Traced a size 12 and added 4" total to bottom instead of the 2" + 1 3/8" per instructions.  I am 5'7" and thought I was adding a lot extra to the hem..... until I re-read the instruction for the umpteenth time.... after cutting.... and realized I'd only added less than an inch than what she recommends.  Plenty to play with when hemming, so no problem in the end.  Added 3/8" seam allowances and all other seam allowances per instructions.  Wanting the inside to look nice and finished, it was sewn with french seams. 
Altered front by deleting the gathers and inserting 5 pleats instead.  Other than the center pleat which is sewn, the others are simply turned down and caught in the neck binding's stitching. 
Altered the back with a small center pleat.  Hmmm, not sure the back normally shows this deep of a pleat.  This type of dress should hit at or a little above the knee and looks fine with the wedges I have on today, as well as flat sandals.  Machine stitched the bottom hem with the blind stitch feature on my machine.  This is the third time I've used that feature, and each time have found it an easy process with an almost-invisible hem finish. 
Added a self-fabric belt inspired by "Vogue Patterns" magazine, June/July 2014's issue showing Vogue 1395.
Cut fabric 6" wide by @44" long.  Tapered ends by tracing around plate.  Vogue 1395, to the right in the photo below, looks cute.
This is the dress planned and made to wear with my new Jersey, Bolero style Jacket from Yoshiko Tsukiori's 'Happy Homemade Sew Chic' book, Pattern N.
The dress neckline is a little higher than the jacket's and offsets this type of swing jacket perfectly.... I think.  Both feel great on and both will get a lot of wear this season.
I was so afraid this dress might look like a tent, but it looks anything but!  Even without the belt, the dress is pretty.  So don't be afraid of trying a new type of pattern.  You might be surprised at the outcome!
Happy Sewing Everyone!
UPDATE: 5.03.2015  FINALLY warm enough to wear my new outfit to church.  You can see more photos here.

4.21.2015

Tripod Carrier

Enjoying nature photography and learning how to take self-timed photos of myself for this blog I found it awkward to carry my tripod on short excursions.  So I made myself a new tripod carrier.
You know, those times when it's a quick little walk or hike where you just want to throw the camera 'round your neck, grab the tripod and off you go.  Now I easily can. 
My tripod is a Manfrotto and because we like to take long trail hikes, my husband purchased a Manfrotto backpack for me that is well padded for the camera, lens, tripod, water bottles, snacks and the like.  Here he is, patiently waiting for me to take pictures, wearing the Manfrotto backpack hiking Devil's Fork State Park's Oconee Bell Trail in 2012.   (You can see the rare Oconee Bell flower, that only grows in our area, at that link too.)
But that is simply impractical for my usual photography needs.  I wanted something to sling over my shoulder with an opening for the tripod to slide in and out of quick 'n easy with a snug little pocket for my phone.  I think I've covered all the bases here.
Heavy weight natural canvas with flowery duck canvas along with cotton webbing for the straps with a little hardware for ruggedness makes this a perfect tripod carrier.  I reinforced all the fabric with stiff interfacing that is normally used for bags.  At first I was concerned it was too 'stiff', but seems 'just right'.  I wanted this bag to have body and shape. 
See how my tripod top peeks out the top.  That's what I wanted to make it easier to pull out and slip in.  The cotton webbing is in a casing here at the top that gives it a snug enough closure.
Like this below.  It's all pulled tight, and stays snug without being too difficult to get the tripod out.
The hardware gives it that no-so-homemade look and adds a rugged touch.  The bottom is a double layer of the heavy weight canvas stitched for reinforcement.  My car keys are on a little clip I plan on clipping to this D-ring when out and about.
Was worried my pocket would either be too snug for the iphone, or not snug enough.  Somehow it came out perfect and even with the carrier slung over my shoulders, which aims the pocket/iphone 'down', the phone is secure.
The camera will be 'round my neck on photography jaunts with the tripod carrier 'round my shoulder. 
Now I'm ready to go places and take pictures!
Wearing my first Alabama Chanin inspired long-sleeved tee with rtw jeans.

4.17.2015

Me-Made-May 2015

It's that time of year to be thinking about participating in the annual Me-Made-May hosted by the lovely Zoe at 'So, Zo.... What do you know?' blog.  I'm in!
me-made-may'14
Click the link above to go directly to her information and sign-up page.  She makes it clear what Me-Made-May 'is' and what it 'is not'.  

It is not a competition, but is to be used as a personal challenge unique to each individual participant.  

I still consider myself 'new' to garment sewing and it was only last year, for the first time, I was able to participate..... and what a fantastic, learning-curve of a month I experienced!  The online garment sewing community is a supportive, encouraging and just plain 'nice' group of ladies with Me-Made-May providing an opportunity to interact with others in a completely different way than blogging.  I realized how much I love wearing my handmade clothes.... and how I needed to make more!  I made new friendships around the world that I treasure today and boy did I learn about photography, my camera and taking self-photos!  Zoe makes it absolutely clear that photos are not what Me-Made-May is about..... but personally to me, it is important.  I've found that the camera does not lie and by taking photos of yourself wearing your handmade garment, you can see flaws you might have otherwise missed.  Also, knowing how to take self-timed photos has provided a lot of fun at family outings and gatherings!  Furthering my photography skills has also been helpful in the nature photos I like to take.     

So for this year  
'I, Lisa, sign up as a participant of Me-Made-May '15. 
I endeavor to wear something handmade each day for the duration of May 2015'
Thank you Zoe!

4.09.2015

Jersey Bolero-style Jacket, Pattern N, Happy Homemade Sew Chic by Tsukiori

I adore my new jacket!  A first for me to make a garment from the Japanese book "Happy Homemade Sew Chic" by Yoshiko Tsukiori, and I enjoyed every single step along the way.  This is Pattern N - Jersey Bolero-style Jacket.
Let's see if cream, almost-white, knit photographs better in the shade.  Hmmm, not much but I wanted to show more of the details of this pretty jacket.  This pattern N is a 'sister' to the same book's pattern D Blouse with Front Tucks.  2 pleats on either side of the plackets on the front....
....with a nice, deep center pleat in the back.... and....
.....I love the sleeves!  They are large enough to house the sleeves of my Rachel Comey Vogue 1247 top easily.  Nice!  Notice how the wind blows and the inside of my unlined jacket shows?  This is why I thought ahead and planned the inside seams to look finished, nice and neat for 'showy' days like this.  Thank you oppknits for helping me think that process through!  :)  I am enjoying instagram much more than I expected and it's a great way to have conversations about project problems with friends who have much more experience than I.
This little jacket has a nice 'swing' to it too.  Have I said how much I love my new jacket?!
There were some mighty curious ladies watching me today!  They are piled on top of each other with their necks craning out the fence to see what all the photography was about.  Guess they're having a 'hen' party!  :)
I so enjoy looking at all the simple designs in 'Happy Homemade Sew Chic' by Yoshiko Tsukiori and try to imagine what they might look like on me.  I am 5'7" and not oh-so-thin as her lovely model, so wanting to get a feel for the fit and particulars about Pattern N, Jersey Bolero-style Jacket before cutting anything out, I could only find one other jacket that has been sewn after a quick Google search.   This was interesting to me that many others haven't sewn this jacket, as its classic silhouette would work on different figure types and be a go-with-anything type of jacket.  Anyway, the pattern pieces were easy to trace and her line drawing(s) and instructions were detailed and easy to follow.  If I was stumped, I just studied her drawings and could figure it out from there.
This knit, unlined jacket was started March 26, 2015 and completed April 8, 2015.  That's pretty quick for me, particularly considering how I went the extra mile in finishing techniques on this project.  Even all machine threads were carefully hand-sewn in, not snipped.  For some reason, once I began this project, it was important for me to put my absolute best work into it.  I learned a few new skills along the way too. 
The pale-cream, stable knit fabric was purchased off the remnant table at Hancock's Fabrics in Greenville, South Carolina.  Don't remember how much it cost, but it wasn't much.... maybe $10-$15 for the piece and there's a lot left over.  A size 12 with seam allowances added per the book's instruction was cut.  No alterations were made.  You can see the pretty sleeves better below. They are flat-sewn in, which I like.
Right side view
Hard to see the inside details..... but shoulder, side and sleeve seams are all flat bound seams per my Threads Sewing Guide book p. 157 using white polyester silk-like lining material for the 1 1/4" binding.  Armscythes are left unfinished.
I really struggled with how to finish the sleeve and bottom hems. After stitching a sample enclosing the seam with bias binding, determined it made the garment too stiff, and I wanted this jacket to have swing and movement.  Also, I was afraid it wouldn't 'pleat' where all the pleats are, so decided to simply sew carefully and encase the top of the unfinished edge of the hem with the top of my double-needle.
Inside view
A few of my samples.  I sampled everything on this project!  You can see below how much better the hems look double-needle stitched instead of bias bound.  Bias binding is on the bottom of each photo.  Very stiff.
Just a few of my neckline samples, below.  The sample to the left represents the book's instruction.  For some reason, I was afraid this would make my jacket feel too 'formal' so instead supplemented my Alabama Chanin neckline version using the same technique I'd used on previous knit tops.  1 3/8" strip of knit, cut off-grain in this case (not bias as per the book), overlapped 1/2" to the front of the jacket, stitched with 3/8" seam to the inside for more stability while embroidering.  The back seam was left in after embroidering to help with the overall stability of the jacket's neckline.  Used double thread of white Button Craft Thread for the herringbone stitch embroidery.  The excess binding was cut off the inside (very carefully!) after the embroidering was complete.  I decided to cut the binding off grain because there is so much room in this jacket, you don't need to worry about the neckline needing to stretch.  In fact, I wanted it stable, and deliberately cut the strips where there would be less stretch.
Neckline handstitching in process.  It is so much easier to embroider with the binding longer to the inside.
Neckline done. The longer inside was cut back to the stitching after embroidering.
Sample for flat bound seam using 1 1/4" binding.  This is such an easy technique with beautiful, satisfying results.  Will definitely be used on future projects.
Looking at the bright blue sky with soaring mid-80 F temps, you'd never know today's forecast was for severe thunderstorms.  Yesterday, between rainshowers, I planted seeds for our summer vegetable garden specifically with the plan that they'd get a good soaking today.  It's hard to outsmart Mother Nature.  :)
Rachel Comey Vogue 1247 top
Self-drafted, lined, elastic waist skirt