These pants were cut out on a Wednesday night right before heading to bed, completely finished by 2:00 p.m. the next day and being worn out the door to attend a casual function at 2:30 p.m. That's pretty quick for me!
NewLook Pattern 6216 is an elastic waist straight leg pattern I've made twice before, here and here. I've always eliminated the cording in the casing. Love these pockets!
When those earlier versions were made, the size 10's seam allowance was the width of the serging. This time I wanted to see what a true size 10 with a 5/8" seam allowance looked like and am quite pleased with these. I like the more straight leg appeal here.
Warning... this pattern runs big!!! If I followed the pattern's sizing suggestion, I'd be making a 14! No Way!
I'm a huge fan of elastic-waist pants because my weight tends to fluctuate back and forth a pesky five pounds.... just enough to affect the fit of fitted garments.... and these types of pants are simply more comfortable for daily wear. But..... I do not want to 'look' like I'm wearing elastic-waist pants and believe the way to sort of get around that, is to size back to where the elastic waist barely makes it over your hips as you are putting the pants on, then that way there's not a lot of extra fabric gathered in the elastic waist. If that makes sense?!
Wearing a rtw shirt and vest here and tucked the shirt in and added a belt to show you how the front rides a little high. This is actually a little higher than my natural waist but though it was important to show you the entire pant. Feeling a little frumpy here.
Ahhh, that's better. The high front waist is a little bit of a bother, but one that's manageable.
The back rides a little low on me, and next time may do a full butt
adjustment. Bwhahahaha! Sorry!! Everytime I say or write that it
makes me laugh..... even though it's so true!!!
As I was setting up the camera on our deck this morning for this post, our woodland creatures were oh so active. You'd be amazed at how much noise squirrels and chipmunks make in the leaves on the forest floor. So much to my complete amazement... a buck and doe came through as if no human were around! And oh what noise they made!!! Thinking I'd missed my chance at a shot, but kept my camera in hand, a few minutes later the most clattering of leaves was heard as this adolescent deer came happily bounding by trying to catch up with mom and dad and sweetly posed for ever a slight second at the top of one of our trails for me. *insert big smile here*
It's been a very nice morning!
Happy Sewing Everyone! :)
11.18.2016
11.16.2016
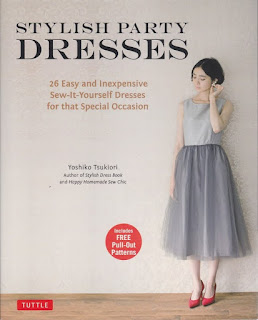
A Knit Frilled Bolero, Pattern x from 'Stylish Party Dresses' by Yoshiko Tsukiori
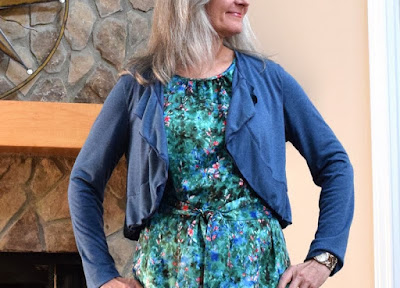
My version of Yoshiko Tsukiori's lovely Frilled Bolero, pattern x from her book 'Stylish Party Dresses' has been recently finished.
And as it seems with most of the garments I make, there is a story to tell.
Way back in March 2016, I was thrilled to find this book, 'Stylish Party Dresses' by my one of my most favorite authors Yoshiko Tsukiori, at my local Barnes & Noble. Having already made a handful of lovely things from her other books, I knew her patterns usually fit me well and I love her style. In fact, I am wearing my Monet dress in this post from 'Stylish Dress Book' pattern a, and you can see the other items I've made from her patterns here, here, and here. About the same time I was reading this book, sweet SaSa posted about her lovely Drape Top she made from the same book and I knew I had to begin a project immediately. I chose pattern x Frilled Black Bolero. My Bolero is not black, so I am calling this pattern Frilled Bolero. :)
In all my happy exuberance, the suggested fabric was not readwell at all, and a very stretchy, thin knit was all cut out, marked and ready to go when I realized polyester georgette was the recommended fabric. My knit was the furthest thing from a polyester georgette as there could be and I was struck with instant paralysis at my ill-chosen fabric. *insert big sad face here* As the happy exuberance was now completely deflated, all was carefully laid aside and life went on.
Then around a month ago, the online Facebook group, Sewalongs & Sewing Contests I'm a part of, inspired me to pull out my one and only UFO (unfinished object) and see if it could be salvaged by a UFO group deadline. I missed the UFO finish date by a mile, but plugged away and now am very happy with this finished Frilled Bolero.
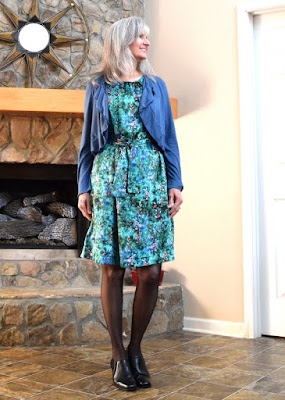
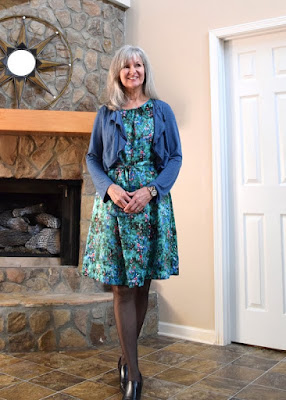
The knit behaved fairly well for being so thin and stretchy, though to be safe, I sampled e.v.e.r.y.t.h.i.n.g before applying to the 'real' fabric. Luckily I had enough fabric for all the sampling, as I used a lot before this bolero was done! Not sure why it's twisted on my arm here. It does fit fairly snug on my upper arm, so it can only be worn with a sleeveless dress. Was thrilled my Monet dress has the same color blue in its fabric, as this was not the original planned dress to be worn with this bolero.
Love the waterfall frills. Hard to see in these photos, but it is 2 layers of frills.
Even though it is Fall here (and finally starting to feel like it!), my summer dress worked well with this lightweight bolero styled with black tights and my black shoes. Not sure what to call these shoes...... boots? Anyway, surprised myself with how much I like this look!
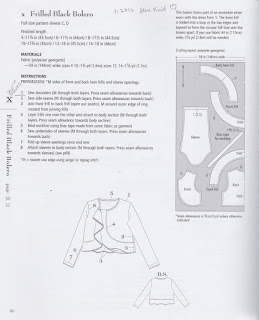
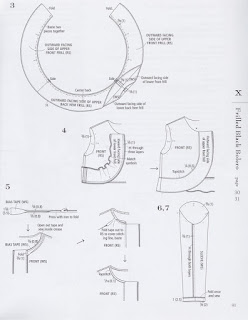
Okay, let's talk about the construction. As a person who is not a fan of sewing set-in sleeves because I can never get the sleeve cap ease just right..... after carefully reading the instructions over and over again for the umpteenth time to overcome the fact I did not read them well earlier, it dawned on me I could sew in the sleeves the flat method. I think this is what it is called. Where you sew the sleeves in right after sewing the shoulder seams, then when sewing the side seams, you sew the arm seams at the same time. And yes, it worked like a charm. I wanted to include the line drawing to the below, right, so you could see how the double frill works. It is actually a large circle, doubled back on itself.
I cut a size 8, as per my size in Tsukiori's chart, and this was fine for the knit. Sometimes with knits vs. wovens you need to adjust the sizing, but in this case all was fine. My biggest fear was stretching out during sewing and/or stretching out once it was worn so the shoulder seams and neckline was stabilized with thin strips of Heat 'n Bond Lite, a fusible tape. That, coupled with straight stitching seems to be working well. No stretch stitches were done on this knit, as I was trying to make it behave like a woven.
Back view. I was a little disappointed that the double layer of frills don't show better.
Anyway, after recently completing an Ottobre top with lots of serged rolled hem finishes, it gave me the idea to finish the edges of the frill with a serged rolled hem and it was the best choice because it gave a nice pretty finish to the frills, and kept everything all drapey and flowy. I was awfully proud of the pretty straight stitching above the frills too.
The sleeve hems were serged first to give the knit a little stability, then turned up and finished with a machine-stitched blind hem. Love it!
This photo below..... what can I say..... so proud of my work here! You have no idea how loooooong and how many samples it took for me to get this binding put on with this degree of perfection. Oh my goodness, it was a major learning curve of hours and hours of bias binding stitching to neckline samples. But I needed that experience and feel it improved my skill level in this area that was weak.
Inside out. Here you can see how I chose to finish the inside seams. This is an unlined bolero and these seams will be seen. I considered wrapping them in binding, thinking it would also stabilize the bolero, but at the same time was afraid it might alter the design and possibly stretch out the knit with so much to cover, including those lovely curves. Again, turning to my serger, using 3 threads, I set it at maybe a 1.25 length stitch.... a stitch that is very fine and close together.... and using my differential feed was able to serge all interior seams with no puckers, pulling or stretching AND I love the 'look' of the seams!
Back view.
Back view of bias binding applied to the neckline..... Yes!!!! And between stabilizing the seam before any stitching took place with the fusible Heat 'n Bond Lite, then all the straight stitching applying the binding methinks this neckline will not stretch out. Seems pretty stable now. Hope so!
As always in sewing, it's always a nice surprise to me when what I thought was a brilliant original plan, becomes something else entirely and is even maybe nicer than I'd imagined. This little frilled bolero is one of those nice 'surprises', especially paired with this particular dress that was not on my radar at all. This dress had always sort of been an orphan, with no particular cardi looking proper with it...... so now it has found a friend in the blue knit Frilled Bolero.
Happy Sewing Everyone! :)
And as it seems with most of the garments I make, there is a story to tell.
Way back in March 2016, I was thrilled to find this book, 'Stylish Party Dresses' by my one of my most favorite authors Yoshiko Tsukiori, at my local Barnes & Noble. Having already made a handful of lovely things from her other books, I knew her patterns usually fit me well and I love her style. In fact, I am wearing my Monet dress in this post from 'Stylish Dress Book' pattern a, and you can see the other items I've made from her patterns here, here, and here. About the same time I was reading this book, sweet SaSa posted about her lovely Drape Top she made from the same book and I knew I had to begin a project immediately. I chose pattern x Frilled Black Bolero. My Bolero is not black, so I am calling this pattern Frilled Bolero. :)
In all my happy exuberance, the suggested fabric was not read
Then around a month ago, the online Facebook group, Sewalongs & Sewing Contests I'm a part of, inspired me to pull out my one and only UFO (unfinished object) and see if it could be salvaged by a UFO group deadline. I missed the UFO finish date by a mile, but plugged away and now am very happy with this finished Frilled Bolero.
The knit behaved fairly well for being so thin and stretchy, though to be safe, I sampled e.v.e.r.y.t.h.i.n.g before applying to the 'real' fabric. Luckily I had enough fabric for all the sampling, as I used a lot before this bolero was done! Not sure why it's twisted on my arm here. It does fit fairly snug on my upper arm, so it can only be worn with a sleeveless dress. Was thrilled my Monet dress has the same color blue in its fabric, as this was not the original planned dress to be worn with this bolero.
Love the waterfall frills. Hard to see in these photos, but it is 2 layers of frills.
Even though it is Fall here (and finally starting to feel like it!), my summer dress worked well with this lightweight bolero styled with black tights and my black shoes. Not sure what to call these shoes...... boots? Anyway, surprised myself with how much I like this look!
Okay, let's talk about the construction. As a person who is not a fan of sewing set-in sleeves because I can never get the sleeve cap ease just right..... after carefully reading the instructions over and over again for the umpteenth time to overcome the fact I did not read them well earlier, it dawned on me I could sew in the sleeves the flat method. I think this is what it is called. Where you sew the sleeves in right after sewing the shoulder seams, then when sewing the side seams, you sew the arm seams at the same time. And yes, it worked like a charm. I wanted to include the line drawing to the below, right, so you could see how the double frill works. It is actually a large circle, doubled back on itself.
I cut a size 8, as per my size in Tsukiori's chart, and this was fine for the knit. Sometimes with knits vs. wovens you need to adjust the sizing, but in this case all was fine. My biggest fear was stretching out during sewing and/or stretching out once it was worn so the shoulder seams and neckline was stabilized with thin strips of Heat 'n Bond Lite, a fusible tape. That, coupled with straight stitching seems to be working well. No stretch stitches were done on this knit, as I was trying to make it behave like a woven.
Back view. I was a little disappointed that the double layer of frills don't show better.
Anyway, after recently completing an Ottobre top with lots of serged rolled hem finishes, it gave me the idea to finish the edges of the frill with a serged rolled hem and it was the best choice because it gave a nice pretty finish to the frills, and kept everything all drapey and flowy. I was awfully proud of the pretty straight stitching above the frills too.
The sleeve hems were serged first to give the knit a little stability, then turned up and finished with a machine-stitched blind hem. Love it!
This photo below..... what can I say..... so proud of my work here! You have no idea how loooooong and how many samples it took for me to get this binding put on with this degree of perfection. Oh my goodness, it was a major learning curve of hours and hours of bias binding stitching to neckline samples. But I needed that experience and feel it improved my skill level in this area that was weak.
Inside out. Here you can see how I chose to finish the inside seams. This is an unlined bolero and these seams will be seen. I considered wrapping them in binding, thinking it would also stabilize the bolero, but at the same time was afraid it might alter the design and possibly stretch out the knit with so much to cover, including those lovely curves. Again, turning to my serger, using 3 threads, I set it at maybe a 1.25 length stitch.... a stitch that is very fine and close together.... and using my differential feed was able to serge all interior seams with no puckers, pulling or stretching AND I love the 'look' of the seams!
Back view.
Back view of bias binding applied to the neckline..... Yes!!!! And between stabilizing the seam before any stitching took place with the fusible Heat 'n Bond Lite, then all the straight stitching applying the binding methinks this neckline will not stretch out. Seems pretty stable now. Hope so!
As always in sewing, it's always a nice surprise to me when what I thought was a brilliant original plan, becomes something else entirely and is even maybe nicer than I'd imagined. This little frilled bolero is one of those nice 'surprises', especially paired with this particular dress that was not on my radar at all. This dress had always sort of been an orphan, with no particular cardi looking proper with it...... so now it has found a friend in the blue knit Frilled Bolero.
Happy Sewing Everyone! :)
Subscribe to:
Posts (Atom)


