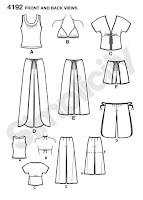
As I make exercise a priority in my life, am finding a little more motivation to 'get moving' when there's something cute to wear. This coral tank top, made from Simplicity 4192, checks all those boxes nicely for me.
Most folks, myself included, might've picked up Simplicity 4192 for the awesome pants. But look closely at the line drawing at the tank top, view A and you will see a simple, shaped tank with a little gathering detail center front and a wide neckband. In my eyes I saw a tank top with style. :)
With this top more of a cropped top version, I wanted a nice long tank to go with my exercise pants (i.e. Ottobre leggings) and/or to be tucked in to a skirt for a layered look for summer, so I lengthened the front and back pattern pieces 4 3/4". Why 4 3/4" you might ask? Because that's all the fabric I had so that helped with that decision immensely. :) My measurements fall at a size 12 bust with a size 14 hips..... but as you saw from my last NewLook/Simplicity pattern make, I made a straight size 10 and it was a perfect fit. So after dithering around for a bit, cut a size 12, sewed 5/8" seams and ended up ripping out the last 6" up from the bottom hem and regrading for a little more room there. All seams were straight stitched on my sewing machine, then serged on my serger.
The lovely gathered center front was really what drew me to this pattern. And the wide neckband. Not having coral matching thread, the neckband was double-needle stitched down with a gold rayon metallic thread. Some of my other metallic threads tend to break, but this one does not and has more of a matte sheen than a shiny sheen. I thought the gold looks nice against the coral in a subtle way.
Big tip here!!!! Before attaching the neckband to the top be sure to zigzag the raw edges closed. The pattern instructions do not have you do this step and it really should as it keeps the knit neckband edges from slipping and slidding as you pin then stretch as you sew. I do this with my quilt binding before attaching to my quilts and it certainly came in handy here. Made this step oh-so-easy and not frustrating at all. The only thing I did not do, that I will be sure to do next time, is also pull and stretch the neckband when sewing over the gathered center front. My neckband has a little bit of slack in that area and I think that would help.
The instructions have you simply turn under a 3/8" hem on the armhole edges. Believe it or not, this was a first for me so I sort of had to think about that before finishing the armholes this way. I was afraid it might give the top more of a 'homemade' look but in the end plunged forward using the double-needle with the metallic gold thread and sewing ever so slowly so as to not stretch out my cotton/spandex knit, stitched a perfect seam on both armhole edges. I had only purchased 1 yard of this cotton/spandex 60" wide fabric with 4-way stretch from my local WalMart back in 2015 and after washing/drying it had shrunk to less than 1 yard, so there was no pieces left large enough to make self-fabric binding. Am glad this armhole finish technique worked out well.
The back. For now I've left a raw edge hem a la Alabama Chanin. But am thinking I may go back and double-needle stitch a 1" hem in the gold metallic thread to tie everything together.
And these Brooks Ravenna 7 shoes, below, are what has triggered all the lovely springtime pastel makes this season! Love these shoes!
Thought I'd leave you with a shot of my front-door view this morning. After a heckuva storm that passed through the middle of the night, with a tornado warning that put us all in the basement for a bit, we awoke to a beautiful morning with bits of green popping out everywhere.
Not sure this top, nor the leggings, qualify as official 'athleticwear', but all I can say is that it is really nice to have pretty colorful garments to wear with cute, comfortable, well-fitting shoes when exercising or working out. There will definitely be more made.
Happy Sewing Everyone! :)
3.31.2017
3.29.2017
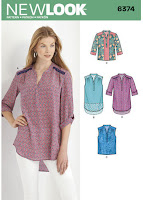
Polka Dots Tunic Top | NewLook 6374
With polka dots always on trend and navy/white a classic combination.... why in the world it's taken me so long to embrace navy and polka dots I have no idea.
Am so glad I picked up this 1/12 yards of rayon challis at Hobby Lobby recently.
Funny because I've always thought navy blue was not a good color for me. Nor polka dots. Why, I really do not know.
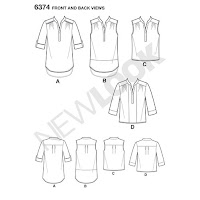
This was one of those times when I saw this fabric, I knew immediately what it would become.... NewLook Pattern 6374 tunic top. I've made this pattern twice before you can see here and here.... so there wasn't any fitting issues to worry about. Cut a size 10 with 5/8" seams and modified the length just like the others. See how long the back hangs down on the model below? Not wanting that much length..... using the length of view C I simply moved my pattern pieces up (both front and back pieces) and cut the rounded hem from that point.
And this is a perfect length for me. Interfaced the neckline and placket on this version and really like the way everything holds its shape. Also, again, sewed the placket closed @4 1/2" up as it is way, way too low otherwise.
This rayon challis drapes nicely. A little stiffer than the earlier floral challis, but that's okay as I really like the overall look. Love the rounded hem on this top.
Well guess my hair covers the back yoke with a center pleat..... but it's there.
Hemmed with a 1/4" rolled hem but this time hemmed the sleeves with a 1" hem and like this 3/4 sleeve look. None of the tops' sleeves have been finished as per pattern instructions because I really like the way the sleeves are a little flared hanging loosely down with no restriction.
Hard to see, but there are front yokes with gathered seams at the front.
And wearing those hardworking Ottobre white pants..... again! Gosh these things go with everything!! Note to self..... gotta' make more white pants. :)
Happy Sewing Everyone! :)
3.21.2017
Boxy Sweatshirt/Take 2 | Burda 02/2017 #111A Sweatshirt
When you are on a roll, why stop, right?! So I made a second version of Burda 02/2017 #111A Easy Sweatshirt. :)
Earlier this month I finished my first make of this cute pattern and immediately knew I would make another.
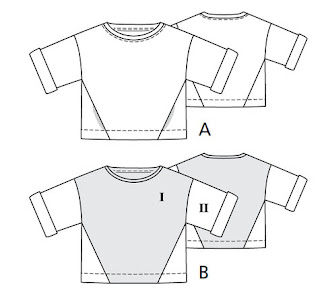
Burda 02/2017 #111A Easy Sweatshirt is an easy-to-make boxy sweatshirt with interesting diagonal design lines both front and back. The front has a hidden pocket that I eliminated on both sweatshirts as the pocket bag hung down in an unsightly way and added bulk to the front that I did not need.
I slimmed this one down a little by folding the pattern at the center front in @1" and folding the pattern at the center back fold line @1". This not only brought in the boxy width, but also narrowed the neckline.
I also wanted a seam line at the side seams, so I simply folded the triangular pattern piece in half, added my side seam allowance to the side seam edge, and cut 4 pieces. This hangs nicely with a side seam. The pink version was made with no modifications and though I like the uniqueness of no side seams, it sometimes 'rounds' around my body instead of hanging 'with' my body, if that makes sense.
I liked the top-stitching effect on the recent Burda green hoodie so much, that I top-stitched all the seams on this one. Love it! Top-stitching is such an easy little thing to do, and in a garment like this, it really adds to the look methinks. French terry fabric purchased at JoAnn's.
You can see it is still boxy, but not overly so on my body.
At first I was afraid I'd slimmed it down too much, particularly in the neckline, but believe it actually 'fits' me better in the long run.
My pink one slip-slids back and forth on me at times that is a little annoying. This one stays put.
Kinda proud of the twin needle stitching at the neckline. :) Twin needle stitched the hem also. Seams are serged. Overall another sweatshirt winner! I like these sweatshirts because they are sweatshirt comfy, but a little unique and different than just an ordinary sweatshirt.
Wearing my white Ottobre pants. Need to make another pair as am wearing these constantly. Today's photos were again taken at Lake Jocassee at Devil's Fork State Park. It was a little disappointing to see the water so low, thus the red clay peeking out in the background here. Usually this area is under water with a sliver of a sandy beach.
Love, love, love the way the mountains meet the water here. We are at the southern edge of the Appalachian Mountain Range.
Suzi and I enjoyed a little snack on the rocks before heading back.
Happy Sewing Everyone! :)
3.19.2017
Anniversary Dress |
Modified Ottobre 02/2016 no. 10 Glorious with Burdastyle 12/2016 #112 sleeves
With longstanding roots in Alabama,
and knowing our anniversary was to be spent in Florence, Alabama, this rayon challis was chosen for this special dress because the white flowers reminded me of open cotton bolls from lovely childhood memories of riding my horse around cotton fields enjoying 'Southern Snow'.
What should have been a project of pure joy, was instead a project of pure pain and frustration.
A mash-up of Ottobre 02/2016....
....no. 10 Glorious Shift Dress....
....that I've made before in linen and love to death.... I misread my own notes on the pattern and cut the back too narrow. My first mistake.
Added bell sleeves from the Burda 12/2016 #112 Bell Sleeve Dress. I did not add the lower 'bells'.
The fabric frayed with every touch. It was so sensitive, I could not even machine blind-hem stitch this dress and instead top-stitched the final hem as I was running out of time. This dress was finished in February and I'm only now writing about it because I've not been sure if it would be a wearable garment.... or not.
Fitting issues abounded as for some reason this looked like a complete tent sack on me.... without this belt. Totally did not get the armscye right when modifying Burda's sleeve pattern for the dress, but am trying to live with it.
So aggravated with the way construction was going, that I really thought this might be my first official wadder, I used cheap Wal-Mart anti-static lining fabric for the full lining..... and found it was not anti-static.... at all. Figures.
Even added 2 back vertical darts per Marjorie's suggestion and that helped a little, but not much.
My acceptance of this dress is all about the belt. During one of the almost breaking down in tears while trying the dress on to realize how awful it looked on me fittings, I grabbed a scrap of fabric and ruched it in my hands to see what a belt might do. And I liked the look..... and it was the perfect belt size. Literally a few minutes later I'd cut and sewn another same-size piece, sewn it right sides together leaving a small turning opening, turned and top-stitched closed, lightly pleated/ruched the fabric and top-stitched that down at the back where I also added 2 medium sized snaps and voila! A self-fabric ruched belt was born.
See that armscye? It just isn't right but am hoping no one will notice but me. It still feels odd too.
The dress looks fabulous with the Burda Faux Fur Jacket it was made to accompany as an ensemble.
Below, you can see I'm not wearing the belt and it just looks so 'full'. Pattern includes in-seam pockets which is nice.
And the rest of the story is that we were so busy sightseeing on our anniversary day in Florence, Alabama.... we decided we'd rather continue in that vein, than rush back to our room at The Lodge to change into dressier clothes to make our dinner reservations at an upscale restaurant in town. Later that evening, tired and in our sight-seeing clothes, we enjoyed a delicious dinner in The Lodge's restaurant.... and THAT was the perfect way to spend our special day.
So this is the anniversary dress that was not worn on our anniversary and I'm finally coming to terms with its fit after all.
Happy Sewing Everyone! :)
What should have been a project of pure joy, was instead a project of pure pain and frustration.
A mash-up of Ottobre 02/2016....
....no. 10 Glorious Shift Dress....
....that I've made before in linen and love to death.... I misread my own notes on the pattern and cut the back too narrow. My first mistake.
Added bell sleeves from the Burda 12/2016 #112 Bell Sleeve Dress. I did not add the lower 'bells'.
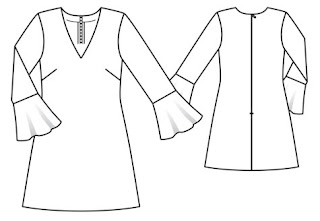 |
| Photo credit: Burdastyle.com |
Fitting issues abounded as for some reason this looked like a complete tent sack on me.... without this belt. Totally did not get the armscye right when modifying Burda's sleeve pattern for the dress, but am trying to live with it.
So aggravated with the way construction was going, that I really thought this might be my first official wadder, I used cheap Wal-Mart anti-static lining fabric for the full lining..... and found it was not anti-static.... at all. Figures.
Even added 2 back vertical darts per Marjorie's suggestion and that helped a little, but not much.
My acceptance of this dress is all about the belt. During one of the almost breaking down in tears while trying the dress on to realize how awful it looked on me fittings, I grabbed a scrap of fabric and ruched it in my hands to see what a belt might do. And I liked the look..... and it was the perfect belt size. Literally a few minutes later I'd cut and sewn another same-size piece, sewn it right sides together leaving a small turning opening, turned and top-stitched closed, lightly pleated/ruched the fabric and top-stitched that down at the back where I also added 2 medium sized snaps and voila! A self-fabric ruched belt was born.
See that armscye? It just isn't right but am hoping no one will notice but me. It still feels odd too.
The dress looks fabulous with the Burda Faux Fur Jacket it was made to accompany as an ensemble.
Below, you can see I'm not wearing the belt and it just looks so 'full'. Pattern includes in-seam pockets which is nice.
And the rest of the story is that we were so busy sightseeing on our anniversary day in Florence, Alabama.... we decided we'd rather continue in that vein, than rush back to our room at The Lodge to change into dressier clothes to make our dinner reservations at an upscale restaurant in town. Later that evening, tired and in our sight-seeing clothes, we enjoyed a delicious dinner in The Lodge's restaurant.... and THAT was the perfect way to spend our special day.
So this is the anniversary dress that was not worn on our anniversary and I'm finally coming to terms with its fit after all.
Happy Sewing Everyone! :)
Subscribe to:
Posts (Atom)


