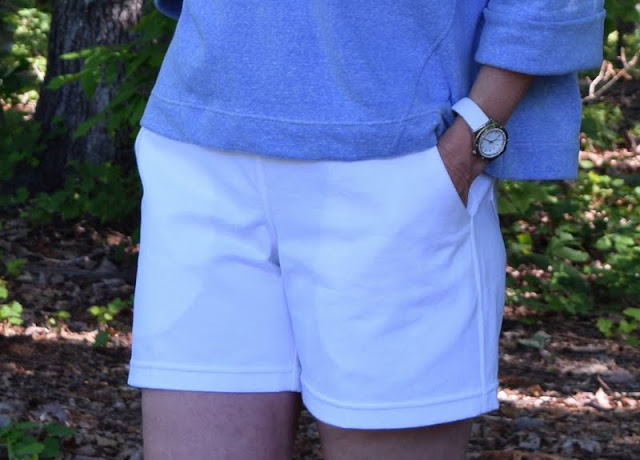
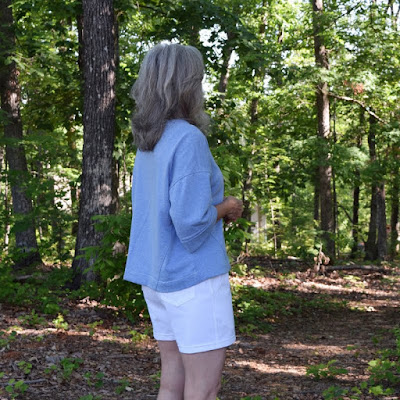
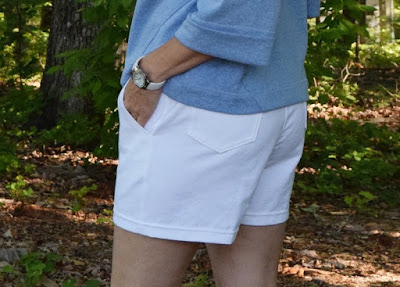
A third pair of Itch to Stitch Belize Shorts has been made. Evidently this is the Summer for Shorts. Belize Shorts.
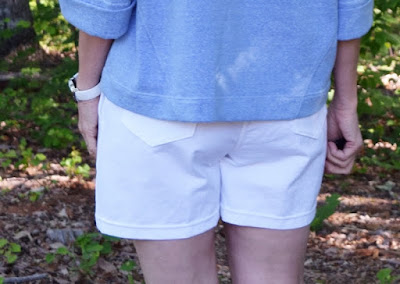
All construction info is exactly the same as pair #1 and pair #2 except back jean-style pockets were added to this pair. Love it!
Incredibly this is the first time I've ever sewn pockets to the back of a
pair of pants so it was a little of a new experience for me. Got them a
little high..... but it is good enough. Learning when 'good enough' is
'good enough'. Traced my favorite pair of rtw jeans pocket for this
pattern. My cell phone fits perfectly. Win! :)
Always interesting to see how different patterns look when made in different fabrics. My previous 2 pairs were made of a quilting cotton weight fabric, whereas this cotton twill is a sturdier, heavier weight, so these shorts look a little stiffer and more structured. I like it.
White brushed twill cotton fabric came from my local Wal-Mart, and was surprised that the pockets can be seen through the fabric. Not gonna' let that bother me, as this pair is so comfy and they are white! And white will go with e-v-e-r-y-t-h-i-n-g this summer! Kept this photo a little darker so the pocket bags could be seen a little clearer.
Why is it that there's something extra comfy about wearing a sweatshirt with a pair of shorts on a chilly Summertime morning. Today's temps will be soaring by noon, but right now this is a perfect outfit for a chilly morning. This is the Burdastyle 02/2017 #111A Sweatshirt.
Pattern info:
Itch to Stitch Belize Shorts/Skort Pattern
Happy Sewing Everyone! :)
5.17.2017
5.15.2017
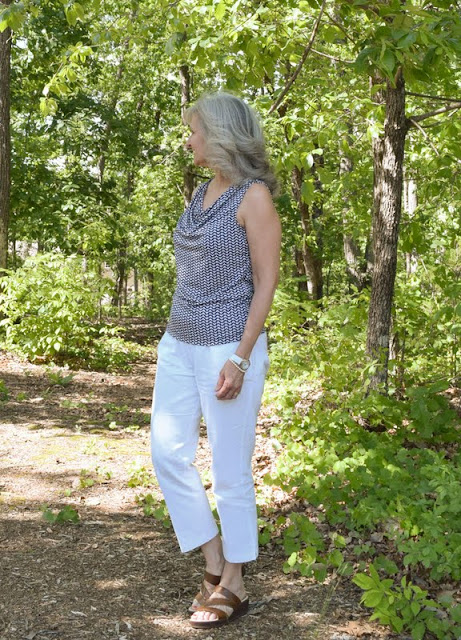
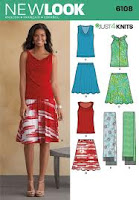
a sleeveless cowl summer top | NewLook Patterns 6108
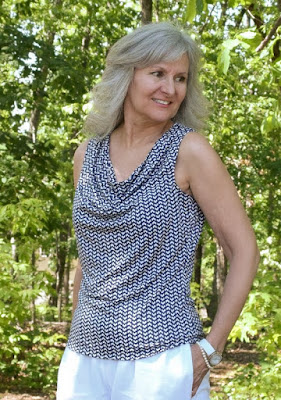
With a hot, humid Summer on the horizon, a sleeveless top always suits. Particularly a sleeveless cowl top that has an easy-going, easy-wearing, yet classic look that can be dressed up or down.
This top works well worn with the hardworking white Ottobre pants, as I did this hot day.....
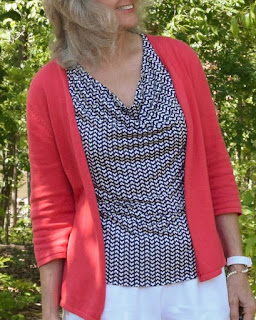
....or layered with a jacket or cardi. On our 90+ degree F days, it's nice to have a lightweight cardi to guard against the freezing air conditioning.
This particular top was made specifically to go with the recently made Megan Nielsen Axel Skirt I blogged about here. After making this super cute form-fitting skirt, there was nary a top in my closet that would well with the skirt. Wanting to honor the skirt, realized I had enough material left over to make a top and one thing led to another upon deciding this sleeveless cowl top might work. And it works perfectly all nice and tucked in and gives this ensemble of separates more of a one-piece 'dress' look.
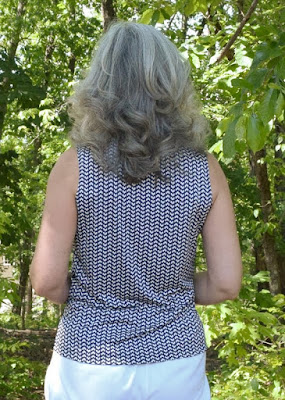
When I first made this top in 2013, I cut a size 8 and sewed a 1/4"/serged seam.... so that's what I did here too..... because I had actually cut the pattern sheet, something I rarely do now. What's curious to me, is that I never would've cut an 8 today as according to the pattern envelope's measurements I should be wearing a size 12 sewing a 5/8" seam. Yet this top fits perfectly. Anything larger would be too large and not give me this type of 'fit'. So sometimes not knowing what you are doing is a good thing?! :) By the way, all that draping down at the back waist does not bother me a bit. Probably need a sway back adjustment, but this is a little fun top that was a quick and simple make. Didn't want to make a mountain out of a mole hill with this project. This project takes about an afternoon or two.
NewLook Pattern 6108 has a couple of different top variations. I made View C. Thinking I might make view A for this summer too.
Front - right side out
Front - inside out to show the panel that makes the cowl
A couple of things I did differently than the pattern instructed.... this pattern does not have you understitch the panel that lines the front that finishes off the cowl.... not sure why, as that seems a critical step that helps the cowl lay inward, so of course I had to do that.
I also stabilized the back neckline with a strip of binding as I do not want this neckline to stretch out. Also it sort of finishes everything off nice and neat on the inside. Seams are stitched then serged.
Armholes and bottom hem are simply turned under and zig-zagged. Hobby Lobby fabric.
I can see this top being in strong rotation in the wardrobe this summer.
Happy Sewing Everyone! :)
This top works well worn with the hardworking white Ottobre pants, as I did this hot day.....
....or layered with a jacket or cardi. On our 90+ degree F days, it's nice to have a lightweight cardi to guard against the freezing air conditioning.
This particular top was made specifically to go with the recently made Megan Nielsen Axel Skirt I blogged about here. After making this super cute form-fitting skirt, there was nary a top in my closet that would well with the skirt. Wanting to honor the skirt, realized I had enough material left over to make a top and one thing led to another upon deciding this sleeveless cowl top might work. And it works perfectly all nice and tucked in and gives this ensemble of separates more of a one-piece 'dress' look.
When I first made this top in 2013, I cut a size 8 and sewed a 1/4"/serged seam.... so that's what I did here too..... because I had actually cut the pattern sheet, something I rarely do now. What's curious to me, is that I never would've cut an 8 today as according to the pattern envelope's measurements I should be wearing a size 12 sewing a 5/8" seam. Yet this top fits perfectly. Anything larger would be too large and not give me this type of 'fit'. So sometimes not knowing what you are doing is a good thing?! :) By the way, all that draping down at the back waist does not bother me a bit. Probably need a sway back adjustment, but this is a little fun top that was a quick and simple make. Didn't want to make a mountain out of a mole hill with this project. This project takes about an afternoon or two.
NewLook Pattern 6108 has a couple of different top variations. I made View C. Thinking I might make view A for this summer too.
Front - right side out
Front - inside out to show the panel that makes the cowl
A couple of things I did differently than the pattern instructed.... this pattern does not have you understitch the panel that lines the front that finishes off the cowl.... not sure why, as that seems a critical step that helps the cowl lay inward, so of course I had to do that.
I also stabilized the back neckline with a strip of binding as I do not want this neckline to stretch out. Also it sort of finishes everything off nice and neat on the inside. Seams are stitched then serged.
Armholes and bottom hem are simply turned under and zig-zagged. Hobby Lobby fabric.
I can see this top being in strong rotation in the wardrobe this summer.
5.11.2017
Australia meets South Carolina | Megan Nielsen Patterns / Axel Skirt
Megan Nielsen's lovely pattern Axel Skirt has been made. A skirt style that at first gave me pause, but absolutely love and adore now that it is all finished and time to be worn!
One of the things I love most about blogging in our lovely sewing community, is that it connects us to wonderful people all over the world. I have been blessed with a sweet friendship that began over a Cadbury Vegemite Chocolate Bar with the ever lovely Carolyn who sews the most beautiful clothes at Handmade by Carolyn.
Recently she sent me this lovely pattern...... along with a box of wonderful Australian goodies.....but those will be things to show another day, as today it's all about the super cute Axel.
Megan Nielsen is an Australian designer and this is the first pattern of hers I've made. You can see more about this pattern at her website here. There are three versions of this cute skirt, and I chose the one on the very far left, Version 2. What I found most interesting about this pattern, is that it's built on negative ease and the waistband has nary a piece of elastic nor zipper. It's all about the knit fabric holding everything up and all together. I had a piece of Hobby Lobby knit originally planned as a drapey top, but thought it'd make a great Axel skirt. And I think it did. Wanting to stay true to the pattern, I made it as instructed, with the exception that I had to narrow the side seams to 1/4" from hip down as I felt it was too tight. Then afraid my drapey spandexy knit might be too clingy and curve-showing, I lined mine with a poly interlock purchased from my local Wal-Mart. I cut a Small.
Wanting to work with my fabric in a different way, thought it might be interesting to cut the front panels on the bias and make chevrons down the front and feel that was sort of achieved. Good enough anyway! This was slippery, slidey, slinky knit fabric and at one point I even used my clunky Bernina Walking Foot. That helped until dealing with the narrow seams. The hem is simply turned under and zig-zagged.
After the skirt was made and I was trying to figure out what to wear with it, felt that a form fitting top, like the NewLook Pattern 6108 might work. I've made this top before and love the way the knit bodice hugs the body with the graceful drapey cowl. Sort of makes this ensemble look more like a dress, than separates. You can read about this cute top's info here.
I like wearing the tie more to the side than straight down the front.
This is a super form fitting outfit for me, so thought it might be fun to accentuate the sporty look with a pair of white Keds and felt right at home and at ease at the Lake this morning.
Did I mention that it is form-fitting?! This outfit will encourage me to continue exercising and eating right!
And here's how I began this day. The coral thrifted cardi complements the blue/white nicely.
And a big Thank You to my daughter who spent the morning at Lake Jocassee with me helping me with pictures. Oh we had such fun! Even surrounded by *gasp* people! To get these nice water with distant Appalachian Mountain views, we had to position the camera right by the canoe/kayak putting in point..... and you would not believe how many people needed to put in and/or take out right when we spent all of 15 minutes standing here taking pictures! Ordinarily it would've been too much for me, but Melissa helped me relax, laugh and have fun. We had a snack at the picnic tables before heading home.
Thank You ever so much sweet Carolyn for your long-distance friendship! You mean ever so much to me. xx :) You can see Carolyn's gorgeous Axel Skirt she made out of pleather here.
Happy Sewing Everyone! :)
5.03.2017
Burda 10/2016 no. 101 Knotted Top + Birthday Fabric Itch to Stitch Belize Shorts
A new top. With a knot. :)
I've been subscribing to the English International Version of Burda now for about a year, and find there's something in every issue I want to make. October 2016's issue was chockfull of pieces but there was something about this Knotted Top that drew me in. It looked like it would be a fun, yet practical top to wear. And it is.
Looks like Suzi has had enough of the photo shoot, so let's talk more about this pattern.
If you don't have access to the magazine, that's okay because all the patterns are listed at the www.burdastyle.com website. I love this site! As I am making more Burda patterns, I have become more active at this website and enjoy the interaction with the other lovely talented ladies there. In fact, Elpida and Ellen's versions of this top convinced me to make this 'now' than 'later'. Hmmm, looking at their cute tops as I insert these links it seems their knit fabrics must've been a little thicker and less stretchy than mine as their 'knots' aren't hanging down as far as mine is. Oh well. Anyway, you can view all the specs, and even purchase this pattern here.
Usually I cut a 38 in Burda, but after tracing a 38 and pondering the size.... ended up re-tracing a 36 then folded the center front in @1/2" tapered to nothing, (which took out a total of @1+" across the front neckline) and folded the center back in 5/8" tapered to nothing before placing on fold. By doing this, it pulled the sleeves/shoulder area up so it does not feel like it is constantly falling off. I believe this is one of the reasons this top is so successful for me as the neckline is p-e-r-f-e-c-t. It does not slip slide around or gap when I bend over.
Can't remember now, but think I bought this soft, drapey Made in the U.S.A. knit fabric at my local Wal-Mart for something like $1/yard. Top takes around 2 yards. This fabric is so stretchy I knew it would make a comfortable top, but at the same time was fearful it would stretch out over time as some of my other soft, stretchy tops have done because I did not take the time to stabilize their seams. So every seam on this top was carefully evaluated as to how they could be constructed to help stabilize my stretchy knit. I want to be able to wear this top again and again!
The shoulder seams were stabilized with an iron-on fusible, but I did not think that would be enough, so I cut 1 1/4" strip of a coordinating non-stretch polyester from the stash that just happened to be the perfect color match to my knit, and sewed an enclosed bound seam there. About this time, Sue made a very sweet remark on IG about how neat I make the insides of my garments....... so the pressure was really on to reach that benchmark of a kind compliment! (Thank you Sue!) So all interior seams are french-seamed... and you know what..... double seaming each seam in a french seam, also super stabilized those seams! Double win!! You can see the arm seam and side seam below. Even though this knit fabric was stretchy, it was fairly easy to sew.
Almost forgot to show you a close-up of the neckline! This was taken with my iphone and the color is not accurate at all..... but you can see a little of what I've done here. First.... I wanted it nice and neat and really thought about how to get a really great finish, so here's what I came up with. I cut a strip of fabric 2 1/8" wide by 22" long (measured the circumference of my neckline, subtracted 15% then added 1/4" and another 1/4" for seam allowances. Neckline measured 25" - 15% = 21 1/4" + 1/4" + 1/4" = close enough to 22"!) and stitched right side of binding to wrong side of top 3/8" from edge. Burda has you cut the 3/8" neckline seam allowance off, but I did not want my top to be too low). Folded strip over, turned raw edge under then top-stitched from right side. Still wanting to be sure all was stabilized..... made a strip of binding out of the matching woven polyester and twin-needle stitched it to the back. This neckline is not going to budge!! And I love the finish.... both inside and out!!
This is a dropped shoulder and I really like the sleeves pushed up like this. Sewed a 1 5/8" sleeve hem with a small zig-zag stitch.
And in all these photos you've seen so far, the top is worn with a new pair of Itch to Stitch Belize Shorts. I've tweaked the pattern a little more and feel I've got an even better fit with this pair. My daughter gave me this yummy fabric for my birthday and told me she envisioned it as a pair of shorts for me. She gave me 4 yards. :)
This top was actually made to be worn with my first pair of Belize Shorts, shown below. You can find the informational post written here.
Such a versatile top it was worn on Day 4 during Me-Made-May 2017 with the Ottobre Design Woman 05/2016 no. 7 Miniskirt.
And my sweet companion wanted to show you her new trick, but I couldn't seem to trigger the camera fast enough. We'll try again next time.
This also completes the "Sew Anything April" Make a Garment a Month Challenge. Thank you Sarah Liz, our lovely Administrator, for organizing this group. If you might be interested to join and sew-along, you can contact Sarah Liz through herSarahLizSewStyle blog or at her IG address as I think the group will be moving to Instagram soon.
Me-Made-May 2017 is in full swing over at Instagram. Check out what folks are wearing at the hashtag #mmmay17. And you can always find me at LisasCarolina.
Happy Sewing Everyone! :)
I've been subscribing to the English International Version of Burda now for about a year, and find there's something in every issue I want to make. October 2016's issue was chockfull of pieces but there was something about this Knotted Top that drew me in. It looked like it would be a fun, yet practical top to wear. And it is.
Looks like Suzi has had enough of the photo shoot, so let's talk more about this pattern.
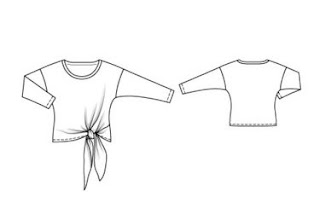 |
| Photo Credit: Burdastyle.com |
Can't remember now, but think I bought this soft, drapey Made in the U.S.A. knit fabric at my local Wal-Mart for something like $1/yard. Top takes around 2 yards. This fabric is so stretchy I knew it would make a comfortable top, but at the same time was fearful it would stretch out over time as some of my other soft, stretchy tops have done because I did not take the time to stabilize their seams. So every seam on this top was carefully evaluated as to how they could be constructed to help stabilize my stretchy knit. I want to be able to wear this top again and again!
The shoulder seams were stabilized with an iron-on fusible, but I did not think that would be enough, so I cut 1 1/4" strip of a coordinating non-stretch polyester from the stash that just happened to be the perfect color match to my knit, and sewed an enclosed bound seam there. About this time, Sue made a very sweet remark on IG about how neat I make the insides of my garments....... so the pressure was really on to reach that benchmark of a kind compliment! (Thank you Sue!) So all interior seams are french-seamed... and you know what..... double seaming each seam in a french seam, also super stabilized those seams! Double win!! You can see the arm seam and side seam below. Even though this knit fabric was stretchy, it was fairly easy to sew.
Almost forgot to show you a close-up of the neckline! This was taken with my iphone and the color is not accurate at all..... but you can see a little of what I've done here. First.... I wanted it nice and neat and really thought about how to get a really great finish, so here's what I came up with. I cut a strip of fabric 2 1/8" wide by 22" long (measured the circumference of my neckline, subtracted 15% then added 1/4" and another 1/4" for seam allowances. Neckline measured 25" - 15% = 21 1/4" + 1/4" + 1/4" = close enough to 22"!) and stitched right side of binding to wrong side of top 3/8" from edge. Burda has you cut the 3/8" neckline seam allowance off, but I did not want my top to be too low). Folded strip over, turned raw edge under then top-stitched from right side. Still wanting to be sure all was stabilized..... made a strip of binding out of the matching woven polyester and twin-needle stitched it to the back. This neckline is not going to budge!! And I love the finish.... both inside and out!!
This is a dropped shoulder and I really like the sleeves pushed up like this. Sewed a 1 5/8" sleeve hem with a small zig-zag stitch.
And in all these photos you've seen so far, the top is worn with a new pair of Itch to Stitch Belize Shorts. I've tweaked the pattern a little more and feel I've got an even better fit with this pair. My daughter gave me this yummy fabric for my birthday and told me she envisioned it as a pair of shorts for me. She gave me 4 yards. :)
This top was actually made to be worn with my first pair of Belize Shorts, shown below. You can find the informational post written here.
Such a versatile top it was worn on Day 4 during Me-Made-May 2017 with the Ottobre Design Woman 05/2016 no. 7 Miniskirt.
And my sweet companion wanted to show you her new trick, but I couldn't seem to trigger the camera fast enough. We'll try again next time.
This also completes the "Sew Anything April" Make a Garment a Month Challenge. Thank you Sarah Liz, our lovely Administrator, for organizing this group. If you might be interested to join and sew-along, you can contact Sarah Liz through herSarahLizSewStyle blog or at her IG address as I think the group will be moving to Instagram soon.
Me-Made-May 2017 is in full swing over at Instagram. Check out what folks are wearing at the hashtag #mmmay17. And you can always find me at LisasCarolina.
Happy Sewing Everyone! :)
Subscribe to:
Posts (Atom)

