Having wanted a new white top for what seems like aaaaages, it may be the end of summer but am loving this one to pieces!
A simple little thing really, but checks off all the boxes of a classic top to me.
Before we talk patterns and fabric, first let me share the story behind
this cute top, as every handmade garment seems to have a story to tell. The Upstate South Carolina county where I live, has a lot of needs. A
few years ago a group of Christians felt led to form a non-profit
faith-based group called The Dream Center
to do something to help the homeless by giving them a 'hand-up', not a
'hand-out'. Their methods have shown success, and they have recently
built a small subdivision of tiny houses called Opportunity Village
where the homeless, and people in need, can live while they take
classes to learn necessary 'life' skills, find employment and get on their feet. They
are funded by donations and their Resale Centers, i.e. thrift stores, one of which opened up in my little town recently. A few weeks ago I
decided to stop in and check it out..... and boy am I glad I did!
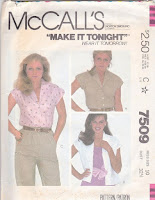
You know how there are great thrift stores, and not-so-great thrift stores? This is a good one and I lucked out and found the vintage pattern McCall's 7509 in my size for all of 10 cents! Thrill! For 10 cents I did not take the time to check out the pattern tissue until I got home, and incredibly all the pieces were there and in great condition. Someone had already carefully cut them out, so this top swept to the top of the queue and was started that very same day. Not sure about the 'Make it Tonight, Wear it Tomorrow' slogan there, but it was done in a couple of days which is pretty quick for me. I made a size 10 with no modifications other than sewing 3/8" seam allowances at the side seams. As a note... the markings were made with tracing wheel and yellow marking paper which did leave marking lines on the fabric that thankfully all washed out. As soon as I finished the top it went in the washing machine and I held my breath!
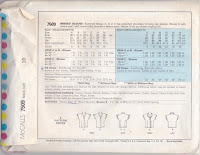
Here's a better view of the line drawings. The description reads "Buttoned blouse A, B or C has extended shoulders forming cap sleeves. Blouse with revers and C with shawl collar have slit in sleeve seam." Oooookay, what in the world is 'revers'? Thinking it was some sort of typo it was interesting to learn Google defines it as meaning 'the turned back edge of a garment revealing the undersurface, especially at the lapel'. Initially cut out View B with the revers collar and no slits in the sleeve seams, then changed my mind and found it ever so easy to cut out the shawl collar from view c. The 2 front and back darts are optional, but that was a big draw for me. My waist is small and these darts help tremendously with a good fit for me.
With a 1981 copyright date, it reminded me of some favorite tops I wore back then. At the same time it also gave me pause because I didn't want to wear a top
that looked 'dated'. In the end decided it had a classic vibe and was
delighted to find it made up as such.
Wearing it untucked here to show you how the top lays and found I really like wearing it this way! Love those front and back darts! When I make this again am thinking to add a small slit at the bottom of the side seams.
This collar is a great collar. It is a flattering design and lays not too high, nor too low.
The pearl buttons came from the stash and it wasn't until I was searching through the mountains of buttons I've inherited from my mother and grandmothers that I realized this is the first garment I've ever made that incorporated buttons and buttonholes. This shirt requires four 3/8" buttons and can you believe there was nary a flat white or clear 3/8" button to be found. I wanted a casual look and initially was afraid the pearl buttons would be too 'dressy' but now think there are perfectly perfect. Love 'em! Interior seams are serged.
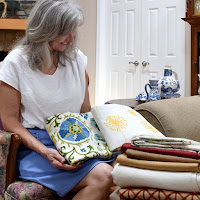
The fabric was purchased in June 2017 when I was on a mission to sew all new white tops for summer (of which I am woefully behind!) and purchased 4 different white fabrics from JoAnn's. All were different blends and all were white and I fretted about remembering which was which, so when I took my perfunctory photo of the end of bolts for future reference, I carefully stacked the white fabric cuts in the same order. These quick photos of the bolt ends have come in so handy to refer back to of fabric content and care.
Ummmm, like in this case I remembered this was White Chambray so in my mind, as I was sewing it up, I thought I would be wearing 100% cotton. It wasn't until I was really 'feeling' the fiber of the fabric and had worn the top for the first time I thought this does not 'feel' like cotton. When I looked back at my photo, which I've isolated the bolt end here below, I realized it wasn't cotton at all. It was 100% Lyocell. Whuuuttt??!!! Another new word! Simplifi Fabric defines Lyocell as 'eco-friendly', 'from nature to your closet', 'a natural man-made fiber from wood pulp'. I'm wearing wood pulp?! Oookay. Reading on.... Lyocell is more moisture absorbent than cotton, has natural breathability, is 100% biodegradeable with beautiful drape and great for sensitive skin. The drape was what drew me to this fabric. Wikipedia has a more technical description if you are interested in more info. It is also known as Tencel. After learning about Lyocell I am amazed it's not more widely available, or known, here. This was a big first for me. Anyway, I probably had some sort of coupon and paid less than $12.99/yard but it is still available at JoAnn's and on sale for $6.49/yard and you can see it here. This top takes @1 3/8 yards.
One more thought about this vintage pattern.... it was nice only dealing with the one-size printed tissue pattern with well written instructions in large step-by-step order. Overall, thoroughly enjoyed the process of making this top and it has triggered an interest in vintage patterns, as I've not sewn from them before. Wearing it with the floral linen Belize shorts.
Also wanted to show how nice it looks all tucked in with the Alabama Chanin modified 6-panel skirt. The top's front and back darts line up nicely with the skirt's front and back panel seams, as well as helps keep everything nice and neat and tucked in and not all blousy at the waistline. The only drawback to wearing it tucked in is the bottom pearl button sometimes shows through if the skirt is more fitted there. This skirt works fine.
Today was the Solar Eclipse event day. We were located in the 'totality' path, so it was interesting to see the gorgeous blue sky this morning......
.......turn to dark for a couple of minutes this afternoon as the Moon blocked the Sun's rays in full. My daughter, Melissa, and I enjoyed the moment together at the top of one of our deck stairwells where she snapped this photo of our automatic lights that came on in the darkness. We've had such a flock of visitors to our area for this event it has caused gas shortages and certain food product shortages, like bread, in our grocery stores. Hotels have been sold out for weeks, schools and lots of businesses were closed. Am so thankful to have experienced this once-in-a-lifetime event with my sweet daughter.
Happy Sewing Everyone! :)
8.21.2017
8.09.2017
Dandelion | Lotta Jansdotter Pilvi Coat
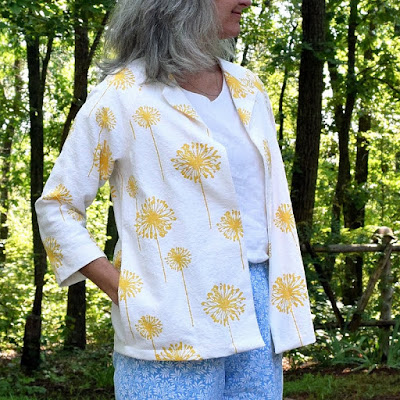
Ever since this Dandelion fabric was brought home, all the other projects in the queue have been pushed aside to make a new unlined jacket.... even though summertime temps are in the 90s F. I'm so glad I did! I love it!
There's something about a dandelion in its full seed state that captures one's imagination in the same manner my lovely fabric captured mine.
You may remember the Dandelion fabric purchased a few months ago from All About Fabrics, a fabric textile outlet in Williamston, South Carolina. All About Fabrics only sells to the general public 3 days each month at their store, but I found the very same Dandelion print fabric online at Fabric.com and they have plenty in stock. Hmmm, their care instructions says 'air dry only'.... I've already washed mine in cold water in the washing machine and dried in the dryer and all turned out well.
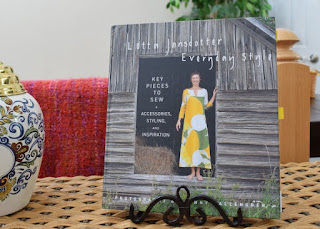
When I first saw this corn yellow dandelion screen print on cotton slub duck, I immediately knew it would be a Pilvi Jacket from the book Lotta Jansdotter Everyday Style. If you click on the book's link, it takes you to Lotta Jansdotter's website where you can see photos of the jacket and her other designs.
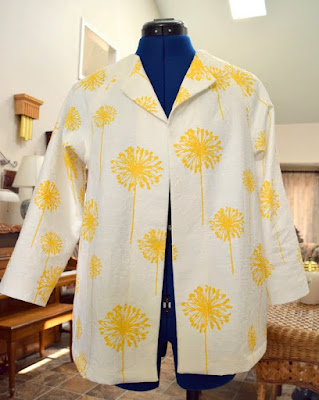
Such a cute jacket! The Pilvi is a raglan sleeve unlined jacket in either a short jacket version or a long jacket version. I tacked the top corners down to give it a 'collar' look.
I wanted a car coat length that was somewhere in between the short and long version..... so that's what I made. Used about 1 1/3 yards of 54" wide fabric. Hardly any scraps left over at all. :)
My measurements were a solid Small at the time, so that's what I sewed with no fitting modifications. In hindsight, I sort of wish I'd cut an X-Small in the bust and waist grading to a Small at the hips. Anyway, a boxy jacket with the option of sewing down the top two front corners of the jacket into a sort of 'collar point'. Which is what I did. 1/2" seam allowances are included in the pattern. Nice!!! She also has you top-stitch all the facings down which I also like.
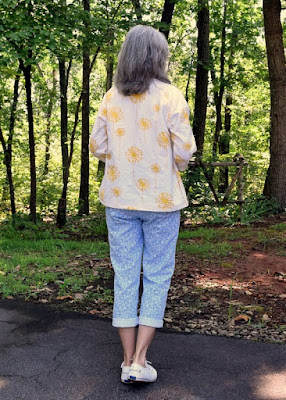
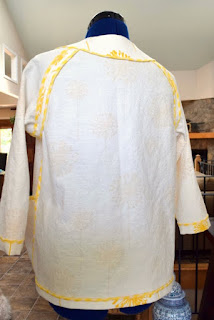
Definitely see the boxy shape in the back. I really like the 3/4 length sleeves. A lot!
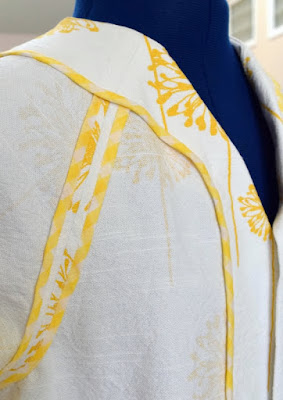
I also top-stitched the raglan sleeve seams.
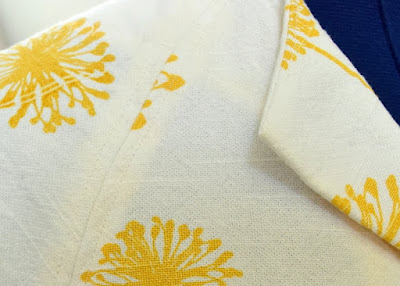
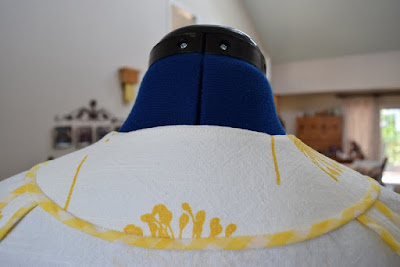
Just so hard to see the white on white. She does not have you understitch the neckline facing, but I did, as you can see a little of the seam here. That's just one of those things you really might want to do regardless of what the pattern instructs. The neckline 'collar' is tacked down with white button craft thread that totally blends in with the fabric and I like this so much more than using a 'button' or some sort of ornament. Think it makes my jacket look like a sort of 'collared' jacket, without the collar.
When making an easy project, like this one, I like to work on skill sets that may be new to me..... so this project was all about hong kong seams and enclosed seams using a piece of yellow gingham that had been in the stash for as long as I can remember.
Don't you just love the yellow gingham against the yellow dandelions?!
This jacket was an utter joy to make!
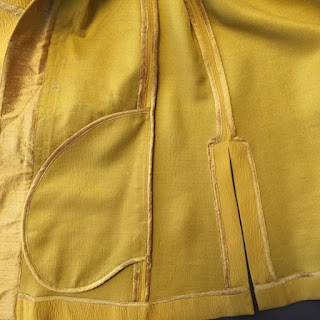
With the exception of how to enclose the pockets with hong kong seams. That was a head-scratcher for me and I simply could not figure out the mechanics at all. A quick Google search turned up a photo of the inside seams of the gorgeous Vogue 1493 Koos van den Akker Kimono Jacket .....
......and this beautiful shot from Meg Carter, of McCall Pattern Company, personal make of the same Vogue 1493 kimono jacket. You can purchase this lovely pattern here, and it sounds like it includes instructions for hong kong seam binding the interior including the pockets.
All the other instructions turning up in my Google search were written in Russian and linked to Russian sites and I get really nervous clicking on those...... sooooooo I sent an e-mail off to my sweet friend Carolyn, who blogs at Handmade by Carolyn, knowing she could help me move forward with my project. And she did. She sent me a link to her Trench Skirt post (interior photo below) and told me to treat the pocket's side seam, and pocket bag, like it was being serged and use an enclosed seam binding technique instead of hong kong seam. Click on her link to see the finished pretty skirt. :)
So that's what I did.
Trying to show a little mini-tutorial of what I did.... I serged the front pocket bag to the front side seam, then hong kong seamed the back pocket bag to the back side seam. This is because the 'back' of the pocket bag side seam is what will show when completed and I wanted to reduce bulk. This is the point I'm at in the photo below. Pin everything together and sew an enclosed seam binding beginning at the jacket's sleeve edge, around the raglan sleeve seams all the way down and around the pocket bag in one fell swoop.
Pin carefully around the pocket bag but you can do it.
You can see a little crease at the top of the bend of the pocket bag. I treated this turn sort of like I would treat the edge of binding a quilt. It's funny how the two crafts overlap sometimes. ;)
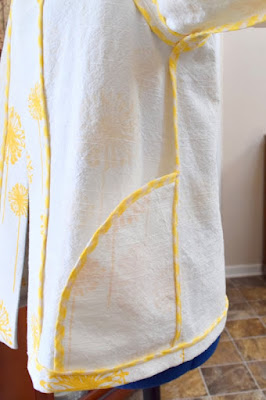
I also used a smaller pocket bag pattern that would fit my car coat length better. Lotta Jansdotter's pocket pattern is huge and would make fantastic pockets in the long coat version but would've overwhelmed my little coat. Also note how I tucked the bottom of the pocket in the hem. Thought this would anchor everything well.... and it does.... sort of. The pockets flap a little more than I prefer so am considering going back and top-stitching them down.
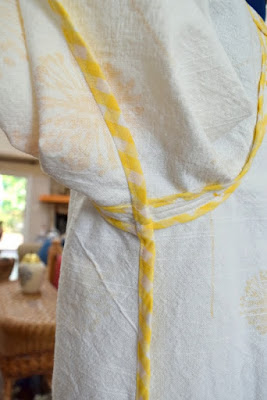
Really like the neatness of the underarm area. Top-stitching the raglan sleeve hong kong seams down was huge in adding to the neatness here.
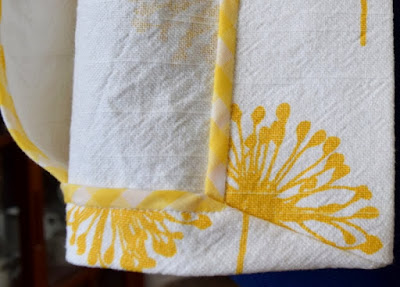
The jacket's instructions have you sort of turn up the jacket's bottom corner and I just really did not like the way that looked on my jacket. So after fooling around with it for a bit, came up with a mitered corner application that methinks looks quite nice and neat. Even was able to match up the hong kong seams here!
Something about working with such a 'happy' fabric and learning new skills combined to make a perfectly enjoyable project.
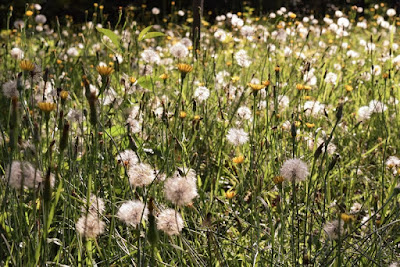
Couldn't help snapping this photo of one of our fields we'd neglected to mow where the dandelions have completely taken over!
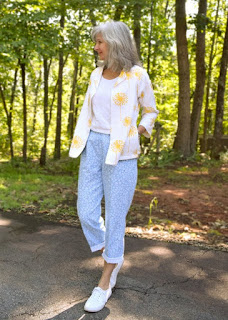
I'm wearing the Ottobre no. 10 Sculpture white linen top and the Ottobre no. 14 Loose-fit pants with the new jacket today.
Happy Sewing Everyone! :)
There's something about a dandelion in its full seed state that captures one's imagination in the same manner my lovely fabric captured mine.
You may remember the Dandelion fabric purchased a few months ago from All About Fabrics, a fabric textile outlet in Williamston, South Carolina. All About Fabrics only sells to the general public 3 days each month at their store, but I found the very same Dandelion print fabric online at Fabric.com and they have plenty in stock. Hmmm, their care instructions says 'air dry only'.... I've already washed mine in cold water in the washing machine and dried in the dryer and all turned out well.
When I first saw this corn yellow dandelion screen print on cotton slub duck, I immediately knew it would be a Pilvi Jacket from the book Lotta Jansdotter Everyday Style. If you click on the book's link, it takes you to Lotta Jansdotter's website where you can see photos of the jacket and her other designs.
Such a cute jacket! The Pilvi is a raglan sleeve unlined jacket in either a short jacket version or a long jacket version. I tacked the top corners down to give it a 'collar' look.
I wanted a car coat length that was somewhere in between the short and long version..... so that's what I made. Used about 1 1/3 yards of 54" wide fabric. Hardly any scraps left over at all. :)
My measurements were a solid Small at the time, so that's what I sewed with no fitting modifications. In hindsight, I sort of wish I'd cut an X-Small in the bust and waist grading to a Small at the hips. Anyway, a boxy jacket with the option of sewing down the top two front corners of the jacket into a sort of 'collar point'. Which is what I did. 1/2" seam allowances are included in the pattern. Nice!!! She also has you top-stitch all the facings down which I also like.
Definitely see the boxy shape in the back. I really like the 3/4 length sleeves. A lot!
I also top-stitched the raglan sleeve seams.
Just so hard to see the white on white. She does not have you understitch the neckline facing, but I did, as you can see a little of the seam here. That's just one of those things you really might want to do regardless of what the pattern instructs. The neckline 'collar' is tacked down with white button craft thread that totally blends in with the fabric and I like this so much more than using a 'button' or some sort of ornament. Think it makes my jacket look like a sort of 'collared' jacket, without the collar.
When making an easy project, like this one, I like to work on skill sets that may be new to me..... so this project was all about hong kong seams and enclosed seams using a piece of yellow gingham that had been in the stash for as long as I can remember.
Don't you just love the yellow gingham against the yellow dandelions?!
This jacket was an utter joy to make!
With the exception of how to enclose the pockets with hong kong seams. That was a head-scratcher for me and I simply could not figure out the mechanics at all. A quick Google search turned up a photo of the inside seams of the gorgeous Vogue 1493 Koos van den Akker Kimono Jacket .....
 |
| Photo Credit: Vogue 1493 |
 |
| Photo Credit: Vogue 1493 |
| Photo Credit: Handmade by Carolyn Trench Skirt <3 |
Trying to show a little mini-tutorial of what I did.... I serged the front pocket bag to the front side seam, then hong kong seamed the back pocket bag to the back side seam. This is because the 'back' of the pocket bag side seam is what will show when completed and I wanted to reduce bulk. This is the point I'm at in the photo below. Pin everything together and sew an enclosed seam binding beginning at the jacket's sleeve edge, around the raglan sleeve seams all the way down and around the pocket bag in one fell swoop.
Pin carefully around the pocket bag but you can do it.
You can see a little crease at the top of the bend of the pocket bag. I treated this turn sort of like I would treat the edge of binding a quilt. It's funny how the two crafts overlap sometimes. ;)
I also used a smaller pocket bag pattern that would fit my car coat length better. Lotta Jansdotter's pocket pattern is huge and would make fantastic pockets in the long coat version but would've overwhelmed my little coat. Also note how I tucked the bottom of the pocket in the hem. Thought this would anchor everything well.... and it does.... sort of. The pockets flap a little more than I prefer so am considering going back and top-stitching them down.
Really like the neatness of the underarm area. Top-stitching the raglan sleeve hong kong seams down was huge in adding to the neatness here.
The jacket's instructions have you sort of turn up the jacket's bottom corner and I just really did not like the way that looked on my jacket. So after fooling around with it for a bit, came up with a mitered corner application that methinks looks quite nice and neat. Even was able to match up the hong kong seams here!
Something about working with such a 'happy' fabric and learning new skills combined to make a perfectly enjoyable project.
Couldn't help snapping this photo of one of our fields we'd neglected to mow where the dandelions have completely taken over!
I'm wearing the Ottobre no. 10 Sculpture white linen top and the Ottobre no. 14 Loose-fit pants with the new jacket today.
Happy Sewing Everyone! :)
Subscribe to:
Posts (Atom)

