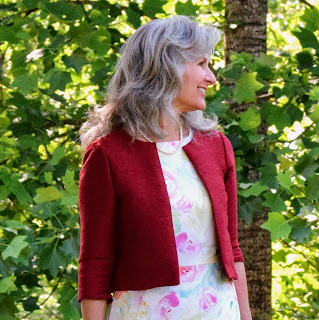
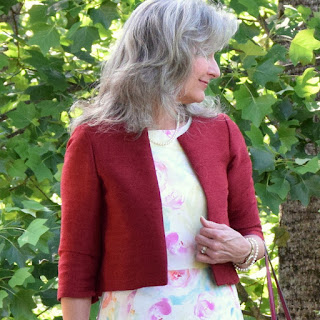
Where has this little jacket been all my life?!!
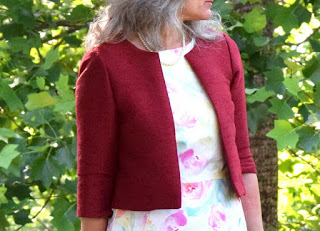
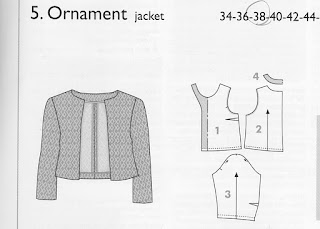
A simple little boxy jacket..... with shape.
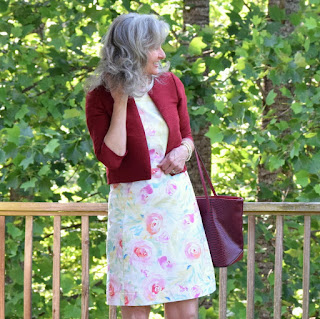
This jacket is designed specifically to be worn with the Ottobre Design Woman 02/2015 no. 4 Sheath Dress, which was my Easter Dress this year......
.....but also goes well with my other dresses.... like the Yoshiko Tsukiori 'Monet' Dress I made a few years ago.
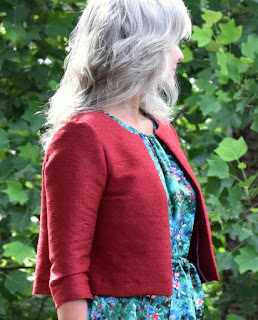
Such a great shape with a little boxy flare at the back.
Simple... oh so simple to sew. Unlined with hong kong seams per the instructions. I traced a size 38 with no modifications.
But I chose to order a new Flat Fell Presser Foot for my Bernina, and flat-felled the shoulder and side seams.
Then following the pattern instructions for the Hong Kong seams, cut the 100% cotton bias binding strips the 20 mm (3/4") wide suggested and s-t-r-u-g-g-l-e-d with sewing such a narrow Hong Kong Seam. Asked about that on Instagram, and the consensus was most folks cut a 1" bias binding for Hong Kong seams. It does look pretty so tiny though, doesn't it?!
On the dress form it's easy to see how the jacket design flows so well with the dress. A very pretty silhouette.
And again, wearing. Super comfortable. The silk was a remnant picked up at my local textile outlet that's only open once a month for all of $7.50. Because I'm not a fan of dry-cleaning, and because there was so little $$ invested in the piece, I washed and dried it before cutting out. I think it handled that pretty well.
Inside out..... You can see the narrow Hong Kong seams and the enclosed seam binding applied to the armsyce seams. Simply serged the sleeve seams.
Back view inside out....
....showing the sweet, thoughtful gift a family member recently sent me. Such a sweet surprise!!! She had the label company download my blog header to make these for me. Love!!!
These sleeves are super skinny..... i.e. super tight..... so to make them comfortably wearable, I made a side split seam at each hemline seam.
Not much experience doing side split seams.... but made this work. Raw edges serged then machine stitched hemmed with the blind-hem stitch.
And wore this ensemble for Mother's Day to church.
Me-Made-May 2018 will be wrapping up soon, so hoping I can catch up on the backlog of garments needing posts written. Feels good to (finally!) get this one done as am wearing this little jacket constantly.... and somehow that feels sort of a wrong thing to do unless the said blog post has been written about such. ;)
Happy Sewing All! :)
5.30.2018
5.22.2018
Yoga Top | Burda 01/2018 #105
Do you ever make something and want to love it? I mean reeeallly love it?
That's how I felt about this top....
.....And I don't. I just don't.
It's not the pattern's fault. It's a super cute pattern.
Methinks it has more to do with poor fabric choice(s) and the oversized design not suitable for my body shape. Sometimes these types of loose, oversized tops look better on super slim shapes, than my more curvy one, thus the fabric catching/clinging as you can see here, below, and on most of the photos unless I am standing ever so still and in just the right stance. Even in the header photo you can see it clinging to the top of my shorts. Also the back catches on my backside in a most unflattering way..... but I'm not showing those photos!
Let's look at little closer at this top. Purchased a thin, 4-way stretch, super soft rayon jersey knit at Hobby Lobby thinking 'soft', 'drapey'.... but in hind sight it's probably too thin for this top. Made a size 36 with no modifications.
This is a fabric eater needing almost 2 yards..... which I did not have..... so my first mistake was thinking a white knit in the stash, with the same knit properties would be a sort of 'cool' back. Wrong! The first thing both my daughter and husband said when they saw it was that it looked like a 'sport' 'baseball' shirt. Noooooooooooooo! Deflated right then, let me tell ya'.
Looking at the line drawing again you can see how there are no armscye seams in the front, yet seems to be in the back.....
..... yet those are really a very cleverly designed curved dart. This photo below was shared on Instagram and I wanted to be sure and share it here. I'm showing how I set up my dart, really this is how I set up all my darts but it worked especially well on this curved over 10" long one. First I traced the dart from the pattern to my fabric using white tracing paper and a tracing wheel. Then I marked the dart ending point with a perpendicular pin, then pinned the dart exactly where I wanted to stitch, being careful to catch the back seam with the pin right on the traced marks. Stitch slowly and carefully from the side seam to dart ending point, finish stitching by dialing your stitch down to nothing. Do not backstitch at your dart points. Leave a long enough tail to thread a hand needle, then sew/hide it back inside the dart seam. Voila'! You will have a perfectly stitched dart.
Like this one, below. This looks like an armscye seam in the back, but is actually the dart. The fabric wraps around from the front, forming the sleeve with the dart and joins the back with diagonal seams. I topstitched those.
With the side view it's easier to see how odd the white looks against the blue. *sigh* Also these sharkbite hemlines are not a flattering look for me. Of course AFTER I'd made this top and was struggling with why I did not like it, I remembered an old rtw top that had this sharkbite hemline that I never liked, because I did not think it flattered my shape, and quickly got rid of it. I may cut this off and make it a regular hemline at some point.
Kind of proud of the neckline. I don't have much experience with V-necks, but followed Burda's instructions and feel this is one of the best features of this top!
Inside out at the neckline you can see my top-stitching looks a little crooked but that's okay as the right side looks perfect. My relief was that the top-stitching 'caught' the binding at the back! The 'V' is finished with a little dart.
These are the leggings this top was made for. I.do.not.like.this. You see I like longer tops with my leggings when I exercise and thought this would check all those boxes, so to speak. It does not.
Here, Below, you can see the back a little better. Looks like a baseball shirt. *sigh*
I do like this a little better, below, paired with gray Burda Leggings 01/2018 #107 (unblogged) that works better, visual wise, but even then you can see how it's sort of clinging to my backside. The white is so unbecoming back there too.
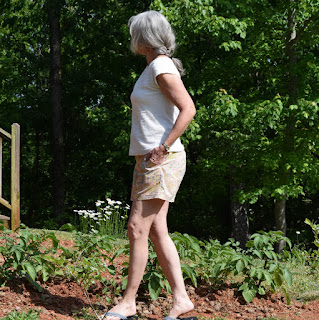
So I was very surprised, when I paired it with the Itch to Stitch Belize Shorts today for Me-Made-May, that it's sort of 'okay'. I've enjoyed wearing it today. So please do not let my disenchantment dissuade you from making this top as with better fabric choices, and consideration of body shape..... I still think it is super cute.
This will be my May 2018 Burda Challenge project.
And wanted to share this lovely Eastern Tiger Swallowtail Butterfly with you. This beauty is South Carolina's State Butterfly and we see lots of them on our property.
Happy Sewing All! :)
That's how I felt about this top....
.....And I don't. I just don't.
It's not the pattern's fault. It's a super cute pattern.
| Burda 01/2018 #105A,B |
Let's look at little closer at this top. Purchased a thin, 4-way stretch, super soft rayon jersey knit at Hobby Lobby thinking 'soft', 'drapey'.... but in hind sight it's probably too thin for this top. Made a size 36 with no modifications.
This is a fabric eater needing almost 2 yards..... which I did not have..... so my first mistake was thinking a white knit in the stash, with the same knit properties would be a sort of 'cool' back. Wrong! The first thing both my daughter and husband said when they saw it was that it looked like a 'sport' 'baseball' shirt. Noooooooooooooo! Deflated right then, let me tell ya'.
Looking at the line drawing again you can see how there are no armscye seams in the front, yet seems to be in the back.....
..... yet those are really a very cleverly designed curved dart. This photo below was shared on Instagram and I wanted to be sure and share it here. I'm showing how I set up my dart, really this is how I set up all my darts but it worked especially well on this curved over 10" long one. First I traced the dart from the pattern to my fabric using white tracing paper and a tracing wheel. Then I marked the dart ending point with a perpendicular pin, then pinned the dart exactly where I wanted to stitch, being careful to catch the back seam with the pin right on the traced marks. Stitch slowly and carefully from the side seam to dart ending point, finish stitching by dialing your stitch down to nothing. Do not backstitch at your dart points. Leave a long enough tail to thread a hand needle, then sew/hide it back inside the dart seam. Voila'! You will have a perfectly stitched dart.
Like this one, below. This looks like an armscye seam in the back, but is actually the dart. The fabric wraps around from the front, forming the sleeve with the dart and joins the back with diagonal seams. I topstitched those.
With the side view it's easier to see how odd the white looks against the blue. *sigh* Also these sharkbite hemlines are not a flattering look for me. Of course AFTER I'd made this top and was struggling with why I did not like it, I remembered an old rtw top that had this sharkbite hemline that I never liked, because I did not think it flattered my shape, and quickly got rid of it. I may cut this off and make it a regular hemline at some point.
Kind of proud of the neckline. I don't have much experience with V-necks, but followed Burda's instructions and feel this is one of the best features of this top!
Inside out at the neckline you can see my top-stitching looks a little crooked but that's okay as the right side looks perfect. My relief was that the top-stitching 'caught' the binding at the back! The 'V' is finished with a little dart.
These are the leggings this top was made for. I.do.not.like.this. You see I like longer tops with my leggings when I exercise and thought this would check all those boxes, so to speak. It does not.
Here, Below, you can see the back a little better. Looks like a baseball shirt. *sigh*
I do like this a little better, below, paired with gray Burda Leggings 01/2018 #107 (unblogged) that works better, visual wise, but even then you can see how it's sort of clinging to my backside. The white is so unbecoming back there too.
So I was very surprised, when I paired it with the Itch to Stitch Belize Shorts today for Me-Made-May, that it's sort of 'okay'. I've enjoyed wearing it today. So please do not let my disenchantment dissuade you from making this top as with better fabric choices, and consideration of body shape..... I still think it is super cute.
This will be my May 2018 Burda Challenge project.
And wanted to share this lovely Eastern Tiger Swallowtail Butterfly with you. This beauty is South Carolina's State Butterfly and we see lots of them on our property.
Happy Sewing All! :)
5.17.2018
Me-Made the Month of May 2018 | aka Me-Made-May 2018
Me-Made-May..... the month set aside in the sewing community to formulate and implement a personal pledge to 'improve their relationship with their handmade wardrobe' is in its 9th year now. Zoe , who has been our sweet hostess all these years, leaves everything up to the individual participant on what part of your handmade journey you might want to work on during this month, with nothing set in stone, which makes this a great challenge to be a part of, if you sort of like to do your own thing...... which it seems I like to do. ;)
My handmade wardrobe journey began 2013 and I've participated in Me-Made-May each year since 2014, but for some reason it was a struggle to decide whether I wanted to participate this year or not. Not sure why..... just wasn't 'feeling' it. I wear handmade clothing made-by-me every single day and feel pretty comfortable with where I'm at. Also, the platform has moved to Instagram using the hashtag #mmmay18..... and though I LOVE Instagram.... wasn't sure I wanted to fill my feed with daily handmade outfits. Ya' know.... didn't want to bore everybody over there. But with sweet encouragement from SaSa, and a couple of other IG friends, I thought I'd try. And boy am I glad I did. It's been a great month so far, and I'm looking forward to completing. Remember, you don't have to have an Instagram account to see the photos there, only if you want to 'like' or comment. So if you want to just sort of check in and out, that'd be fine. You can find my IG account here where I am also sort of 'journaling' the days along with the outfits. Once you are there, simply type the mmmay18 in the search box and it will take you to the hashtagged collection and you can see everyone's work. Let me warn you..... it has exploded in numbers this year!!!
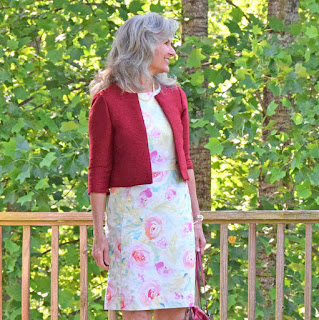
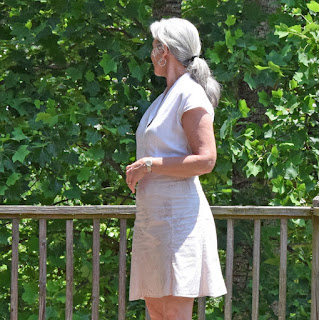
So today's post will show the first 15 days of outfits, and then I'll conclude with the rest when the month is over. I'm using my Photo Journal site to log the links to outfit information, so if you want those, just click on the 'DAY' link under each photo to click through there. So here we go!
Aaaaand that's it so far. Not going to bore you with any analytical evaluations because, truthfully, there are none. Now let's get back to sewing and making!
Happy Sewing Everyone! :)
EDITED TO ADD: The Conclusion Post of Me-Made-May 2018
My handmade wardrobe journey began 2013 and I've participated in Me-Made-May each year since 2014, but for some reason it was a struggle to decide whether I wanted to participate this year or not. Not sure why..... just wasn't 'feeling' it. I wear handmade clothing made-by-me every single day and feel pretty comfortable with where I'm at. Also, the platform has moved to Instagram using the hashtag #mmmay18..... and though I LOVE Instagram.... wasn't sure I wanted to fill my feed with daily handmade outfits. Ya' know.... didn't want to bore everybody over there. But with sweet encouragement from SaSa, and a couple of other IG friends, I thought I'd try. And boy am I glad I did. It's been a great month so far, and I'm looking forward to completing. Remember, you don't have to have an Instagram account to see the photos there, only if you want to 'like' or comment. So if you want to just sort of check in and out, that'd be fine. You can find my IG account here where I am also sort of 'journaling' the days along with the outfits. Once you are there, simply type the mmmay18 in the search box and it will take you to the hashtagged collection and you can see everyone's work. Let me warn you..... it has exploded in numbers this year!!!
So today's post will show the first 15 days of outfits, and then I'll conclude with the rest when the month is over. I'm using my Photo Journal site to log the links to outfit information, so if you want those, just click on the 'DAY' link under each photo to click through there. So here we go!
| DAY 1 |
| DAY 2 |
| DAY 3 |
| DAY 4 |
| DAY 5 |
 |
| DAY 6 |
| DAY 7 |
| DAY 8 |
 |
| DAY 9 |
| DAY 10 |
| DAY 11 |
| DAY 12 |
 |
| DAY 13 |
 |
| DAY 14 |
| DAY 15 |
Happy Sewing Everyone! :)
EDITED TO ADD: The Conclusion Post of Me-Made-May 2018
Subscribe to:
Posts (Atom)

