6.27.2018

Classic Shorts | Burda 06/2018 #105

A 'classic' pair of shorts to accommodate a tucked-in top, fitted waistband (i.e. no elastic!) with a rtw 'look' has been on my wish list for some time..... and in this pair my wish has come true.
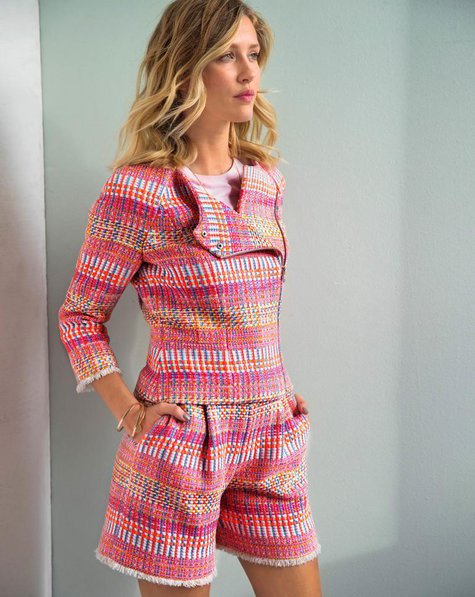
In the 2018 June Burda issue, Burda shows both of their finished shorts, Burda 06/2018 #105A and Burda 06/2018 #105B , made in Boucle fabric..... so at first this pattern was sort of by-passed as boucle just doesn't fit into my lifestyle.
770x967_bs_2018_06_105a_heft_large 770x967_bs_2018_06_105b_auswahl_1_large
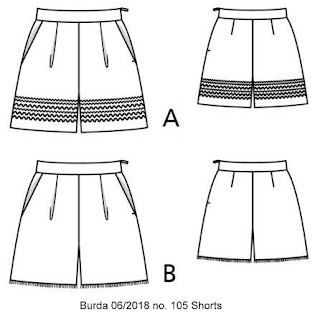
But when I took a closer look at the line drawing, it seemed this would be a great classic shorts pattern.  Period.  With pleats in the front, darts in the back, nice pockets, straight fitted waistband, side invisible zip with a nice flare and length, this pattern seemed like it should fit my body shape well.  A long time ago I had some rtw shorts made similar to this. 
As I've been wearing the white Itch to Stitch Belize Shorts almost every.day and have a little more of that fabric, figured this pattern would look great in the white brushed cotton twill.  Not having a lot of experience in fitting a fitted pair of bottoms, decided to make a muslin with a WalMart fabric that's been in the stash for a while.  Looks like a floral linen, but don't think it is.  It was a dream to sew.
What is funny is that I was so concerned about the fitting process..... and there was none.  Other than the usual grading from a size 36 waist to size 38 hips the fit was perfect for me.  Total Shock!  In a good way.
Even the backside fit spot-on perfectly without grabbing my behind.  A usual problem.
If I had thought the muslin would be this wearable, I would've taken a little more time with fabric pattern placement.  Not keen on the large blue flowers repeating so close together there in the front.... but overall guess it's okay.
Completely forgot to pay attention to the waistband seam lining up on the invisible zipper installation and thought about redoing it.... you know those old perfectionist tendencies.... but had a good talk to myself and said it was okay.  And it is okay.  The zip went in with no buckles or puckers..... even at the bottom which is where my usual problems occur.  Very happy.  By the way... love these pockets!!!  These are my favorite type of pockets and Burda provided them nice and deep.
Back view.  Here you can sort of see that the back waistband is shorter in overall width than the front.  See how the front sort of wraps around there.  LOVE this!  The small of my back is so narrow and always a problem with clothes fitting properly.... so this hugs my back well, yet has enough room in the back crotch area to not grab or pinch the derriere.  Another problem I usually have.
Inside out..... found a soft floral cotton in the stash and cut the waistband in half so this would be against my skin.  Such a pleasure adding these little touches. May I also say how super proud I am of the interior stitching on this waistband.  I took my time and pinned v.e.r.y carefully before top-stitching down and it came out very nice and even.
Also trying to show how Burda incorporates the pockets into the center front seam.  All lies nice and flat and these pockets don't move around in an unsightly way.  Also had fun loading my serger with different colored threads.  Seams are sewn then serged.  Hems are double-needled top-stitched.
First of all kind of amazed I actually made a June garment, from the June 2018 Burda issue, in June!  That's pretty fast work for me.  And another is that this is my second Burda make for June.  So I'm adding that to the 2018 Burda Challenge for me.
Overall this project was a skillbuilder in a stress-free way and a pleasant process.  Took maybe an afternoon to complete.  Now I'm ready to cut into the white brushed cotton twill.  Meanwhile feel like I've got some sort of 'bonus' shorts to wear!  Wearing the Ottobre Sculpture asymetrical top out of white linen with it here.  Love this top and love it even more now that I have a pair of shorts to be able to tuck it in.
*EDITED TO ADD*:  I've made a 2nd pair of shorts, using this pattern, out of brushed white twill (almost a denim) weight) you can read about here.  Wearing it with a new Burda top.
Happy Sewing All!  :)

6.21.2018

Peacock Dress | Ottobre 02/2016 no. 7 cross front dress

Ready for the hot 'summertime' in the colors of a Peacock.
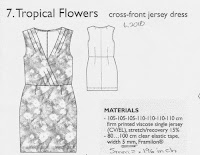
Ottobre Design Woman 02/2016 no. 7 Cross-front Jersey Dress pattern is a sleeveless, faux wrap mini-dress that has the most comfortable wearability.  Fit is perfectly perfect as Ottobre Design Woman's patterns usually provide for me, but even this one seems exceptional.  Confession time though... the entire process of making this dress filled me with dread, to the point of almost not completing.  Dread because of the concern this dress would be too form-fitting and too body-hugging to be wearable.  It was quite an awful feeling of doom.... but kept telling myself to believe in the pattern.... to believe in the designer.  And am so very glad I did as this is probably one of the most flattering dresses I've ever made.
This pattern has been on my radar since 2016 when it was released.  The model is wearing one version on the cover, below, and Ottobre calls it Tropical Flowers Cross-front Jersey Dress from the 02/2016 issue.  My fabric is not jersey, but some sort of polyester 4-way stretch picked up at my only-open-once-a-month local textile outlet All About Fabrics.  This little dress uses minimal yardage.... maybe a little more than a yard.  I did not peg the skirt as per the pattern, but brought the side seams straight down from just below the hip.  Pleats, at both front shoulders and both bottom corners of the front bodice, create the lovely wrapped, draped effect.  Again, Ottobre has back neckline darts that give the back neckline a beautiful shape and fit.  Darts both front and back on the skirt.  No pockets.  I made size 36, graded to size 38 at the hips.
Loved this fabric the minute I saw it and purchased it in 2 colorways.  This one is my favorite.  Anyway, this morning was all about figuring out how to wear the dress without the faux wrap unwrapping, so to speak.... so in the photo below, you can see where I've safety-pinned the top closed at the top neckline overlap.  This is where photographs help so much as I had no idea there was this much 'pull' until I saw the photos and decided this was not acceptable.  So, let's try something else....
..... thought maybe putting a little rtw cami underneath and removing the safety pin might work..... and ..... it's quite clear to see the wrapped opening 'open'!  But not sure I like this 'look' either.  Seems kind of sloppy.
Soooooo.... let's try both the cami AND the safety pin pinned a little lower so there's no pulling.  Love it!  May go back in and make a little tack there, but for now the safety pin is working fine.
This dress has a nice silhouette for my body shape.  Having said that.... it is meant to be a mini mini-dress and fearing such I added 1" to the length, with a mere 5/8" hem and it's 'mini' enough for me.  I'm 5'7" tall.
No fitting modifications were made and it wears like a custom fit.  Interesting the pattern is meant for a woven or a knit.... with the instructions of course advising to accomodate the pattern for a zipper in a woven.  Pattern has you cut 2 back bodice pieces and 2 skirt back pieces regardless of fabric choice.  My knit has such a beautiful print I hated to break all that up with center back seams, so placed my pattern bodice and skirt pieces on the fold.  Super pleased!!  Also an interesting construction of the pattern included sewing 7 mm elastic within the seam that attaches the bodice and the skirt.  I used 1/4" elastic, as that seemed more sturdy and had no problems learning this new skill.  It gives the waistline a little more stability and holds everything together well.  My fabric was more on the thin side, than the thick side.  In fact, I was concerned it might be too thin and need a lining, but after all was done, think I'm okay.
Here you can see all the pleating and draping a little bit.  Put a LOT of thought in the fabric placement for the front pieces, and pleased with how that turned out.  Actually switched the wrapover piece to get that particular fabric pattern at the front.
Seams are serged....
.....and had a lot of fun loading my serger with all the colors of my dress!  Sometimes it is the little things, no?!
5/8" hem, serged raw edges first to give the knit some stability, turned up and zigzagged hemmed because did not want to take any chances on the twin-needle channeling.  Pleased with how the hem turned out all nice and even.... no waviness.  Experience really helps dealing with slippery-sliding material.
This will complete the Make a Garment a Month June's theme of 'Journey'.  There are no journeys nor vacations on the horizon, so I chose this little dress as if there were some sort of exotic trip in the future..... with the reality it will simply be added to the wardrobe.  And that's okay.
Suzi thought about joining me today, but then decided to bark, bark, bark at the back neighbors.  Up on our high deck, we have a sort of bird's-eye view of the surrounding land through the trees, and she was trying to be protective and let me know something was amiss.... but barking at the neighbors are not a good thing in my book!
Oh, hello..... I'm back now.  So funny all the drama that happens when one is trying to capture their new dress in photographs looking all calm, cool and collected!  Ha!
Happy Sewing All!!  :)

6.13.2018

Burda 01/2018 #107 Leggings

Ever on the quest to add athletic/exercise clothes to the handmade closet.... pieces that will actually be worn while exercising!..... I was quite excited to see these unusual leggings in the Burda 01/2018 issue.
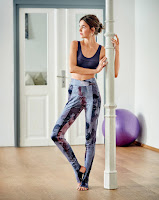
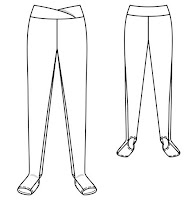
Burda 01/2018 #107 Footed Leggings.... only mine are sans feet.  ;)  Takes around 1 1/4 yards of fabric and I simply cut the front pattern piece off right there at the ankle line to delete the foot piece.  Notice the awesome waistband.  These are high waisted, which I LOVE, and no elastic.  Yep, you read that right.... no elastic is in this waistband.  I was both excited and skeptical to see if these would hold up as well as be comfortable with no elastic in there.  They are both..... but ONLY if you chose the right fabric.  I'll talk more about that a little later down in the post.
Photo Credit:  BurdaStyle.com
https://www.burdastyle.com/pattern_store/patterns/footed-leggings-012018
This is my third pair.... for me!!!  My daughter scoffed up the first two pairs, which n.e.v.e.r happens, so I was happy she was so excited about them.  Used the 4-way stretch Heathered Quick Dry fabric from JoAnn Fabrics purchased last year.  Not sure I'm super keen on this fabric for tight fitting leggings, as it seems to show all the lumps and bumps but it is a comfortable wear.  By the way, I do try to keep all my fabric receipts, as well as log the fabric in when purchased..... so at times like this I can refer to my notes/info to see what exactly I have.  In this case, notes were not made on this fabric, but because I kept my receipt, I could simply log the SKU numbers into the JoAnn search box on their website until I 'found' my fabric.  This is great in case I wanted to purchase more, or see fabric content info.
Anyway, thought I'd shortened these to capri length by taking 4" off length, but instead it's above the ankle.  That's okay, I actually like this.  I'm 5'7".
Now let's talk about fabric choice.  If you look closely at the 'recommended fabrics' Burda suggests "Use two-way stretch fabrics only".  Do not..... I repeat DO NOT use what I would call two-way stretch fabrics..... a fabric that only stretches across the cross-grain.  ONLY use 4-way stretch fabrics.... a fabric that stretches both across the cross-grain and length-grain.  The first pair I made was with a 2-way stretch and it rides down every time you bend or stretch making it not only uncomfortable, but pretty much unwearable.  This was confusing to me at first, why Burda would recommend a 2-way stretch fabric for a garment that clearly needed the 4-way stretch until I read a post Beth, Sunny Gal Studio, wrote about understanding Knit Fabrics at her blog, and then it all made sense.  Scroll to the middle of her post to read her short paragraph about 1-way/2-way stretch vs. 2-way/4-way stretch.  Evidently the sewing world has no definitive meaning about the stretch of knits and depending on the pattern maker, depends on which type of stretch they mean.  In the future when Burda recommends 2-way stretch fabrics, I know they mean the type of fabric I would call 4-way stretch.  The type that stretches both cross-grain and length-grain.  As an aside, Beth has also written another, more in-depth article on Understanding Knits you can read here.
Photo Credit:  BurdaStyle website
So the first pair of leggings, made with the 2-way stretch fabric from Wal-Mart, was top-stitched with Stitch #10 on my Bernina 1230, as well as the other 2 successive pairs.  You've been seeing me use the decorative stitches more recently, and this is sort of changing my sewing game.  It's amazing how taking the time to do this, adds to the ready-to-wear (rtw) look.   The minute my daughter saw these leggings, she loved them because they did not look 'homemade'.  She actually wore them, pulling down at the back and all, until I could get another pair made of 4-way stretch cotton spandex from WalMart.
I'm actually wearing the 4-way cotton spandex in the photo below, and these are super duper comfortable.  In fact, I had to retrieve them from the dirty laundry basket to photograph them as they are usually on the girl.  Her only complaint, is that the fabric seems to be already 'pilling' and 'wearing'..... a fabric issue, not pattern issue.
Trying to show a little of the decorative stitching down the outer leg seam.
Bleached out the photo to try to get the cotton spandex gray to photograph well, but alas.  Hopefully you can see a little of the structure of this pattern.
A closer view of the overlapped waistband.  For my recent pair, I shortened the waistband a little to pull in the back waist for an even snugger fit.  No elastic... and these really do stay up.  All pairs are a size 36 at the waist, graded to size 38 hips.  Added 3/8" seam allowances because I knew I'd be using my serger and sewing small seams.  1" hem.  A quick sew.... maybe an hour or two after cutting out.  Am thinking I'll draw a traditional waistband and add elastic next time to compare.
This will be my June 2018 Burda Challenge project.  Meg is doing a great job pulling together the monthly 'Challenge' projects logged at Burda's website, so you might want to see what others are creating, as well as be sure to log yours in there too if you should be participating in this project.  We have some highly creative and talented folks in the Burda community, let me tell ya'!
In conclusion..... this pattern is well drafted and I will definitely be making more.
These photos include the new racerback tank top that was recently made.
Happy Sewing All!  :)

6.11.2018

Racerback Tank Top | Simplicity 2116

To be lost in a spurt of creative energy.... no track of time... embracing the moment.... pure bliss.
Suzi and I sort of match the paddleboats at one of our local South Carolina State Parks this morning, don't you think?!  If you look ever so closely, I'm also 'matchy-matchy' with Suzi's leash.  Hmm, need to do something about her collar methinks.  Of course Suzi's lovely neutral black pairs well with everything.  ;)  It was raining on us as we explored.
This is a lovely racerback tank top from a thin 2-way stretch soft turquoise knit found in the stash, purchased from WalMart in 2013 for all of a whopping $1.50/yard.  Takes less than a yard.
Back view with the hair hiding the racerback.... but you can see it goes super nice with the Itch to Stitch white Belize Shorts.  Am finding these shorts are being worn to death this summer, so that shows I need more white shorts/pants/bottoms in the closet.
Easier to see the lovely racerback in this photo below.  I widened the racerback back and like the silhouette this produced.  Still need to wear my racerback athletic bra with it as the bra straps show from a regular bra.
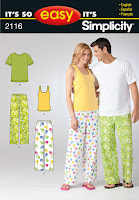
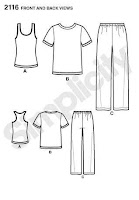
Simplicity 2116, view a, which is now oop, was the pattern chosen for this top.  Pattern Review shows a few lovely versions sewn up if you want to check those out, as well as what other's think of this easy pattern.  This is my go-to pattern for Tom's comfy pants, but have never made anything else.  This is really a nice little basic top pattern.
With a rtw racerback athletic top already in the closet purchased years and years ago, in a sudden, unexplained, burst of creative energy, plunged in to see if I could sort of 'copy' it by modifying this pattern..... and let me say, this is where tracing all those Burda and Ottobre patterns pay off, as it wasn't a big deal at all to trace off this pattern, measuring as I went, modifying here and there gleefully enjoying the creative moment.  Basically this is a size 10 flared to a size 14, adding @2 1/2" to length and widening the racerback back.  3/8" seam allowances as I'd already tested the fabric through the serger and knew that would work.
And then I decided to add decorative top-stitching in a soft gray, on pretty much every seam using the 10 and 12 setting on my Bernina 1230..... after serging the seams.... which took the most time because my poor machine did not like all the motion these 2 stitches produced on top of the bulkier serged seams.  But I prevailed and am happy with the results.
Armhole seams are simply turned under and top-stitched with stitch #10.  No serging first here.
Could not bring myself to turn the neckline under, as per pattern instructions and the armhole, so cut a binding strip and attached sort of like a facing then top-stitched #10 here too.  There's a little bit of awkward bulk, but doesn't bother me at all.  And it lies nice and flat against the chest.  Yep..... rapidly overcoming perfectionist syndrome.  :)
A closer view of the stitching, but not sure how much more it shows.  I like the soft gray against the turquoise.  Toyed with the idea of white thread, but am sooooo happy I stuck with the soft gray.  It gives a nice detail without a lot of contrast.
Side seam..... for some reason thought the #12 stitch might handle the serged seams better, but it didn't. 
I like this stitch too though for decorative top-stitching on items like this.  For some reason my camera isn't picking up the details well today.
Back view.  Isn't this wider racerback kind of nice.  My back neckline had an odd curve because evidently when I redrew the back armhole lines, I didn't take something into account.  Pondered the problem for all of one minute, then added a couple of back neckline darts, like what Ottobre usually adds in their patterns, and all lies smoothly against the body now.  It's interesting to me, how a little project like this, shows what experience in sewing different patterns produce in one's skillset.
Hem..... raw edge was serged first hoping to help stabilize this knit, then top-stitched with sticth #10.
These are the Burda Leggings I will be blogging soon (NOW BLOGGED!) that this top was made specifically to be worn with.  But..... after seeing the set of photos taken with the leggings..... and my poor out-of-shape body shape..... not sure anymore.  With leggings I usually like to wear more longer length tops.   Also think this knit is a little too clingy(?) or something(?) with the leggings.
But after wearing it with the white shorts today, am thinking I will cut off the additional length I added, re-hem and enjoy wearing it with these sorts of items that look better with a normal length top.  I really do like this cute little top and it will be perfect for our hot summertime temps.
So embrace those creative moments..... and simply 'create'.
Happy Sewing All!  :)