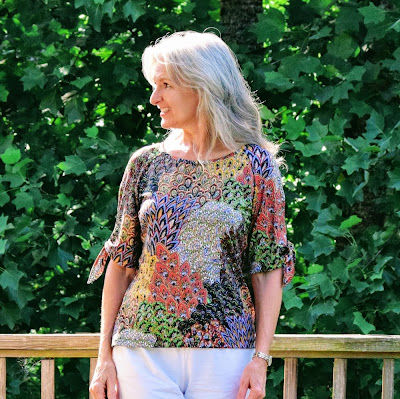
Super simple. Super quick. Super cute. I love my new top!
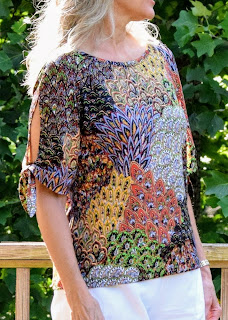
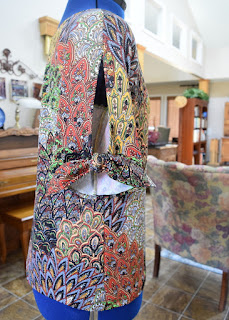
The open sleeves with ties, coupled with a semi-fitted look, are what drew me to this pattern Burda 07/2018 #119.
Even I can't believe how quickly this was done!! My notes show I began the process 6.27.2018, around the day I received the July 2018 Burda issue.... and that is most unusual for slow-poke me. Below you can see their line drawing. I wasn't paying much attention in all my excitedness for this top, and mistook the top drawing to be the front. Nope, that's the back... it is a VERY low-scooped back.
See!!! Um..... this so would not work in my life and would fall off my shoulders in a jiffy.
Thankfully I caught my mistake before I cut into my fashion fabric, and channeling Nancy Zieman's Pivot and Slide pattern alteration method.... I pulled that back neckline up AND narrowed the back. The low-scooped pencil drawing is the original size 36 back neckline on a fold. The higher pencil mark is my new neckline. The red pen is what I made.... a higher neckline with a narrowed back. I always have trouble with stuff sliding around my back shoulders and I wanted to be sure this would be wearably comfortable. Then before I could think twice.... I cut into my fashion fabric and held my breath hoping all would work. And it did! I also graded it to a size 38 at the bottom.
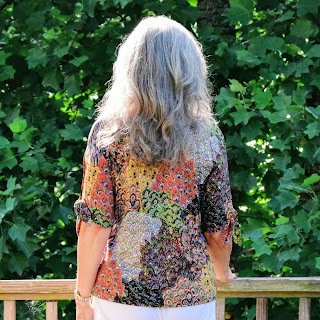
Aaaaaand my hair covers everything today! I'll show you the back on my dressform on down in the post, but here you can again see the slight fittedness of the top. Very flattering both back.....
..... and front. Love those sleeve ties. It gives this simple top a little style. Fabric came from my local only-open-once-a-month textile outlet. Cost around $7.00 for this piece. This is the sister piece to my Peacock Dress. Super comfortable.
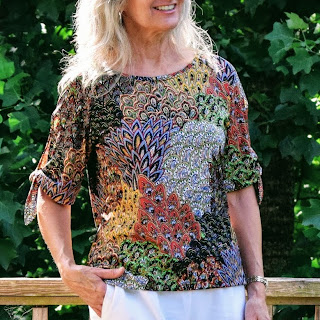
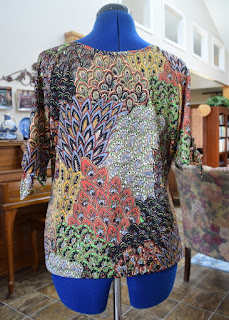
Okay guys.... you are not going to believe this.... but as I was writing this post, looking at my dressform photos, all the above photos, and checking (double-checking!) my top..... I just realized I wore my top backwards to an appointment in town this morning as well in all the photos wearing it here because this, photo below, is the Back View..... not the front view I initially thought. Good grief!! *rolling eyes* I definitely need to sew in one of my tags to denote the back in the future. In the meantime, please forgive my backwardness today. ;)
So this is the Front View. I had to determine the new neckline binding length since I'd changed the dimensions, so I measured my finished neckline, (@27") then subtracted around 10% of that number, (@2") to cut my binding @25" stretching it as I sewed it in. Kind of pleased with how flat it lays. No puckers, no problems. Nice. Also these are colors I always wore when I was a brunette and still find them pleasing today.
Sleeves!!! This pattern is the Sewing Lesson insert in the magazine and it was quite enjoyable to simply follow step-by-step with visuals making a Burda pattern. Also, this link will take you to their online Sewing Lesson step-by-step instructions. I really like the resources Burda provides.
This is my project for the 2018 Burda Challenge for the month of July.
If I hadn't gotten chicken and lost my confidence when I got to the neckline binding step, this top would've been finished in a matter of hours.... instead of days. Wearing it with the Ottobre pants today but can see it as a great Fall transitioning piece with my black mini skirt..... and wearing it front side out in the future!
Happy Sewing All! :)





I love this blouse! I saw this the other day and thought the back neckline would be too low for me, so I love how you altered it. It looks great with your Ottobre pants.
ReplyDeleteApparently your top looks great no matter which way you wear it. Super cute!
ReplyDeleteThis top is a lovely addition to your wardrobe, Lisa! Surely no one would have noticed you wore it backwards. I have to put a label in all of my garments, tops and bottoms, because I would always wonder how to wear them.
ReplyDeleteI *love* this - great fabric choice, and the alteration info is super helpful. I also thought that the back neckline was too low for me, so your method of narrowing and lifting the back will be perfect for me to try also -- thanks for the inspiration!
ReplyDeleteIt's a lovely top, whichever way around you wear it! Beautiful fabric too.
ReplyDeleteDear Lisa, I love reading about your projects and you are such an inspiration to every one! ♥
ReplyDeleteI have nominated you to The Mystery Blogger Award, http://www.ellensewing.com/2018/07/the-mystery-blogger-award_14.html
I think you can wear this whichever way you want to wear it! It's a super little top. And the neckline now is perfect - wide necks are just not practical.
ReplyDeleteSuch a lovely top and I love the sleeves and the fabric. I can imagine that you will wear this blouse a lot over the summer.
ReplyDeleteWhat a cute top! The fabric is perfect and I like how you altered the back neckline. It didn't occur to me that you were wearing the top the wrong way, it really isn't noticeable :)
ReplyDeleteWonderful print! I thought the fabric was georgette at first glance. I love the top, you look beautiful in it.
ReplyDeleteI Love your new top too! It's super cute and the print is really lovely :)
ReplyDeleteBeautiful top. I liked it in Burda, but the back wasn't convincing.It's much better your way! Do you think it would work with a woven fabric (such as tana lawn) ?
ReplyDeleteThanks !
Thank you Karine for your lovely comment. To answer your question..... I really do not know, but in the same breath I don't see why not..... particularly if you raised the back to keep it from falling off back there. Would be interesting to see how it would work in a woven! :)
DeleteThanks Lisa. I'll have a go!
Delete