8.23.2018

Stitch Sisters Kaftan | a free patternless pattern

When you hear the word 'caftan' (or kaftan), what vision comes to mine?  A loose, formless fitting sort of dress snugged in at the waist with a belt?  Lots of voluminous fabric floating about?  That was my first thought, until I saw the new patternless pattern by Stitch Sisters and was pleasantly surprised at the nice 'fit' achieved simply by sewing a bunch of rectangles together.  No muu-muu look here!
This pattern was brought to my attention when 3 of my Instagram friends sent out an invitation to join in on their 'sewingsansfrontieres' challenge to be completed 9.4.2018.  Sewing without borders is the loose translation and I loved everything about the thought behind this challenge immediately.  Suzy sews in Spain, Helene sews in Canada and Sue sews in Australia..... around the globe holding hands in friendship..... that's what the sewing community is all about, isn't it?!  So definitely I was in.  So then..... what was this Stitch Sisters Kaftan patternless pattern......?
When you go to their patternless pattern link you will see a couple of charts...... a sizing chart and a fabric measurement chart.  No pattern.  All rectangles.  Completely out of my comfort zone!!!!!  I do not like cutting rectangles out of fabric like this.  Nope, not at all.  You even follow their instructions for cutting out your neckline... no template.  Noooooooooo!!!!!  Too easy for something to be out of whack resulting in a less than par garment.  I began to question this whole project, but ever up for a challenge and a learning experience.... onward I plunged. 
Wanting this to be a quick project, so I could continue sewing the ever-growing-sewing-queue, a few fabrics from the stash were auditioned with this animal print rayon challis chosen.  Purchased from the last trip to my only-open-once-a-month textile outlet center All About Fabrics, it cost all of maybe $5.00.  And it was a huge pain to cut out rectangles as it slipped all over the place.  Using my rotary cutter and straight edge accompanying ruler helped.
This print is different than what I usually choose to wear, and with the softness and floatiness of the challis thought it'd make a great caftan to sashay about in.  Though in reality there is not a lot of sashaying ability in this pattern as it is quite close to the body for a more flattering fit....and that is exactly what I like best about it!
Knowing I'm not too keen on other garments I've made in the past that have a voluminous amount of gathered fabric, I paid close attention to the sizing chart and the fabric widths, so I made the smallest size on their chart.  Perfect for me.  Great 'fit'. 
Raised the neckline 1".  Perfect.
Their blog post shows step-by-step instructions throughout the process.  They have you use bias binding to finish off the neckline installed in a little different way than I've done before.  It's applied and top-stitched all before you stitch the middle seam...... and at this point my attitude wasn't the greatest, so I simply pinned that middle seam at the neckline the best I could and stitched.  And be still my heart, the top-stitching lined up pretty near perfect!
Dealing with severe fabric limitations.... I'd only purchased a little over a yard of this print, I modified my caftan to only 40 5/8" long front and back pieces using the short sleeve measurements they provided.  Didn't like where the sleeves were hitting my arms, so lengthened them by adding a 2 1/2" black knit folded in half (that added 1 1/4" length and finished the edges off at the same time) that lengthened the sleeves fine and added a cool black accent that I really like.
At this point I was completely out of the animal print fabric and used the same black knit, cut 2" against the grain (so maybe 2" x 55"?), selvedges cut off, then stretched and stretched until it sort of coils in on itself.  Cut that in the middle, knowing I would still have some stretch when tying even though it did not add up to the measurements suggested..... knotted the ends and have ties I really like.
They provide 5/8" seam allowances in all the measurements, so after I'd sewn the side seams, went back in, unpicked and re-stitched from about 2" below the ties the 5/8" seam grading out to 1/4" seam allowance from above the hips on down.  Not a big difference, but enough.
With the 40 5/8" length, I sewed a 2" blind-stitched hem on my machine.  Not sure I'm thrilled with this length..... it's a little long feeling on me..... but wanted it more on the longer, lounging-ish side of dress.
Originally planned this to only be an about the house, comfy dress.... but am so pleased with the results it may be worn out and about sometimes too.  Not sure if this is advertised as a 1-hour make..... but I would plan on it taking more around an afternoon or so.  This was a busy week for me, so after the bulk of the work was done one afternoon, the rest was completed in snippets of time.  It was fun to see it all come together this way!  This was a good project and I am very pleased. 
I noticed while wearing the dress this day, as well as in some of the photos above, that it looks like the front is shorter than the back.... it is not.  I've measured and re-measured and all is equal and correct.  I think the dress is pulling back at the neckline, pulling the neckline and front of the dress up a bit.  Doesn't bother me at all.  Just thought I'd mention it in case it was noticed in the photos here.  Now where's that sewing queue?!!

Happy Sewing All!  :)

8.16.2018

Ode to Frida Kahlo | The Story In Dress

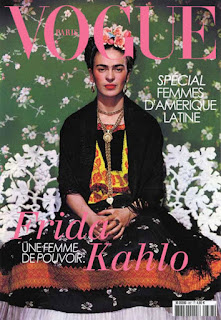
You've probably heard of Frida Kahlo, the artist, before.  I  had not, as I am weak in the humanities and the arts...... but I love to learn.  This is my 'Ode to Frida Kahlo | The Story in Dress'.
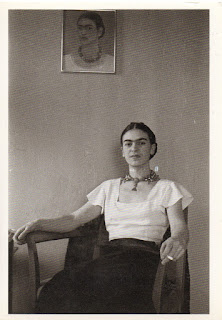
A Mexican surrealist painter who was known for her self-portraits, Frida Kahlo born in 1907 and died in 1954, lived a most enigmatic life.  Married to the artist, Diego Rivera, her marriage was fraught with affairs on both sides and much sadness yet she maintained loyalty to Rivera her entire life. She was stricken with polio in childhood that left one leg shorter than the other with the greatest tragedy happening in her teen years, when a bus she was riding in, was in a terrible accident injuring her by completely impaling her body by a metal rod.  Incredible that she could survive such an event in those times, she endured many operations and much pain her entire life.  Yet interesting to me, I rarely found her defined as 'disabled' or 'handicapped' in my readings.  During the years when women's dress hems were rising, Frida embraced the traditional Tehuana Dress that originated in the Oaxaca, a southeastern region of Mexico, dressing in the native traditional way that became her 'signature' look.  Her way of dress  'defined' her and in a few rare photos showing her in pants, it actually looks odd to me.  The long skirts and boxy tops probably provided more comfortable wear considering her constant physical pain, casts and limitations.   But this is a sewing blog and we need to get on with the rest of the story......
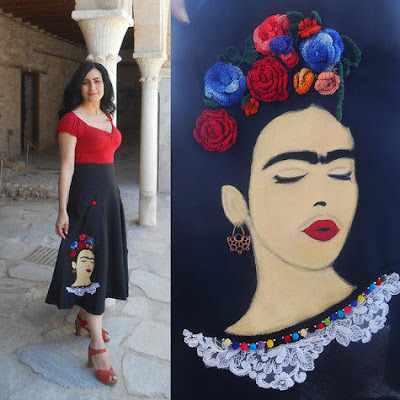
My Frida story began on June 9, 2018 when the beautiful Elpida posted her gorgeous hand-painted 'Frida' skirt in her Burda Studio account.  The skirt is not only hand-painted, but includes crochet flowers in Frida's hair and a real earring, below, and to say it caught my eye does not do this piece of work justice.  It is stunning!  At this point I'd never heard of a woman named Frida before and if you were to scroll down and read the comments at Elpida's post, mine responded that 'I was not familiar with Frida and had enjoyed learning more about her after a quick Google search'.  But who can forget this sort of image!! It was stuck in my mind.... the strong eyebrows, cheekbones and red lips with flowers in her hair.  Elpida has graciously given me permission to post her beautiful photo and I want to thank her again.  And if you are not familiar with Elpida's work, please check out her Burda Studio as well as her Instagram account.  She is an artist!  She also has another photo posted in her Burda Studio you may want to see of her Frida skirt.
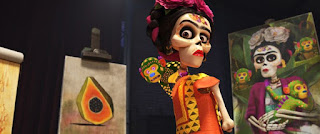
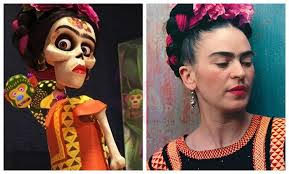
Not too long after this exposure to Frida Kahlo, my family was watching the movie 'Coco' for one of our traditional Friday homemade pizza and family movie nights, when the 'Frida' scene appeared..... and suddenly I realized I 'knew' who this character represented.  This link held an interesting article to read about the scene as it is quite funny, complete with the character painting self-portraits holding the monkey that Frida was known to enjoy.....
Photo Credit
..... duplicating Frida's dress and hair well.  Have to tell you I felt quite 'smart' as I shared what little I knew about Frida with my family as the lightbulb went off in my head with this connection.  Btw, 'Coco' is a great movie we all enjoyed.
On July 17, 2018 Kate from the wonderful blog Fabrickated began a 'Dress Like Frida Sewalong' , so by now at least knowing who Frida was, sort of!, I enjoyed reading Kate's blog post and clicked on the resources she linked and posted there.  But I was not interested in participating in the Sewalong at the time, because my time is limited, my handmade wardrobe is still limited and I.need.wearable.clothes!  To be perfectly honest..... Frida's style of dress is not my style at all.  But I continued reading Kate's posts and her 2nd post defined and featured the making of a huipil, (pronounced 'wee-peel'), Frida's traditional top of choice.  One of her commenters mentioned this video  of the making of a traditional huipil that I watched and found most interesting.  But I knew I could not do this..... as a huipil is adorned with beading and trims and again.... is simply not my style.

By then the curiosity spirit had been aroused and I came upon the most fascinating documentary of anything I've found on Frida called 'My Dress Hangs There:  Frida Kahlo as Fashion Icon' done by the Museum of Fine Arts, Boston.  Highly recommend taking the time to watch this little over 1 hour video, if you don't read or watch anything else about Frida as it covers, not only her fashion, but her life in a biographical way.  Scholarly and very well done.  Still felt there was no way I wanted to sew any clothing remotely anything like what she wore.

Then a few of my IG friends were posting some of their works in progress, Sue who blogs over at fadanista was one.... and they all looked like they were having such fun pulling together prints, beads, trims and even creative textiles for their hair.  I thought how nice but I did not have time as I needed wearable clothes in 'my style'.

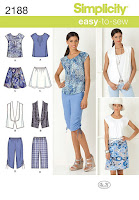
It's still hot and humid here and recently I'd picked up a small piece of crepe fabric wanting another summer top.  As I was fingering the fabric, wondering what pattern I should choose, I found myself thinking..... this looks like fabric Frida might've worn.  Bright colors, symmetrical design.  Hmmmm.  As I thumbed through my pattern stash and came upon Simplicity 2188 I realized this is a top made from a modified rectangular piece of fabric with a pleated neckline...... a huipil...... in a nutshell.  At that point I knew this little top had to be made.  As I laid out the fabric for pattern placement, it was chosen deliberately for the flowers and leaves to lay this way with the thought of Frida and what she might have worn.  From what I can tell, some of the tops she wore were plain, though honestly most were embellished with trims, embroidery and beading.  I've already blogged all the details of this top here and disregard that red arrow, below, as this is the photo I used on the construction blog post to point out a sewing detail.  You can see from the pattern, that from the shoulder seam to the hem it is pretty straight, particularly after the pleats from the neckline would pull it in more at the upper side seams.
After making the top I realized then I could create my own modern, completely wearable version of an outfit paying homage to Frida, but still be in 'my style'.  That's when the Burda skirt pattern was picked up and completed.  You can read all the details here, but that goldenrod yellow top-stitching thread was deliberately chosen to coordinate with this yellow top with this full ensemble in mind.  By now I was SO excited about this outfit!!!  There might have even been a few dreams about how to pull it all together by now.  ;)
So, with great joy and excitement.... I want to present my 'Ode to Frida' ensemble.  My version of a huipil and my version of a long skirt.  This is very much a wearable outfit for me.  For this blog post I added a colorful scarf at the waist for a belt, but will probably wear the top tucked in, with a jacket or cardi, as this heavy suede skirt is meant more for a Fall/Winter season.
There's more jewelry on today, more blush on the cheeks and the reddest lipstick I own to sort of recreate, in great respect, Frida's 'look'.  The hair is up and french braided and I have to tell you I have not spent that much time on my hair since probably going on a date back in high school!  I completely fail in the 'Frida look'..... but you get the idea.... there was great effort to pull together this blog post for today.
An old period chair was even lugged outside as a prop.  No cigarette though.  ;)
Channeling Frida.
Now this is the real me with my sweet pup and I cannot tell you how much I have enjoyed this process.  I hope Kate is okay with my interpretation of her sewalong..... as isn't that really what this is all about.... creating our own clothes, in our own fashion sense and individuality.  That's what Frida certainly did!
A few more resources I'd like to share with you.....
......I found this Harper's Bazaar article interesting, as well as The New York Times. 

......Kate has published a 3rd week and a 4th week on the Sewalong and I think she's got a few more upcoming posts on Frida planned.    And a big Thank You to Kate for triggering this interest in Frida for me.

My chapter and journey on Frida Kahlo is complete now and I hope you might have enjoyed learning a little more about her.  May we all never lose our 'love of learning'!!

Happy Sewing All!  :)

8.15.2018

'The Big Valley' Skirt | Burda 11/2017 #106 Skirt

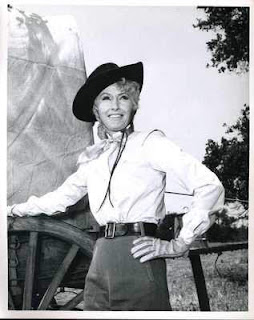
Channeling Barbara Stanwyck this morning.  ;)
She played a strong female character in the TV show 'The Big Valley' back in the day and the minute I put this skirt on, it reminded me of her.
Something about a skirt like this that makes one stand a little taller, a little straighter and feel 'strong'.  I like that.  :)
After seeing Elpida's beautiful version last year, I couldn't wait to make my own.  So Burda 11/2017 #106 Skirt pattern was traced last season..... and then I ran out of season before the project could be finished and all was put away, fabric and all.  Then a few weeks ago, while working on another completely different project, I remembered this skirt pattern/fabric and realized it'd be the perfect piece to complete that ensemble and within a couple of days this pretty skirt was completed.
https://www.burdastyle.com/pattern_store/patterns/topstitched-skirt-112017
Notice my fabric color is quite similar to Elpida's skirt too.  I seriously LOVE all the things she makes!!
I also admired her beautiful hand-stitched top-stitching she used on her skirt, but my fabric is a thick micro-suede, with an almost poly type backing and there was no way any needle could get through this except from a machine.
The most time consuming part of this skirt was deciding the top-stitching method and thread color.  My fabric was so thick my poor machine could not handle top-stitching a double-thickness, so I ironed the front seams open using a warm iron, and top-stitched on both sides of the seam using a goldenrod-yellow serger thread.  That was the only thread I had in the color I needed.  Not able to put the serger spool on my sewing machine, I simply wound an empty bobbin with the serger thread and put that on my thread spool and loaded my machine.  It worked great.  Moved the invisible zipper from center back to left side so the back would be nice and neat.  Still cannot seem to get that invisible zip in without a little pucker.  *sigh*  I can live with it though.  And it is at the side so it's not as noticeable as it might be in the back.  A skill I need to work on.
Be sure to watch out for the grainlines and place your pattern pieces accordingly.  Needed my walking foot as the fabric slid a little during stitching, which surprised me as it's so thick.  That's why it's always a great idea to sample your stitching first.   Hem was double-needled top-stitched with thread that matched the fabric color.  All seams were stitched and raw edges left unfinished.  No need to serge or finish because this fabric does not fray and I wanted seams to lie as smooth as possible.
Fabric came from All About Fabrics, my only-open-once-a-month local textile outlet center and 2 yards cost @$15 or less.   Am finding I'm purchasing more and more of my fabric there, as I (clearly!) like the choices available, the fabric quality is nice and a big plus is that I feel I am supporting a local business.
The fit actually surprised me as it is f-i-t-t-e-d!  I thought it'd have more ease from the hips down, but as you can see below, it's pretty slim and snug in the fit.  I made my usual size 36 waist graded to size 38 hips..... and after looking more carefully at Burda's model as I write this post, it looks like it fits her this way too.  I do like it.  It is just a different fit than I thought it would be.
Not a skirt to wear out for a big meal though!!  Gosh side views look almost identical don't they.
And I love the back view!!  All nice and neat without the zipper back there.  It does not feel too tight in the back at all either.
My sweet pup decided to join me for a bit this mid 80 degree temp morning.  Not a day for suede and boots but wanted to write this post.
Even though the plans I thought I had for this skirt were switched up a little at the last minute, it was a pleasant surprise to find it went perfectly with this Burda top.  Love it when those things happen like that!
Be back in a few days to show you the completed project all put together I've been working on!

8.17.2018 EDITED TO ADD:  The original plans for this skirt have been completed and written about at my 'Ode to Frida Kahlo | The Story in Dress' post.  So excited about this learning journey!
Happy Sewing All!  :)
EDITED TO ADD:  This is an August item for the Burda Challenge 2018.

8.10.2018

Simplicity 2188 Top

It's still hot and humid in South Carolina, so summertime sewing is still in full swing.
This pretty crepe fabric was picked up off the Clearance table at Hobby Lobby for @$4.00 for a 1 1/2 yard piece and I could not for the life of me figure out which was the 'up' side and/or 'down' side as it looked to me as the blue flowers went one way, and the coral flowers went the other.  Thinking the blue might be a more 'dominant' color, I went with blue flowers up.  And may I add this fabric was so slippery and slidey and a real pain to work with.  Terrible.  But the top turned out a pleasure to wear, so guess it was all worth it in the end.
OOP Simplicity 2188 has been in the pattern stash for years and this is my first make from this 'easy' pattern.  Uses @1 yard of fabric so my piece was perfect.  Photo credits below to Pattern Review.
There was much thought in pattern placement as I wanted the larger flowers to be centered, with the smaller leaves and surrounding flowers placed symmetrically all 'round.
Feel that was accomplished well in the back too.  At the hemline, both front and back, you can see where my darn  slidey fabric moved off placement during cutting..... but I'm okay with that.
And it wasn't until I began to write this post that I noticed my right sleeve was completely turned in and looks awkward with extra creases and pleating in these photographs.
Oh well, keeping it real today!!
Made a Small based on my measurements, with no modifications.  Had to unpick a couple of the pleats because again, the darn slidey fabric shifted during marking transfers.  To be perfectly honest, all these pleats were eventually sort of 'winged'..... which is a huge deal for this perfectionist!  Hem is twin-needle stitched.
A closer look at the pretty pleated neckline.
The shoulder seam hits a little to the front.  I top-stitched it for extra durability against any weird stretching and also because I just like this look.
Neckline has facings so it doesn't impede the pretty pleats and found I actually like this.  The neckline facings were a pain to cut dealing with the darn slidey fabric, so once I cut out the facing interfacing pieces, I simply placed those over my wonky fabric neckline facing pieces and cut/traced from there.  Even though I'd stay-stitched the entire neckline, found the back neckline had stretched out a little, so I measured very carefully before pinning the prepared facing to the neckline..... lining up the offset shoulder seams first and working from there.  Be sure to clip, trim and understitch the facing after sewing.  Not sure the instructions have you do much more than understitch.  This time I serged the raw edges of facings.  All seams are sewn then serged.  Thought about doing french seams, but wanted a quick'n easy sew.  And it was!
These armscyes are not my favorite way of doing/finishing armscyes.  See that dot the red arrow is pointing to?  That's the bottom of the armscyes.  Basically this is a rectangle.  Knowing I wanted serged seams..... not serged raw edges of a seam..... it took a little brain power to figure it all out so I'd get a complete serged seam from the dot down, and serged raw edges around the armscye to be able to turn in, and in again for a finished armscye seam.  Sooooo afraid my darn finicky fabric would do some weird rolling/stretching after I'd finished these seams, but all was fairly tame after ironing.  Whew!
Wearing it with the Itch to Stitch Belize Shorts this day.  And my sweet Suzi is wearing her pretty bandana from her day at the doggy spa.
This little top is part of a larger ensemble/project I'll be sharing a little later.  So stay tuned!!

8.17.2018 EDITED TO ADD:   The original plans for this top have been completed and written about at my  'Ode to Frida Kahlo | The Story in Dress' post. Did you know this little top is a modified 'huipil'?   Please visit and read more about it there. 
Happy Sewing All!  :)