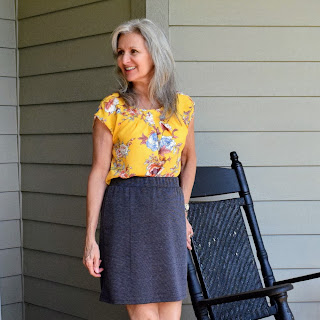
How I did not know I needed a gray knit skirt in my wardrobe before is beyond me, as this little gem is easy to wear and goes with so much.
NewLook Pattern 6164 has been around for ages and looks like is now out of print. For those who've been reading blogs for a while might remember Shannon, who used to blog at MushyWear Sewing Blog, who clearly felt this was a favorite by making up all the components of this pattern at one time or another. That's why I purchased it so long ago, maybe early 2013?, having only made the cardigan back then way too big and not in a great choice of fabric print. To be honest I'm not sure it's still in the closet today. But this post isn't about the cardigan, but the skirt. This is an elastic waist, 'for knits only' pencil skirt with a back vent. My body shape does not wear pencil skirts well, so I modified the pattern by flaring out the sides a little and shortening it considerably. Cut a size 12.
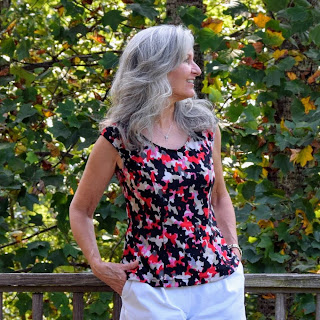
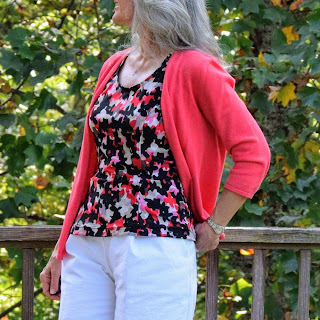
What drew me to the pattern was how the elastic waist seemed to lay nice and flat without any gathers in all the line drawings. My waist is small compared to my hips, so mine seems to gather a bit in the waist area. It doesn't really bother me as this skirt will always be worn with a belt or something like a cardi over the elastic waist. I'm wearing the Ottobre Sculpture top with it today sans cardi to show you the details and fit.
So afraid I might look 'dowdy'..... I might've shortened the skirt a little too much? Oops! If I make it again it will probably be lengthened an inch or two.
The gray pontiroma from WalMart was in the stash, also from long ago, probably cost @$6.00.
A super quick afternoon make!
Cannot seem to find the time to post the mini-capsule 'plans'.... but this completes item #2.
Already in strong rotation wearing it with Item #1 the McCall's M5890 top and a rtw cardi......
.....and the Simplicity 2188 Top. After taking this photo the other day, I realized I'd neglected to iron it well.... thus the odd vertical lines. That's all taken care of now...
..... and this is how it's worn today. Thrifted rtw cardi and Ottobre top. I've always like this little top and it's always looked better tucked in, than out.... so was thrilled to see I could enjoy wearing it again. All because I needed a simple gray little skirt in the wardrobe.... just didn't realize it!
Coming up soon will be item #3 for the mini-capsule wardrobe, Burda 9.2018 #109 Jacket out of the comfiest furry fleece. It's all done, just needs buttons/snaps.
Happy Sewing All! :)
9.26.2018
9.17.2018
Make your own custom dog collar for your pup in less than 30 minutes
For those who own a canine companion..... have you ever considered making your own custom dog collar for your sweet pup? With the right hardware and knowhow, you can knock one out in less than 30 minutes.
I've been sewing for many years making all sorts of handmade items from home dec, reupholstering furniture, quilts, craft items, not to mention making all my clothes for the past 6 years..... but it n.e.v.e.r occurred to me to make my sweet pup's dog collar.
I'd recently found a perfect-to-me aqua/turqoise rope leash and the colors clashed with Suzi's rtw pink collar that got me thinking it might be nice to have more choices with Suzi's 'jewelry'. I looked all over in stores for a pretty turquoise collar and could find none. The photo below was taken a few weeks ago at one of the trailheads of our local rails-to-trails trail we like to walk showing her bright pink collar with her new leash.
Our area has recently taken an unused railroad-bed and converted it to trails for walkers, runners and bicyclists. No motorized vehicles allowed. This is what most of the trail looks like, below. We are very lucky to have this safe place to enjoy. The rails-to-trails trail is quite popular with bicyclists, so I like to not have to deal with a lot of leash. Whenever I am aware that a bicyclist is coming from behind, I like to bring her to the side of the trail for a sit/stay for safety for all and one of the things I like most about this rope leash is that it's only 48" long and much more manageable for me than a traditional 6' long leash. I do not use a retractable leash. Suzi is well-trained and well-behaved.... most of the time!..... so the 48" gives her room to stride out, yet easy to come back to me for instruction if needed.
Got off on a little rabbit trail there so-to-speak, so let's get back to her new collar! By now I was beginning to think I could sort of wing it and make my own......
..... so I spent an enormous amount of time trying to resource the hardware locally to find nothing was available. These D-rings used in dog collars are quite heavy duty and not even my local hardware store like Lowe's carried them.
A contoured side release buckle was completely nonexistent to purchase locally.
With mounting frustration, I finally set aside a chunk of time to research all the supplies I needed online and was thrilled to find quality hardware sets available at Country Brook Designs for $12.99 for a set of 10 with free shipping. AND I received my package within 2 days of placing the order!! Sooooo happy! The contoured side release buckles and the triglide buckles are both YKK brand and this D-ring is exactly what you would find on a rtw dog collar. Heavy duty and well made.
The blue 1" nylon webbing was already in the stash so figured I could use that as my base and found this pretty ribbon in the perfect shade of turquoise at my local only-open-once-a-month textile outlet center All About Fabrics. The ribbon's design is a 3-D effect..... sort of a rubberized type of application of the leaf motif on a grosgrain ribbon. If you notice closely you can see the print is printed off center. All About Fabrics buys 'seconds' and this was probably why. Doesn't bother me a bit.
By now I'd found the perfect "How to make an easy quick-release dog collar" tutorial on YouTube and within 30 minutes, or less, Suzi's new collar was made. These are super easy and quick! Even adding the ribbon like I did here. Suzi is a medium size dog, but I really like the 1" collars on her, so after measuring her neck, cut my webbing 29" and it was perfect. These type of collars are humane for dogs as they do not tighten if the dog should pull on the leash. And with the contoured side-release buckle it seems it would be much more comfortable fit on the dog's neck than the ordinary straight buckle. I also like the D-ring off to side, on its own like this, below..... not sewn in with the buckle as all her rtw collars were made.
It took me a while to find a new hook for her dog tags to enable me to move her tags from collar to collar easily and finally found these at Lowe's for $5.18 for a set of 2.
So this collar cost @$2.00 to make..... $1.30 for the hardware, $.70 for the ribbon and I had the webbing in the stash and can't remember what it cost. This type of collar is on the market for anywhere from $15.00 - $25.00. But more importantly Suzi and I can 'match' well now! :)
She wanted to be sure and check out all the gear before heading out on our morning walk.
The collar was easily sewn on my domestic Bernina 1230. The only tricky part was sewing so close to the buckles..... the buckles sort of got in the way. I found it easier to move the handwheel by hand for a few of those stitches...... otherwise.... no problem.
Happy Sewing Everyone! :)
9.07.2018
The beginning of a mini-capsule wardrobe | McCall's M5890
With all good intentions of posting my self-imposed mini-capsule wardrobe plans, I got so caught up in the planning and prep work that I ended up simply jumping right on in and made my first two items. We'll talk about about this cute top today..... out-of-print McCall's M5890..... then (hopefully!) I'll be posting my overall plans shortly.
See, I had even begun taking planning pictures for you!
I expected this to be a quick and easy jumpstart to my mini-capsule wardrobe and this simple top turned into one big headscratcher and seam unpicker. I unpicked at least 5-6 seams before I got the finish I wanted. Below you can see a little of what I'm talking about. The pattern surprisingly has you simply turn both the neckline and armhole edges under 3/8", then another 3/8" and top-stitch/edge-stitch. I could not bring myself to even think about that sort of finish as I like things finished with bindings and facings. Once I got to the neckline application point, I also realized this neckline was perfect for me as it was. If I turned under the 3/8" + 3/8" I would lose @3/4" total and was concerned that would be too low. A sweet elderly lady at church recently gave me all her buttons, threads and misc. notions from when she used to sew..... and in that bag was a package of black woven pre-made bias binding. Perfect for my neckline as you only lose 1/4" in depth. So that's what I did. At first I wasn't sure I liked it as the neckline had a tendency to not lay flat, but let it be and I'm okay with that. A lot of how it lays has to do with how the shoulder seams sit on my shoulders in the proper place. This is really quite an elegant neckline design. Also below you can see the utterly pitiful job I did on the right armhole to you..... turning the 3/8" + 3/8" and top-stitching. It made me sick to look at that..... so I applied the black woven bias binding to the (left to you) armhole and found that though it looks nice in photos.... it sat awful on the body. All those seams were unpicked and I gave up and turned in the 3/8" + 3/8" and was super careful and top-stitching and....
.....LOVE my armhole after all. Unpicked the other one and with a better attitude (ahem!!) took my time turning the 3/8" + 3/8" and though it looks poorly in photos, it lays on the body very nicely. Added clear elastic to the shoulder seams as per pattern instructions. Top-stitched all the princess seams so they would lay nice and flat. Did not serge them as I did not want seams possibly showing through my pretty fabric. Side seams and shoulder seams are serged.
Very happy with this fit. I wanted a close fitting top that would not be confining nor constraining and that is what I got.
Hemmed a 1 1/4" hem and top-stitched with double needle. It channeled a little but I'm so over that problem it doesn't bother me much anymore.
Lovely fit.
Took all sorts of photos in the early morning light before heading out to the only-open-once-a-month fabric outlet store to come back and find only a few shots were in focus. This was one, below. All others were re-taken trying to find relief from the strong afternoon light.... and all were in focus. Go figure. *sigh* Have not unlocked the secret to taking focused photos using the remote.
Here's the last photo from this morning with a thrifted cardi finishing everything off nicely. This look below, is the core of 'my style'. Wearing the white Burda shorts.
Sarah Liz must be on the same wavelength as I, as it was quite a nice surprise to see the Make a Garment a Month theme for the next few months!
And because I was trying to pull my plans together to show you, I had taken this photo of the skirt pattern chosen to combine with this charcoal gray knit fabric planned to go with this top. NewLook 6164 is a pattern for knits with an elastic waist. This is already made and hope to show it to you soon. Along with the rest of my plans. ;)
Plans include Burda, Ottobre, Itch to Stitch and really wanting to fit in the Jalie Eleanore Jeans skinny version this month too. All will go with each other and I should have a nice jumpstart to Fall/Winter. I've never done anything like this and have been pleasantly surprised at how much I am enjoying the creative process.
Happy Sewing All! :)
See, I had even begun taking planning pictures for you!
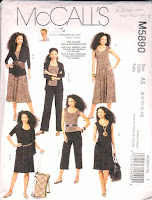
Having had McCall's M5890 for years, this is the first garment I've made from this pattern. It is a Nancy Zieman ten/twenty/thirty minutes to sew publication. I miss Nancy Zieman a lot. Anyway, one could make a capsule wardrobe out of these garments. I made the top, view C.
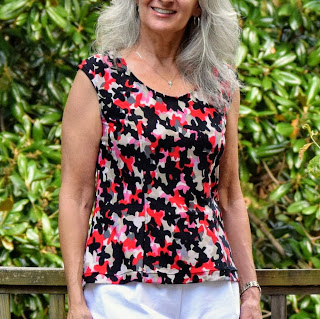
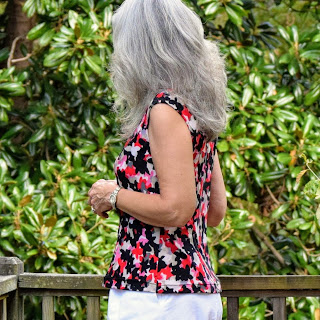
Princess seams front and back, cut on cap sleeves with a slight flare from the waist down, I just knew this would.... should..... be a flattering fit on my body type. We are still super hot and humid here in South Carolina with temps hovering around 90* F, so this is a perfect top to transition to Fall. I built my mini-capsule wardrobe around the colors in this fabric. Fabric came from All About Fabrics, my local textile outlet center. Love that place!!
Having made so many Burda and Ottobre patterns lately with lots of tracing, I was super excited to use an already printed pattern..... and still ended up tracing!!! Fitting is one of my goals for this year so after lots of measuring the flat pattern, I realized it needed modifications and I felt more confident building those alterations off a traced pattern than on the original pattern. Basically I cut a size 8 and graded to size 10 at hips. Sewed 5/8" seams. Lengthened 2". This top is very short!!Princess seams front and back, cut on cap sleeves with a slight flare from the waist down, I just knew this would.... should..... be a flattering fit on my body type. We are still super hot and humid here in South Carolina with temps hovering around 90* F, so this is a perfect top to transition to Fall. I built my mini-capsule wardrobe around the colors in this fabric. Fabric came from All About Fabrics, my local textile outlet center. Love that place!!
I expected this to be a quick and easy jumpstart to my mini-capsule wardrobe and this simple top turned into one big headscratcher and seam unpicker. I unpicked at least 5-6 seams before I got the finish I wanted. Below you can see a little of what I'm talking about. The pattern surprisingly has you simply turn both the neckline and armhole edges under 3/8", then another 3/8" and top-stitch/edge-stitch. I could not bring myself to even think about that sort of finish as I like things finished with bindings and facings. Once I got to the neckline application point, I also realized this neckline was perfect for me as it was. If I turned under the 3/8" + 3/8" I would lose @3/4" total and was concerned that would be too low. A sweet elderly lady at church recently gave me all her buttons, threads and misc. notions from when she used to sew..... and in that bag was a package of black woven pre-made bias binding. Perfect for my neckline as you only lose 1/4" in depth. So that's what I did. At first I wasn't sure I liked it as the neckline had a tendency to not lay flat, but let it be and I'm okay with that. A lot of how it lays has to do with how the shoulder seams sit on my shoulders in the proper place. This is really quite an elegant neckline design. Also below you can see the utterly pitiful job I did on the right armhole to you..... turning the 3/8" + 3/8" and top-stitching. It made me sick to look at that..... so I applied the black woven bias binding to the (left to you) armhole and found that though it looks nice in photos.... it sat awful on the body. All those seams were unpicked and I gave up and turned in the 3/8" + 3/8" and was super careful and top-stitching and....
.....LOVE my armhole after all. Unpicked the other one and with a better attitude (ahem!!) took my time turning the 3/8" + 3/8" and though it looks poorly in photos, it lays on the body very nicely. Added clear elastic to the shoulder seams as per pattern instructions. Top-stitched all the princess seams so they would lay nice and flat. Did not serge them as I did not want seams possibly showing through my pretty fabric. Side seams and shoulder seams are serged.
Very happy with this fit. I wanted a close fitting top that would not be confining nor constraining and that is what I got.
Hemmed a 1 1/4" hem and top-stitched with double needle. It channeled a little but I'm so over that problem it doesn't bother me much anymore.
Lovely fit.
Took all sorts of photos in the early morning light before heading out to the only-open-once-a-month fabric outlet store to come back and find only a few shots were in focus. This was one, below. All others were re-taken trying to find relief from the strong afternoon light.... and all were in focus. Go figure. *sigh* Have not unlocked the secret to taking focused photos using the remote.
Here's the last photo from this morning with a thrifted cardi finishing everything off nicely. This look below, is the core of 'my style'. Wearing the white Burda shorts.
Sarah Liz must be on the same wavelength as I, as it was quite a nice surprise to see the Make a Garment a Month theme for the next few months!
And because I was trying to pull my plans together to show you, I had taken this photo of the skirt pattern chosen to combine with this charcoal gray knit fabric planned to go with this top. NewLook 6164 is a pattern for knits with an elastic waist. This is already made and hope to show it to you soon. Along with the rest of my plans. ;)
Plans include Burda, Ottobre, Itch to Stitch and really wanting to fit in the Jalie Eleanore Jeans skinny version this month too. All will go with each other and I should have a nice jumpstart to Fall/Winter. I've never done anything like this and have been pleasantly surprised at how much I am enjoying the creative process.
Happy Sewing All! :)
Subscribe to:
Posts (Atom)


