I'm completely in love with my new Possible Bag! The term 'Possible Bag' hails from early frontier days and would be "a bag for every possible thing". Particularly the nineteenth century frontiersmen's small bag/pouch (think Davy Crockett) that would hold small gear for hunting. Well I'm not hunting, but I like the idea of 'possibilities'.

This is a modified bag from Mary Mulari's now out of print 'Made For Travel' Book. One might remember Mary as a frequent guest on Nancy's Zieman's TV show 'Sewing with Nancy'. I bought this book for $1.00 at our local library's book sale years ago. Once a month the library holds a book sale of books that have been donated that would not be suitable to add to their collection as well as books they are culling from their collection. Funny story.... this book was a part of their collection that I'd check out frequently until all of a sudden it was no longer available. Imagine my surprise to find it at their Book Sale where I quickly secured my purchase and was ever so happy to have it now in my personal collection.

Her Bedside Bag caught my eye with its rounded top and boxed bottom corners. We are very lucky to have an awesome YMCA near my home and I am trying to work on more consistent exercise there and part of that is having the proper gear to hold my little things.... like phone, driver's license, etc. and thought a little bag like this might work. I don't like to use the lockers, so the bag has to be built to stay with me or hang on hooks on the wall in the room I'm in.
This is Mary's larger version bag pattern photocopied from the book with seam allowances added. At first I thought a wristlet would be a good idea and dove in making a faux leather version.
Some mistakes but overall a big learning experience. A biggie..... it needed body to hold its shape. This little bag collapses on itself and gives my phone/stuff no protection.
I did line it and added a little pocket....
.....as well as the wristlet and found I do not like a wristlet at all. Also used an All Purpose Zip and though it works great 'zipping' open and shut, the small zipper head is puny. Even after adding some little wooden beads it just doesn't look right.
Also added a tab and small ring with leather latigo and again.... yuck. Doesn't look right. But I have been using this little bag, which turned out to be a good idea because it gave me more time to figure out exactly what I needed.
I needed more room. So I redrew the pattern, keeping the basic shape as I found I really liked the rounded top. Not using/liking the wristlet I was grabbing the rounded top to carry my little bag and thought that made a better grip than a square bag.
Mary's original pattern is on top of my newly drawn modified pattern and basically the only difference was widening the sides a little.
Having bought this awesome canvas at my local only-open-once-a-month textile outlet center a few months ago for maybe $10/yard? Maybe less? Embracing a more organic, natural product and nature colorway, thought this might make a great bag. Ummm, yep it did! *squeal* This was one of those projects that I could 'feel' was turning out so good during construction, that it almost frightened me to go to the next step.... afraid to mess it up.... if that makes sense.

But move ahead I did and this time LOTS of changes were made..... beginning with using a fusible fleece to create a more stable fabric and padding. But the biggie has to be a metal zip!!! Yes!! I was able to figure out how to install a metal zip without breaking a needle or sewing over my fingers! I'd ordered a bunch of different sizes and metals metal zips from Wawak during one of their sales and that is where having a cool stash of products comes in handy. It really is small details like this that really raises a handmade item to a higher quality in my eyes. This time I remembered to take a few pictures during construction. The key to sewing a metal zip is to line up the edge of your zip tape of the opening of the zip even with your fabric and use that 1/2" or so of zipper tape to sew on in your side seam allowances. This also hides the ends of your zip tape inside your seam allowances. My seam allowances were around 1/4" - 3/8" or so. Below you can see the closed zip head is even with the side of the bag.

Now re-work the zipper stop to the size you need using fabric. I cut about a 1" x 4" strip of canvas and began by sewing the canvas as a stop this way first... down the sides..... not across the zipper teeth. Maybe 1/4"-3/8" stitching is all you need. I folded my canvas over maybe 1/4"/3/8" so no raw edges would show on top of the zip. I also have more canvas showing here as I wasn't sure how much to cut off at this point. Where your stitching stops, and all measurements have been carefully checked and double checked! then cut your zip.... but not your fabric at this point. Yes, you can cut through a metal zip with an old pair of scissors and very carefully. It was no big deal.

You can see here below in this fuzzy shot.... my dark brown zip has been cut just beneath where the stitching stopped and that left my long canvas tail. At this point cut your canvas even with your bag's sides. I got so excited that everything was working well I did not take anymore photos of this stage, but hope you get the idea.
You might can see better here what I'm talking about. This is the newly completed zipper stop with the top-stitching also complete. What this does is gives you about 3/8" of canvas, far right, to sew through and completely miss sewing through any metal from your zip as you complete your bag.
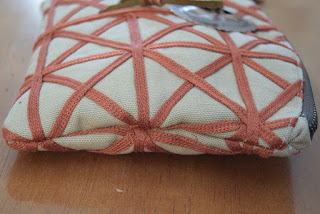
Attention was paid to little details like matching fabric pattern.....
.... a little off but doesn't bother me a bit...
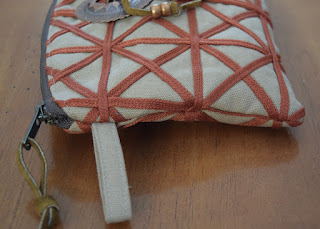
..... this was tricky to sew through as my fabric is a mid-weight canvas with top-stitched knit jersey strips. So it was all roller coaster for my poor sewing machine and got pretty thick and bulky in places...... but my sweet Bernina handled it all like a charm. Particularly after I changed my needle to a Denim weight. ;) Below you can also see I added a canvas tab instead of a wristlet. This will work well for hanging on hooks at the Y. I triple stitched it inside the seamline to the seamline during construction because I do not want any weak points. Decided not to box the bottom corners as was afraid of the bulk and not really sure I needed that at this point anyway.
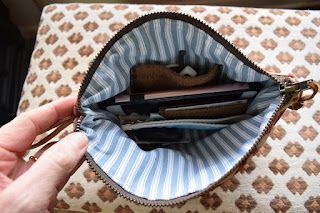
I added a little raw silk pocket inside to hold my earbuds and lined the whole thing with linen striped ticking.
Perfect! It holds all my stuff exactly like I wanted and needed.
But the best thing of all is this little finishing touch of 'jewelry'. As I looked at my plain little completed bag, I began to think..... 'What would Sue do'.
Sue has been making up a bunch of bags recently using all sorts of thrift store odds and ends....
.... so I began to channel Sue and found an old belt of my mother's that I'd put away.... made of suede latigo, beads and metalwork and in short order had worked it into my new project. Felt it was fitting as I've always loved Native American Indian lore, and some think there is Cherokee in my mother's line from Oklahoma..... it added to the character of my 'Possible Bag'..... and in some small way my mother is a part.
Anyway, back to the making..... took a few minutes to sew a small 'pocket' out of the raw silk to hold my driver's license and a little money. I am serious about making this bag work well for the Y and needed to reduce bulk. I don't want to take my wallet inside, much less my purse, and also don't want to leave anything in my car.
Well, the key fob I made during my 'making' storm of December looks a little out of place now. One thing I like about this key fob is that it's easy to find and grab!
And all ready to go with my new Possible Bag with a new year full of possibilities.
Happy Sewing All! :)


