NOTICE: The content of this website is copyright ©2011-2020. All rights reserved. Unless stated otherwise; all photographs are taken by me and are owned by me. All content is created by me and is not to be sold or re-formatted to be sold, or used in any way for market gain. Thank you. Lisa
4.14.2020 UPDATE: First of all, please do NOT contact me to order and/or make face masks to sell. This blog is about journaling my work while, hopefully, inspiring others to sew. I am not a company. I do not sell products through my blog.
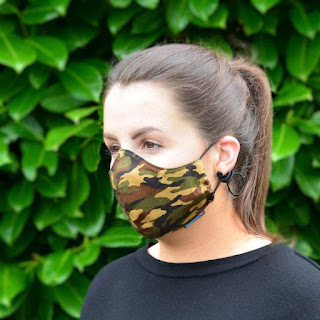
I also want to reiterate I am NOT a face mask expert. This post was originally published February 2019 to share how I made fabric face masks for my pup's groomer. Recently there has been some question about the elastic sizing for this face mask. Evidently all faces are not created equal size.... and some folks are saying it's a 'perfect fit', others are noting it pulls on the ears feeling too short and uncomfortable. As you read my post, my pup's groomer thought the ponytail holders were 'perfect'..... my daughter and I wear the masks shown in the photo below where I used 1/4" wide flat elastic cut 7" long and overlapped 1/2" to sew together and we both like the snug fit..... while others deem them unwearable because of the pull on the ears. So clearly there is a LOT of difference in what people find comfortable to wear. This post is about showing what worked for me.

Having said all that, I recently came up with the idea to make bias tape ties that should solve the elastic problem. They can be tied around the ears.... or tied around the head. I cut 44" 100% cotton fabric 1" wide, ran it through my bias tape gadget, sewed it shut, cut it in half (so each 'tie' is roughly 22" long) then ran each 'half' through each channel. Now the mask is fully adjustable in a couple of different ways for the wearer. Hope this might help. Be safe all. Lisa
4.04.2020 UPDATE: The Centers for Disease Control (CDC) now recommends wearing Fabric Face Masks when out in public.
3.18.2020 UPDATE: Recently So Sew Easy included this Fabric Face Mask post in a Face Mask Sewing Patterns Roundup..... a collective post featuring DIY Face Masks of different shapes and forms. So if you are looking for something a little different than what I've shared here.... you might want to check out their site too. Their information is free, just like my information is free and Craft Passion's pattern I used is free. We have a wonderful selfless sewing community. Be safe everyone. Lisa
2.29.2020 UPDATE: Due to the high volume of traffic to this post recently due to the worldwide coronavirus outbreak, know that only an N95 rated face mask will prevent the wearer from inhaling viral particles. Click here to read about the differences between face masks. If there is no access to an N95 rated face mask and this is your only option, you might want to include the additional steps Craft Passion wrote at the end of her updated blog post showing how to sew a pocket sleeve for a surgical mask or nonwoven material to slide into to give a little bit more filter to the mask..... but again, will not bring it to the protection of an N95. That is also where you will find the free pattern. I followed her pattern but used hair bands.... i.e. ponytail holders......as the elastics to fit around the ears. My steps and mini-tutorial about how I sewed those are below in the body of this post. I hope and pray all will be safe. Lisa
Have you ever considered making a fabric face mask? Some folks who deal with allergies may feel their only option is the disposable paper mask, but a mask of soft fabric might be something to consider. My sweet companion Suzi, below, is sporting a lovely pink fuzzy barrette given to her by her sweet groomer Erin and you will see in a minute how all that connects to face masks. ;)
Suzi is a high maintenance border collie mix, who not only needs a special prescription diet, has allergies to most things.... but also needs monthly grooming. Her grooming is more than just a bath and blow-dry, needing teeth brushing, ear cleaning and anal glands expressed regularly..... a necessity for Suzi that is part of keeping her well and healthy. So we love Erin, her groomer, who we see every 4 weeks. I don't share with many folks that I sew my clothes..... which sounds so funny with how active I am about all that here and on IG.... but generally have found that it creates an awkward pause that most nice people just don't know what to say because it is such an anomaly in my area. So it caught Erin by surprise when I shared a couple of sewing related things on Facebook and she texted me asking if I could make her a couple of fabric face masks because she's allergic to dog dander, and that she'd like to pay me. Erin is the sweetest, kindest, most generous person of all..... so of course I said 'sure' and that there'd be no payment and could she send me a photo of what she'd like. In my mind I'm thinking face mask? Where in the world can I get a pattern for a face mask?!!
 |
| Shiny coat, bandana and barrette means Suzi saw Erin this morning |
This is the image Erin sent me, below, linking it back to the
Etsy shop where it was listed for sale for $17.51 + $13 for shipping from the UK to USA. Adjustable elastic around the ears, fully covering the nose, mouth and chin. Those are the features I zeroed in on. And pattern.... at this point was certain I'd have to figure all that out on my own.
So imagine my surprise when a simple Google search provided the one and only perfect pattern! And it was free!!
Craft Passion drafted 3 sizes in their simple pattern and provided step-by-step instructions. Somehow I printed a little .pdf booklet, but today can only find the instructions on their website. Anyway.... it is free. A big Thank You to Craft Passion for providing this great service.
So leave it to me to overthink everything at this point. *Cue rolling the eyes here!* Knowing Erin needed these for allergies, I thought about what sort of fabrics would make the best filter. Bottom left is a cotton gauze to be lined with soft cotton knit, bottom right is 100% linen to be lined with cotton muslin. Those fabric contents would filter allergens well, right?
Below you can see how they made up. Cotton knit was not a good lining as it kept collapsing on itself and honestly they were just all blah. I was so focused on filtering, I wasn't thinking aesthetics. And these pitiful elastics were just...... pitiful. Wimpy, too stretchy, too flimsy.... but they were all I had on hand and could find at my local notions dept.
The blahness of the original 2 affected me to the point where a quick look in the stash provided a couple of cute 100% cotton quilting prints that became the 2 masks below, both lined in 100% cotton muslin. These 4 masks were taken to Erin as a sort of prototype/sample for her to let me know what worked best for her.
She immediately gravitated to the cat fabric and said she loved purple. After a few days of using, she also said the cottons worked great and were the best because they kept their shape. She loved that it covered her nose, mouth and chin and that the pattern was perfect. She also added that they laundered well. She was a trooper about the disappointing elastics, but I knew there was definitely room for improvement there.
Knowing I had a good pattern, now I turned to Etsy for cute doggie fabric. And boy what fun I had!! As everyone knows, Etsy is a marketplace for independent sellers and I had the great good fortune to land on
The Fancy Flutist Finds site when she was selling her stash of doggie fabrics. Such a super nice seller. After responding almost immediately to my e-mail asking for reduced shipping charges due to combining fabrics, she asked what I would be making. When she realized I needed such small pieces, aka scraps really, she included all the doggie scraps she had for free in my package too. What a nice surprise!! Isn't the envelope she made for me fun too?!!
These are the larger pieces I purchased. It was doggie cuteness overload. I specifically tried to buy the prints that had purple after Erin shared with me that was her favorite color. Now it was time to sew all the face masks.
The face masks are super easy to sew..... just fiddly and a little more time consuming than one would think. All are 100% quilting cotton lined with 100% white cotton muslin. But honestly the biggest headscratcher was what to use for the elastic around the ear. I purchased a couple of different types of sturdy elastic cording from another Etsy seller and initially thought the problem was solved..... until I realized knotting them was awkward.... actually they would not knot and stay knotted.... and my poor Bernina absolutely could not sew through the rubberized middle of those things. More time was
lost spent on figuring out how to attach those darn elastics until the thought crossed my mind about hair elastics. Or better known in my world as Ponytail Holders. :)
These are soft, stretchable and already secured in a circle..... so no awkward tying of knots or adding a cord stop. Actually one of my originals had cord stops added to the elastics and Erin spoke of how it rubbed her ear and didn't feel good.
These certainly seemed to be the right size for the mask needs and it was fun to match colors to masks.
The way I chose to sew them in is how I've got my machine set up below. Both sides of the mask are left open, so I simply placed the elastic within the seam allowance and slowly, carefully stitched the seam closed encasing the elastic as I went.
Fiddly but easy!!
All the insides.
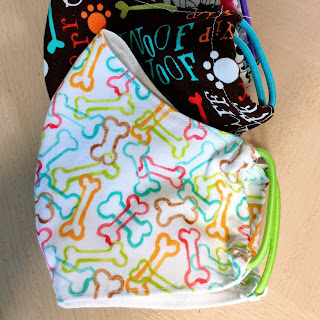
Wanting to show the great curved form that covers the nose, mouth and chin.....
All done and ready to be used.
In all I think I made maybe around 10 doggie print face masks.... just forgot to take photos. It was quite exciting to take all these to Erin as she thought the original 4 were 'it'. :)
Priceless to see Erin's look on her face as she unfolded each one and tried them all on. She said the ponytail holder elastics were p-e-r-f-e-c-t. She even gave Suzi an extra spa day as a sweet thank you.
So never in my wildest imagination would I have thought the sewing skillset I have been working so hard to achieve over all these years would be used in this way. And I am so VERY grateful for the opportunity those skills provided for this sweet project.
Happy Sewing All! :)
2.06.2020 EDIT/UPDATE: With the current worldwide 2019 Novel Coronavirus threat, this page is receiving a lot of attention recently. Not sure if this pageview uptick is connected to taking precautions against the threat of the virus, but as a full disclaimer I have no idea how much of a germ barrier these masks might be as they were made for my pup's groomer to help her combat inhaling dog dander and fur.


