3.24.2020

NewLook 6735 a t-n-t favorite

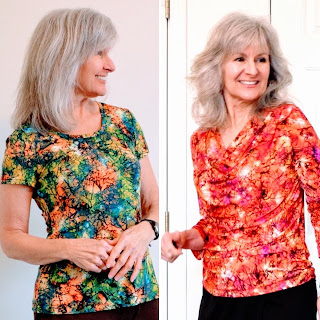
Needing an easy project, NewLook 6735 was the pattern to turn to.  Again.  Beginning to lose count on how many of these I've made.  Classic pattern.
My t-n-t (tried-n-true) easy wearing tee shirt pattern that's been tweaked here and there, finally re-traced with all the modifications altered and/or noted so it's a sit down and not think about it sort of sew.
What would normally be an afternoon make, took a few days as am finding it hard to concentrate with the constantly changing news drawing me in.  Everything is put down when my President or state governor holds a press conference.  Makes me think of World War II days when families might stop all they were doing to huddle 'round the radio for updates of those serious times.  One point of construction I'd like to note is that I do not gather anything.  With knits its so easy to 'ease' those 'gathers' in.... bust area and even the sleeves.
The sister fabric in the orange-red colorway made Simplicity 1716, below.  This green colorway was supposed to be another top like the Simplicity, but could not bring myself to manage those 6 pleats again in this slinky knit.
Absolutely could care less with the puddling back there.  This top will become part of my workout wear and this does not bother me at all.
When one forgets to take off their glasses..... ;)  Still getting used to my new surroundings and neutral walls.  Miss the woodland setting some days..... but this is much easier when its' cold and rainy outside like today.  Wearing self-drafted leggings/pants that needs work in the fitting department but are comfortable to wear on days like this.
This also completes the Make a Garment a Month sewing challenge for March 'Matching March'.  2 tops out of 2 sister fabrics = Matchy Matchy in my book?!  ;)   This challenge is hosted only on Instagram and you can find the information by going to my instagram page and clicking on this picture to see the hashtags. 
Because I clearly need a break on sewing knits, BurdaStyle 3/2019 #109 will be the next project out of a drapey cream crepe.  Not sure why they labelled this as a 'Blouse' as that would be totally indecent... but I shall call it Over Shirt and think the lovely cream will go with everything.  In our hot summers, the air conditioned indoors are chilly to me, so when I'm wearing a sleeveless dress it will usually be paired with some sort of lightweight jacket or over shirt.  Hoping this will suit that need.
On a completely divergent note..... I am one of those people who enjoy Bible Studies and Daily Devotions...... who only reads Nonfiction and Biographies and maybe a classic here and there like 'Jane Eyre'.  But it didn't always used to be that way.  Many pleasant hours were spent reading Marquerite Henry's 'Misty of Chincoteaque' series, Walter Farley's 'Black Stallion' series and all things horses during my growing up years long ago, so Olga da Polga, the adventurous guinea pig missed my radar.  With the serious times at hand, and the oh-so-cute illustrations and my friend expounding on her love for Olga da Polga as she gave Melissa a copy of her beloved set to take to the classroom so other youngsters could enjoy these out-of-print books.... I could not help but begin the first book before Melissa took it to her school.  Not far in to the reading there is a passage that caught my eye.... the normally spunky, confident, wanting-to-go-places Olga da Polga's thoughts as she was plucked from her familiar surroundings at the pet shop and plunked into a box heading to her new home.
"She had also made an important discovery.  Going places when you know where you are going is one thing, but when you don't know it's quite a different matter." 
Somedays I feel like Olga da Polga.  ;)  We are doing good.... finding the new normal... a new routine.... being flexible for these ever-changing times.  We are so blessed.  And most importantly these days.... we have plenty of toilet paper.  :))
Happy Sewing All!  :)

3.19.2020

NewLook 6735 | an old favorite and a little chat

Deciding these strange times are a great opportunity to catch up on some makes from last year that I've neglected to blog.  Case in point..... the ever cute and classic NewLook 6735.
An oldie-but-goodie pattern still in print, click here to go to Simplicity's site.  I've had my pattern since I first began sewing my clothes..... sometime around late 2013.  A classic top pattern, this sort of fit never goes out of style.
I've made the long sleeve version as well as the short sleeve you can see here.  This was a Hobby Lobby fabric too, below.
Back in 2014 I finished off the neckline a la Alabama Chanin style because machine stitching a neckline binding on seemed most intimidating at the time.  Wrote a short tutorial you can see here about how I did this.  Sleeve hems were also hand-stitched.  This top, below, was adored and worn until the fabric wore out.
Hard to see, but a key element to a great fit with this pattern are the side seam gathers at the bust line.  I do not gather these the conventional way, but ease them in by stretching the fabric as I sew between the dots.  This is also how I put the sleeves in.  Mimi G gave me this idea of easing in knit sleeves in one of her videos.  Oh my goodness she made it look so easy.  It's not hard.... but I take my time and sew s-l-o-w.  By the way..... I love to watch youtube video creators like Mimi G and Brittany sew because even if I may not be making the garment they are sewing, it's great to learn from the pros!!   Can you tell I took my time and tried to figure out the best fabric pattern placement, below.  Receive compliments on this top every time I wear it and believe it's the fabric that catches folks' eyes.
Fabric came from Hobby Lobby and is still available.  Occasionally Hobby Lobby offers free shipping and that's when I place an online order.  You can see Shirley's cute tank she made out of the very same fabric here.  So funny we purchase the same fabrics from Hobby Lobby!!  I think you already saw this 'action' photo, below, but thought I'd share it again.   Pleasantly surprised to be enjoying my self-defense class, learning a form of Kung Fu...... thus ya' know..... channeling 'Po' below.  Ha!  See the similarities?!!  ;)  Those classes have been suspended as even my beloved YMCA network has closed for now due to trying to slow the coronavirus spread.  Restaurants have closed with the exception of drive-thru or curbside take-out.  Retail stores like Macy's and Ulta have closed.... the entire Mall has closed.  Grocery stores and pharmacies are open with reduced hours and extra time taken for disinfecting.  We are taking this very seriously in my area.... and I am glad. #flattenthecurve
Okay.... on to more pleasant thoughts such as organizing.  Years ago Sarah Liz shared her way of organizing her sewing notes and I thought it was a fantastic idea and immediately copied it using a photo album that holds 4" x 6" 'photos'..... only in my case it holds 4" x 6" index cards.
On each card is this basic template established years ago.  Date of beginning project - date of ending project.  Always note the pattern, awkwardly draw a copy of what I sewed, construction notes and changes I'd make next time..... and last but not least fabric info and swatch.  I've made so many things now, I've begun noting info on the actual pattern itself.... but always continue with the notecard no matter what.
Another little tip.... see that little tag pinned to the slevedge of my fabric?  It tells me the yardage, 'w&d' means 'washed & dried', and source of purchase.  AAF is shorthand for All About Fabrics one of my favorite local haunts.   Another NewLook 6735 view c will be my next project.... and if the fabric might look familiar....
..... it could be because it's the 'sister' fabric to the recent Simplicity 1716.  My original plan was to make 2 of these cowl, 3/4 sleeve tops, but after dealing with all the slippery slidey-ness pinning all those pleats.... decided to go with something much simpler.  Thus the NewLook 6735 short-sleeved view c.
And if I were going to the gym today, this is exactly what I'd be wearing, below.  Instead it's out for a solitary walk then working out at home.
Happy Sewing All!  :)

3.17.2020

Simplicity 1716 Top

As the coronavirus begins to spread across the United States.... my city, state and country have begun encouraging people to stay at home to ‘slow the spread’. 
Yesterday our South Carolina governor closed all public schools and universities in our state for at least 3 weeks, so even my daughter, who is a 2nd grade teacher, is working from home as they implement e-learning for her students.  Last week I shopped my stash choosing Simplicity 1716......
Top info
..... paired with a bright and lovely silky knit, as it was clear changes were coming and I needed a pleasant distraction.
Fabric purchased at All About Fabrics
This knit is a luxurious, super slinky, shifting, silky pain in the you-know-what to sew, but will be oh-so-wonderful to wear... so the first order of business was figuring out which needle to use.  Microtex worked well on this.
Having never made this pattern before, chose the tunic length view E, with the cowl neck and 3/4 length sleeves but all along construction was worried this might be too tight through the hips, even though I cut my normal size 10 grading to 12 from the waist down per the Nancy Zieman pivot and slide method.  The working theory was that if the tunic was too tight, it could be cut off to be a top.  Below.... you are looking at the enormous amount of pleats this lovely begins with.  4 to make the cowl drape, and 2 above the bust to add to the drape = 6 total.  The inner cowl is part of the pattern (not attached separately in any way) and folds in nicely during construction.
Below you can see the massive amount of pleat pinning I do.  Each pin plays an important role in forming a perfect pleat.
Even though the knit did not 'mark' well, still tried to mark the pleat lines to the best of my ability, then carefully pinned those lines with vertical pins noting the sewing line.  The horizontal pins are keeping the knit from sliding.... with the last horizontal pin noting where to stop sewing.  Was very pleased with the pleating on this.
Was zooming right along and began pinning side seams together when I realized I was dealing with horrible curling.  As in the curling one would see across the grainline..... not curling one would see on a knit cut along the grainline.  Pulled some of the selvedge scraps to check my cuts and yep.... you guessed it.... I cut the fabric completely opposite the grainline of what it should've been.  *sigh!*  You'd think after sewing my clothes consistently since 2013 I'd be immune to making a 'newbie' mistake like this..... but nope..... mistakes happens to all of us, no matter how long we've been at it.  Okay.  Now what to do.  Luckily in this case, this was a super stretchy 4-way stretch knit, with all directions of stretch pretty much equal.  Whew!  So I continued.  And it was a real pain to pin these curling side seams straight.  ;(
Here's the one and only photo of the top under construction at the tunic length.  After setting the sleeves in flat, (because I'm horrible at setting in sleeves and will always choose flat if I can!), then stitching up the side seams along with the sleeve seams so it could be tried on..... it wasn't only tight..... it was indecently tight from the hips down.
Now let's look again at the pattern.   See the upper right blue dress..... the tunic length was a little shorter than this.... and it looks nice and flowing around her hips.  *sigh*  On to Plan B.... cut it off to a top length of view F and at this point chose to 'ruche' the sides too.  I've never done that before and thought it'd be interesting to see how that all worked.  In this case.... it was sewing a 1/4" wide elastic 4 1/2" long to pre-determined points on both side seams.
And this is what it became.  Sewed 1 1/4" hems in sleeves and top's hem.
 Worn with the Ottobre mini-skirt on this stay-at-home day......
 .....thinking everything looked great until I saw these photos.  See the 'ruching' on the left side?  Something looks very wrong there.
 And again..... below..... yuck.
 Hmmmm..... definitely needs the seam ripper.
Meanwhile..... as I was writing this post to get a pattern link for you (looks like it may be out of print)... I realized that 2 of my sewing buddies have made this pattern before..... Sarah Liz made this very top sans ruching (which may be what I end up doing!) and Shirley who made the alternate neckline as a dress.  Funny story about Shirley.... the last couple of tops she and I have made we've chosen the very same fabrics from Hobby Lobby!!  And we don't even live anywhere near each other.  Great minds think alike, no?!!
So future plans are to think of this time at home as an opportunity to definitely sew, as this little top was the most pleasant distraction to deal with all the uncertainty at hand.

Hugs!!!

3.11.2020

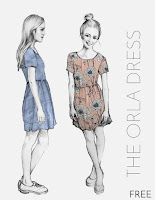
Orla Dress by French Navy | a free pattern

To say I adore my new dress would be an understatement!   We all know each dress has its own story to tell, so let me begin at the beginning with this lovely thing.
As everyone on the sewing planet is probably aware, The Orla Dress produced by French Navy, is a free online .pdf download that has been available now for quite a few years.
I made a version straight from the envelope waaaaay back in October 2017 as a Christmas gift for my daughter, pictured below with McCalls 4979 comfy pants, also for her.  She loved the comfy pants but wasn't too keen on the dress.
So eventually the dress became mine.  ;)    Every time I wore this cute thing, it always rolled through my mind the couple of tweaks it needed to make it 'perfect'.....

  • raise and narrow neckline
  • lengthen bodice 1"
  • pleats instead of gathers
  • add pockets..... preferably applied vs. in-seam
  • fully line both bodice and skirt
Yep, just a couple of tweaks.....!!
Then along came last month's Make a Garment a Month 'Free February' Challenge and knew this was the project that needed to be made now.    Remember Make a Garment a Month has moved to Instagram so if you want more information about this fun challenge, to go my Instagram account and click on this post for all the hashtags and contact information.  Edited to add:  Well, duh, guess you can see all that on the photo below.  *que rolls eyes and sighs*
Back to the dress.... had already purchased a pretty quilting cotton from Joann Fabrics with this pattern in mind..... so it was really all about having the sewjo to do this.
"Sewjo"  Definition:  'sewing energy and/or sewing motivation.'  In my case lack thereof.  So it clearly did not get done in February.  Early March work was begun and immediately crashed to a halt as I over-thought pleat placement and applied pocket work.  Eventually I threw up my hands and gave in to going with the flow..... putting in in-seam pockets and clustering a set of 3 pleats at each side seam both front and back.  And all worked perfectly!
Took time first making all the modifications on a newly traced flat pattern.... beginning with the size Small...... then paid LOTS of attention to the fabric placement patterning.  Extremely proud of my work here.  This pattern only needs 1.5 yards.... but somehow I didn't buy that much, much less taking into consideration pattern placement..... so it was a miracle this all worked.  May I say literally a handful of scraps were leftover.  Front, below....
Back, below.  Also proud of the invisible zip insertion with very little to no puckering!!!  Yes!!!  A skillset I have been working on for a while.  I channel the lovely Diane at Dream Cut Sew every time I put an invisible zip in now.  She wrote a tutorial of her technique you can find here.... only I use an invisible zipper foot for the zip insertion, then switch to a conventional zipper foot to sew the seam closed, back-stitching at the bottom of the zip like she does.
Bodice lined with oh-so-soft white cotton muslin..... just like the original version..... because I liked the feel of that against the skin during hot summers vs. a bemberg polyester lining fabric....
.....and remembered to clip and understitch the neckline seams.  Important.  This lies nicely and does not roll out.
In-seam pocket work, below..... used a previously unused cut set of pockets out of white lining fabric for the front of the pocket.... and fashion fabric for the back.  This was critical as I was running out of my fashion fabric at this point.  Remember to understitch your pocket seams too.
Inside out, front...... you can see the contrast between the cotton muslin bodice lining fabric vs. the polyester bemberg lining fabric used for the skirt.  Clustered pleats there too, but wasn't too concerned about placement and such.  Wanted to use the bemberg lining fabric for the skirt because the quilting cotton fashion fabric is already a little 'stiff' and did not want to make the drape of the dress any stiffer.
Inside out back, below.  Super proud of the zip insertion all 'round!!  Experience really does make the difference with this sort of thing.
Below, showing how I simply serged the armhole seams together, within the seam allowance, with the lining fabric after the sleeves had all been put in..... if that makes any sense.  This helps with the steps of construction enabling me to try the dress on with seams intact before adding the lining
Finished the hem by machine stitching using the blind hem stitch and special blind hem foot for my machine.  My favorite method!!!  What I've found critical, is the placement of the pins.  See how I have mine pinned below.  Holds all in place beautifully, yet easy to pull out while stitching without messing up your stitching line.  Gee I thought I'd written a video tutorial post on how to machine stitch a blind-hem easily.... but cannot find it now.  I'll write a separate post on that soon for those who may be interested in how to conquer this intimidating technique easily.
Can you see the hemming stitch after ironing?!  Nope not me either!!  It's 'blind'!!  Ha!!  Let me assure you it is there and secure.
So there you have it.... a new pretty dress..... front.....
.....back.  Not sure why it wrinkled up there... hmmm... didn't see that in the mirror earlier.  Oh well, think I must've twisted my body setting up the camera.  Wore it all day this day.
Here was a fun shot I shared on Instagram recently.  Orla Dress meets Orla Dress!  Ha!  :)
One last thing I wanted to say.... I was a little surprised to find the pleats make this dress feel more like a 'nicer' dress than the gathers.  With my age and the styles I like to wear, this works well for me as I am definitely more of a pleat girl than a gather girl, so I am most happy.
Happy Sewing All!!  :)